
Shop Layout
No matter how a workshop is laid out, at some point in time, whether it’s from the acquisition of a new tool, or a need for better efficiency, there comes a point where things need to get changed up a bit (This is one of the reasons I have everything in the shop, with the exception of the miter saw station, mobile).
I’ve had probably no fewer than like 7 or 8 layouts of my workshop since we moved into our new house in September 2017. At the time of moving in, I had a vastly different array of tools than I have currently. Nevertheless, the key to laying out my workshop has always involved getting measurements of all of the tools that I have, an accurate measurement of the space in which to work and making a model in Sketchup.
I can’t really recount all of the different setups I’ve had over the past few years, as I simply can’t remember a lot about them and I have no real visual representation of them (even my Sketchup drawings aren’t worth a damn at this point). I can only really discuss the most recent arrangements.
Might as Well be Gilligan’s Island
After getting all of my major power tools, come the fall of 2018, I wanted a setup that would allow me to work on full sheets of plywood with the garage door closed. With that in mind, there aren’t a lot of ways in which to position the table saw and outfeed table in order to accommodate this setup. I settled on what you see here.
I had the whole tool island setup going on big time. This was actually a pretty good setup (or so I thought at the time). All of the major tools were well within reach of the outlets on the wall, and cutting plywood sheets on the table saw was a breeze.
However, as I began working more and more on assembling things, the location of the assembly table was not in a very good spot. I did not have a lot of room in which to work, and moving a large piece on/off the table was VERY tight, especially with the garage closed. After 6-8 months of this arrangement, it was time to change things up a bit to make more working space on the assembly table.
Now THIS is Going to Be It (of COURSE it is)
This time around, I decided to abandon the idea of cutting full sheets of plywood with the garage closed. I didn’t really need this ability on an everyday basis, not to mention I had purchased a track saw by this point to aid in breaking down plywood. I basically just rotated my entire tool island clockwise 90° and made a gigantic open space for myself.
This setup was perfect (oh you silly little turd, you). I still didn’t have any issues with power cords, or my dust collector for that matter. This worked well for a little while, but I was, again, finding the area around the assembly table to be a problem again. I had access to three sides of the table which was not optimal all of the time. I would rather have the option to walk around a piece to work on it instead of having to try and spin it around (if I could even do that).
A couple of months now gone by, and time for another change.
FINALLY (hold your horses there, buddy)
Given that I had so much open space between the assembly table and the miter saw station, I found that if I simply turned the assembly table 90° and moved it 3’-4’ away from the table saw, I still had plenty of room on the floor, but now I had full access to the assembly table from all sides.
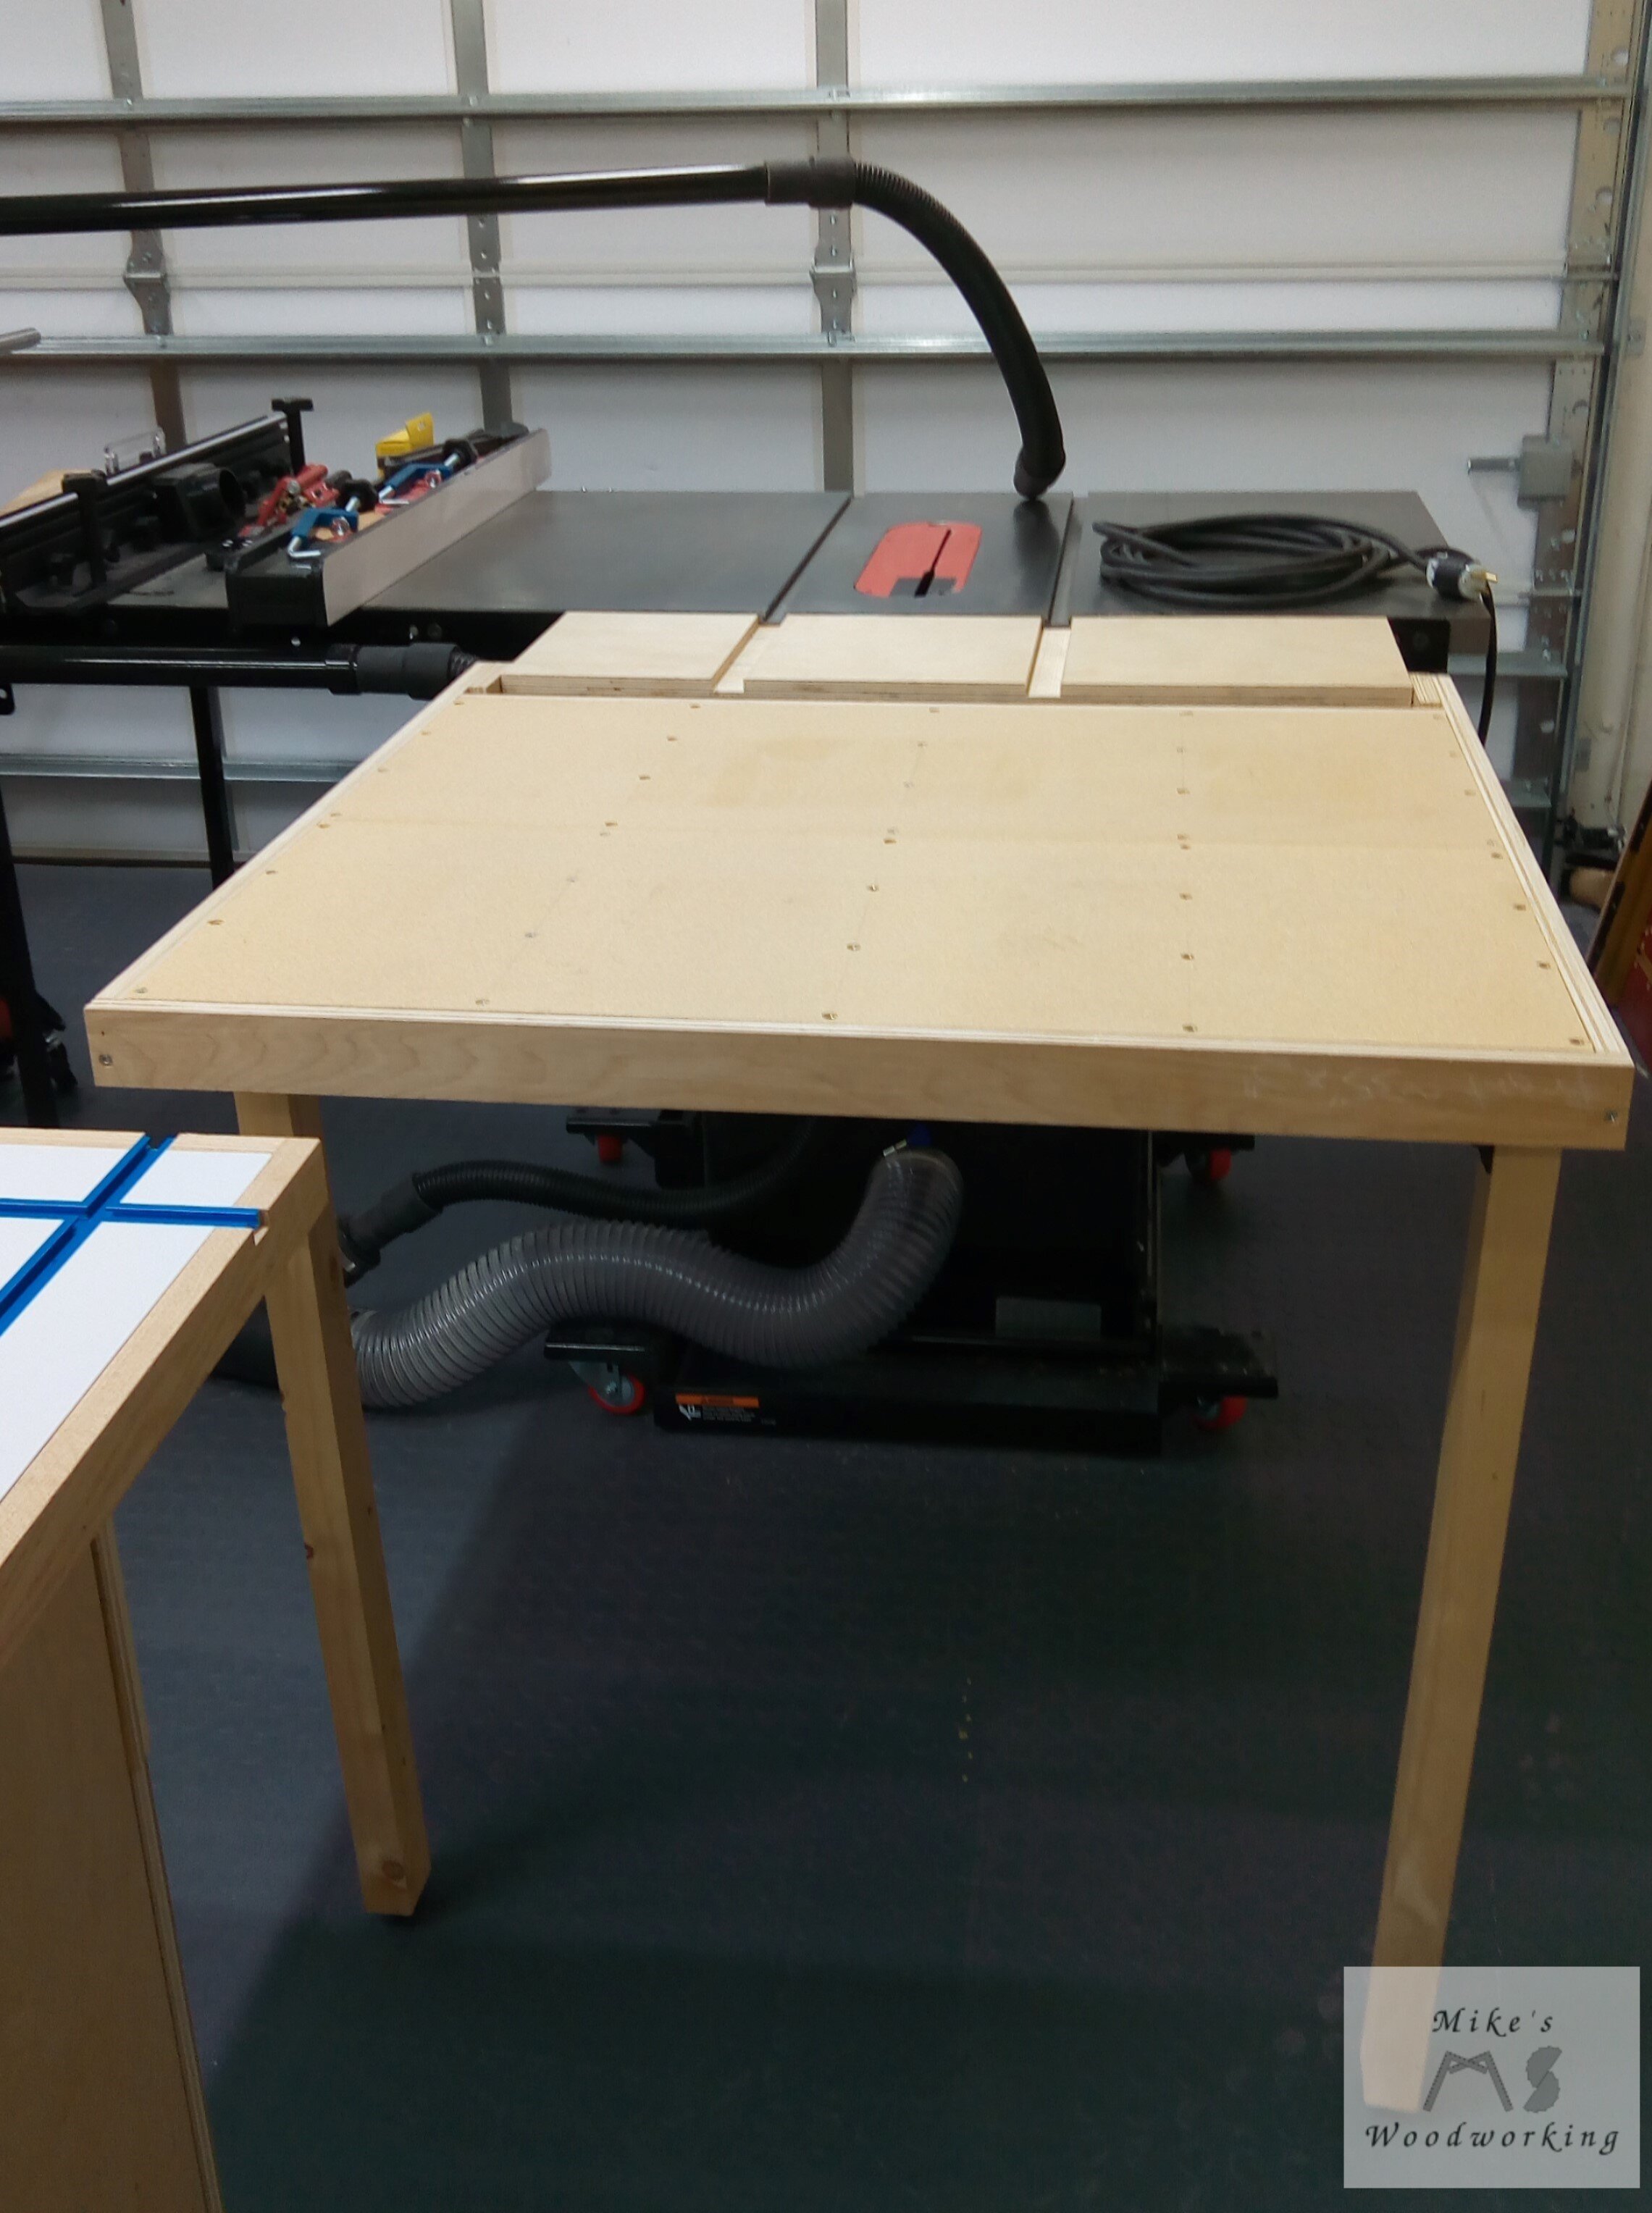
I had one small problem with this setup, and it was that my outfeed table was now just a bit too far from my table saw to be effective. It was then that I remembered April Wilkerson made a video of a folding outfeed table for her table saw that would be a perfect fit for the void I now had.

With the aid of her purchased plans, I fashioned my new outfeed table out of a bunch of scraps I had laying around and I was off to the races.

Everything was going pretty good with this setup. I had plenty of space to move around. I made one slight adjustment to this layout by moving it to the right a little bit to accommodate a new cabinet meant to house all of my table saw and router accessories. This worked out great. With a couple of more tweaks here and there I was finally organized in my shop and the layout was at its most functional (I’m like the stupid teens in a slasher movie at this point...no clue of what lies ahead).

It’s Time to Lighten Up
Fast forward about a year or so to June 2020, and I’m finding things in the shop that I’m not happy about again (a year is a long time for me in one shop setup). I wasn’t happy with the lighting situation happening in the garage. I only had a few sets of hanging shop lights in a few spots in the shop, and I was left with some darker areas (right where I would typically be trying to now take pictures of finished projects). More annoying than the lighting was the flip-up outfeed table on my table saw. When I had it in the up position, I had to walk all the way around my shop to get to things, instead of cutting through between the saw and the assembly table. This was a major pain in the ass.
I was watching a few videos from Jason Bent about setting up his new shop. He was installing new LED shop lighting from American Green Lights that I’d seen a few other makers install over the past year or so. The quality of the lighting was superb, so I finally bit the big one and bought and installed the new shop lighting. With the aid of Jason’s and a couple of other videos, I laid out my lighting and put it into place. WOW!!! Biggest improvement to my shop since I’ve been in it.
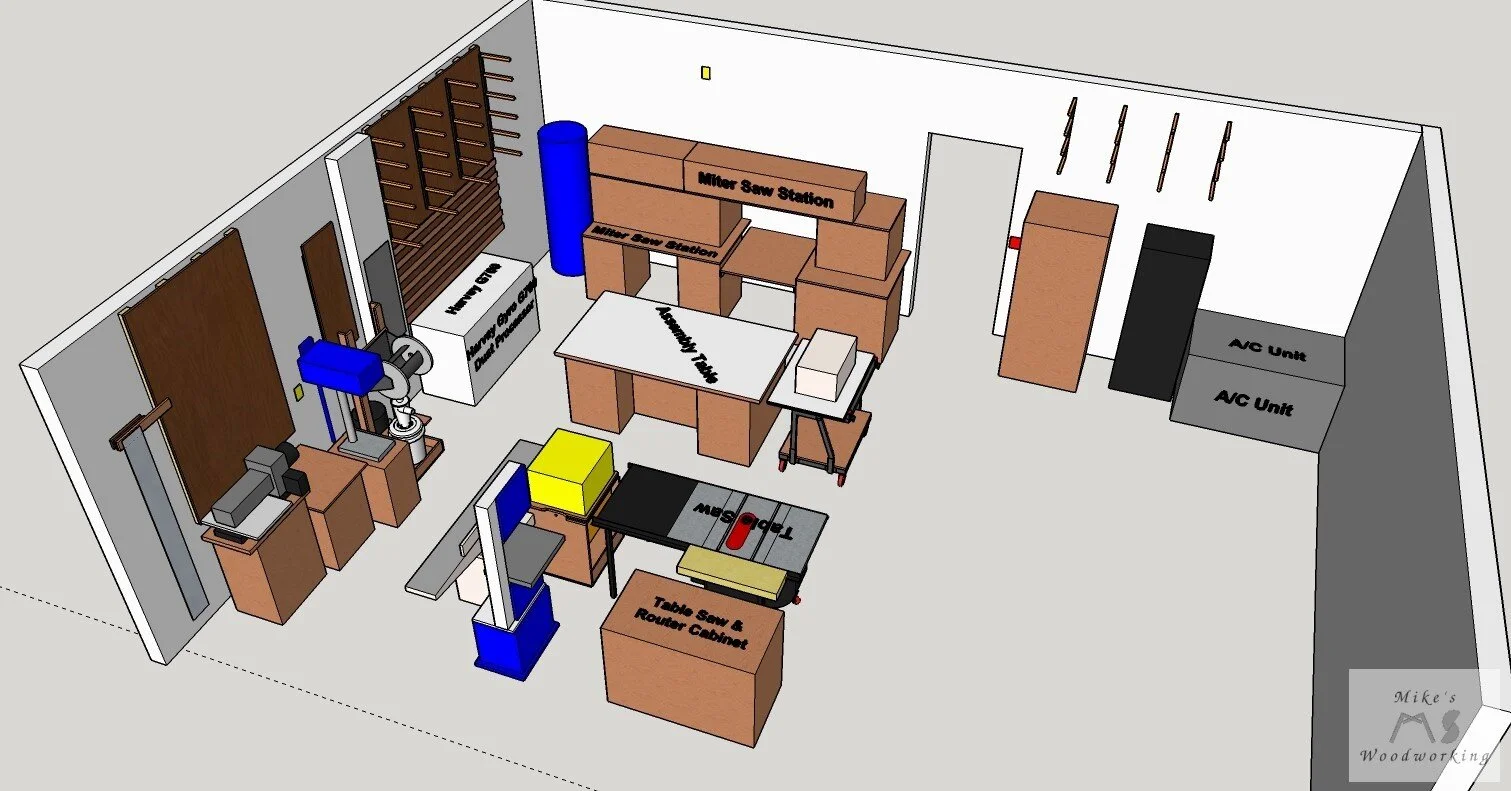
Coincidentally, in addition to Jason setting up his new lighting, he was putting together his new dust collection setup, and the new dust collector he had really caught my eye. It was from Harvey and it was unlike any other dust collector on the market. I did more research and decided that I wanted to move ahead with getting it (although working just fine, I was growing tired of my JET dust collector). That’s all well and good, but where was I going to put it??? Yes, you know where this is headed…
The Flippin’ Problem
I initially thought about just putting the Harvey dust collector in place where my JET one was already stationed. It looked like it would work, but I wasn’t keen on the pipe on the Harvey that would be sticking out near the floor for me to slam into all the time, given that particular spot in the shop was a bit of a choke point. Not to mention, I’d made my finishing cart and now had my sanding station in use on the shop floor as well. Things were starting to get a little cramped in here.
Simply putting the Harvey in the same spot as the JET was a no go. I decided to swap the positions of the Harvey and my sanding station and finishing cart. This would technically work, but there was still that choke point. I need to come up with something else.
The biggest sticking point I was facing was the flip-up outfeed table on my table saw and the table saw & router cabinet. I was having the hardest time with finding a good spot in the shop for both of these things. After a few hours in Sketchup of moving things around and getting frustrated, the light bulb finally went off. I didn’t need to keep the folding part of the outfeed table at all. I built the table saw & router cabinet at such a height as to allow it to work as an outfeed table down the road if it was needed. Well, now it was needed (having some forethought in designing shop projects does pay off).
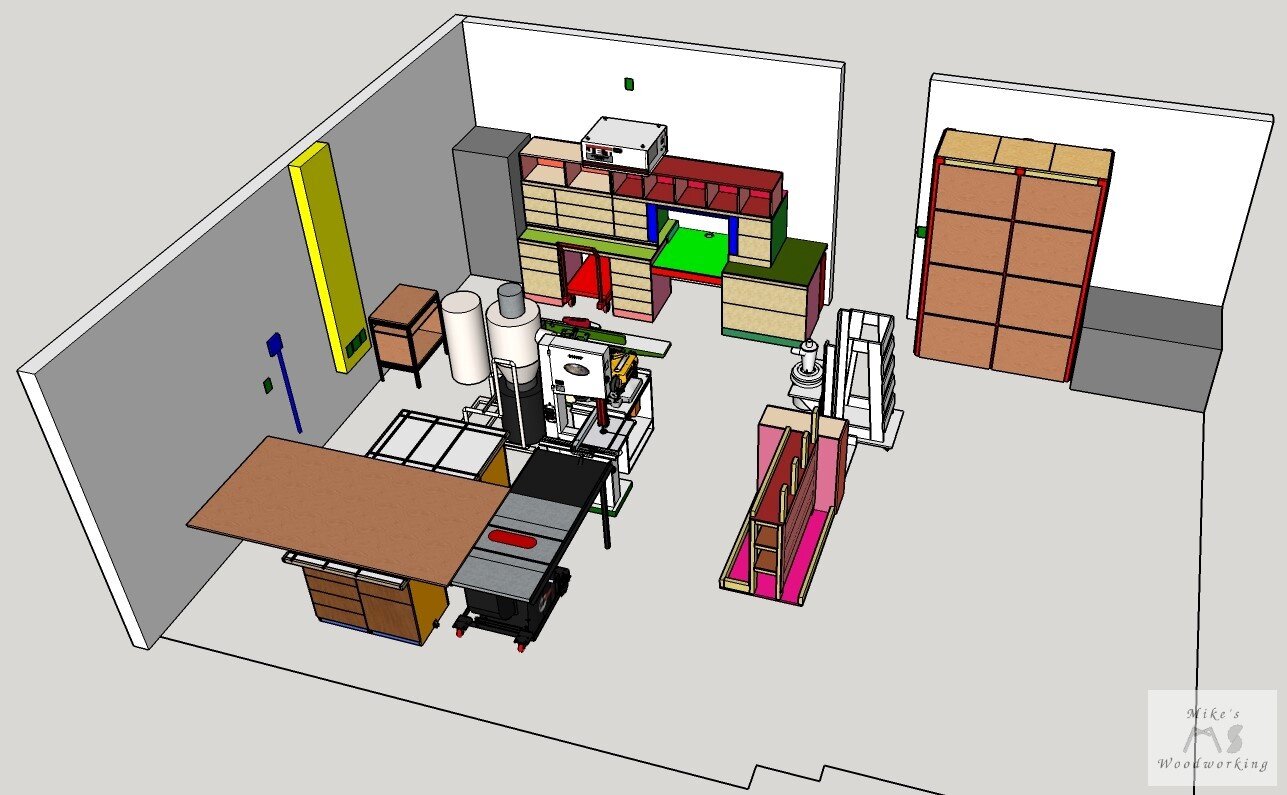
This opened up a whole slew of possibilities for tool arrangements. I decided to break up the tool island I had (at least a little bit) and settled on the setup seen here. I rotated the tool island (minus the JET dust collector) 180° and positioned the table saw & router cabinet in such a way as to allow me the ability to handle full sheets of plywood without issue. The band saw, flip-top cart and jointer would be moved a bit further away from the table saw, giving me better access to the router table attached to the table saw. The flip-top cart and band saw could easily be moved around when working on longer stock and if a really long board was going to be fed through the jointer, I’d just briefly open the garage.
Please excuse the lack of detail with the items in the workshop layout picture. I was going for a simplified representation of things to make the file size a bit smaller.
My assembly table was moved over a short bit to allow me a little more room between it and the Harvey and its dust port as well as full access to the drawers on the side of the table. Speaking of the dust port, with the new layout in the shop, I was able to shorten my dust collection hose by half as a single length of Rockler anti-static hose reaches all of my major power tools without issue (I had two spliced together before).
Now I’m done...or AM I?
As of November 2020, this has been the setup in my workshop, and it is my best yet. I’ve got full access around my assembly table. I’ve got plenty of room to walk between the assembly table and miter saw station, as well as between the tool island and assembly table. I’ve worked on a couple of projects with this setup and the work flow has been markedly improved (at least to me). I still have to open the garage if I want to cut a full sheet of plywood on the table saw, but that’s not a problem. I find that my access to most things in the shop has improved, with the exception of one thing (oh no, not again).
Because of the current shop layout, the only place to put my Rockler Material Mate is on the end of my assembly table. This blocks the drawers on that side of the table from being easily accessible. I mean, the Material Mate is on wheels, so it’s not a huge deal to move it out of the way. However, if I’m in a zone and need to grab something from one of those drawers quickly while working on a project, having to stop and move that cart out of the way is a bit annoying.
Thankfully, I’ve found a way to address the problem, and it doesn’t really require moving much of anything around in the shop. I’m currently working on finalizing this whole process, so stay tuned for more on this after the new year.
***UPDATE: February 2023***
There have been quite a few changes to the shop since I first published this article over 2-1/2 years ago.
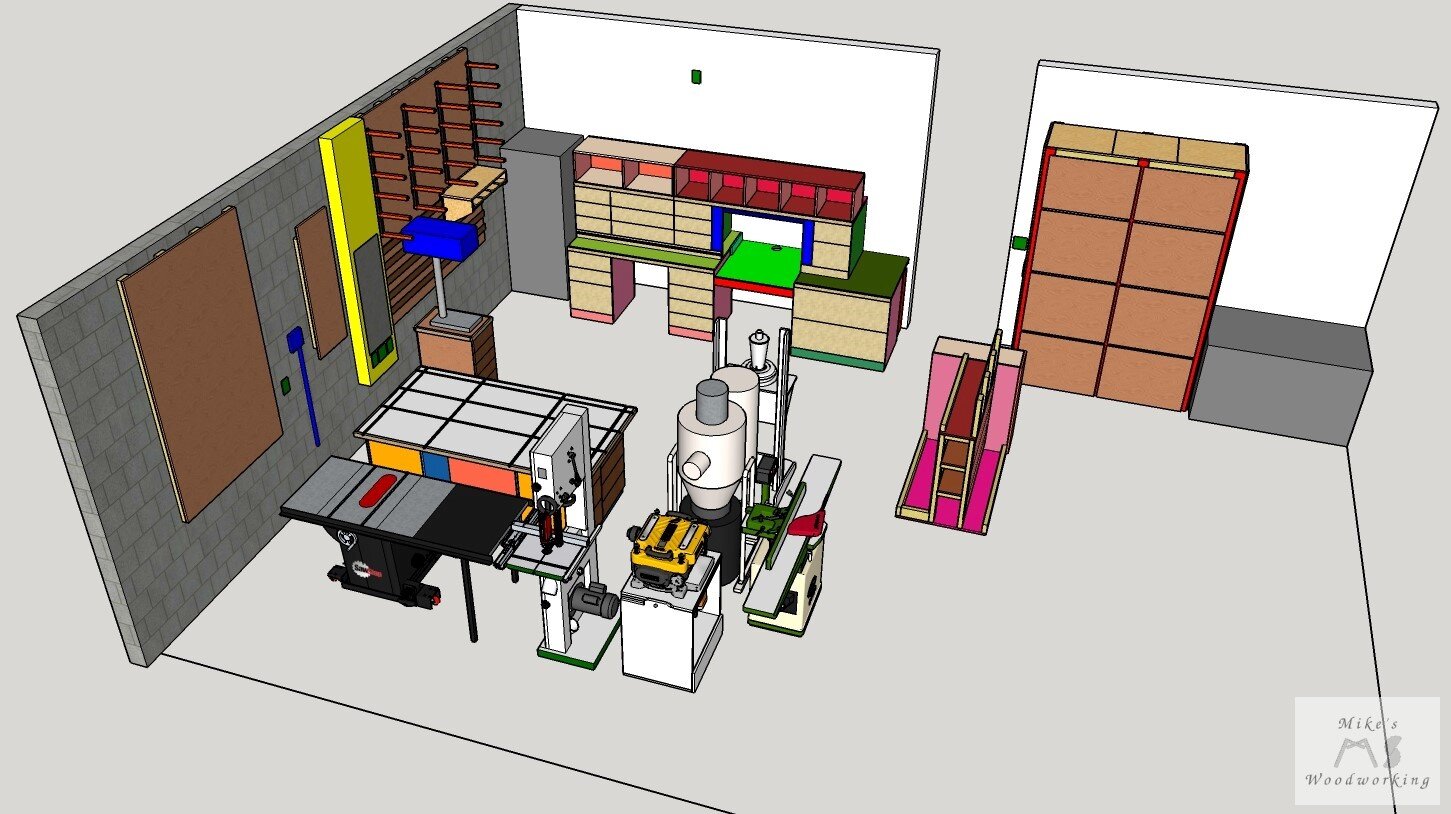
There are a few items that are no longer in my shop. The Jet 8” jointer (sold), drum sander (sold) and vacuum cart (pending sale) are all gone. Also, the drill press cart and flip-top tool cart are no longer in service, both having been disassembled and reused/scrapped.
The scrapwood storage cabinet has been replaced with lumber cart 3.0 and the vacuum cart was replaced with a Makita dust extractor. In addition, the wall storage above the old scrapwood cabinet has moved to above the garage door rails on the left garage side wall.
Along those same lines, my wood storage, which was above the Harvey dust collector has been moved to the lower section of the left garage side wall. This allowed much greater ease of access to the materials, most notably removing the need to use a ladder. In the place of the wood storage on the right garage side wall, I’ve installed more rows of French cleats and rearranged my clamps to make better use of the space.

SOOO much room for MORE clamps :)
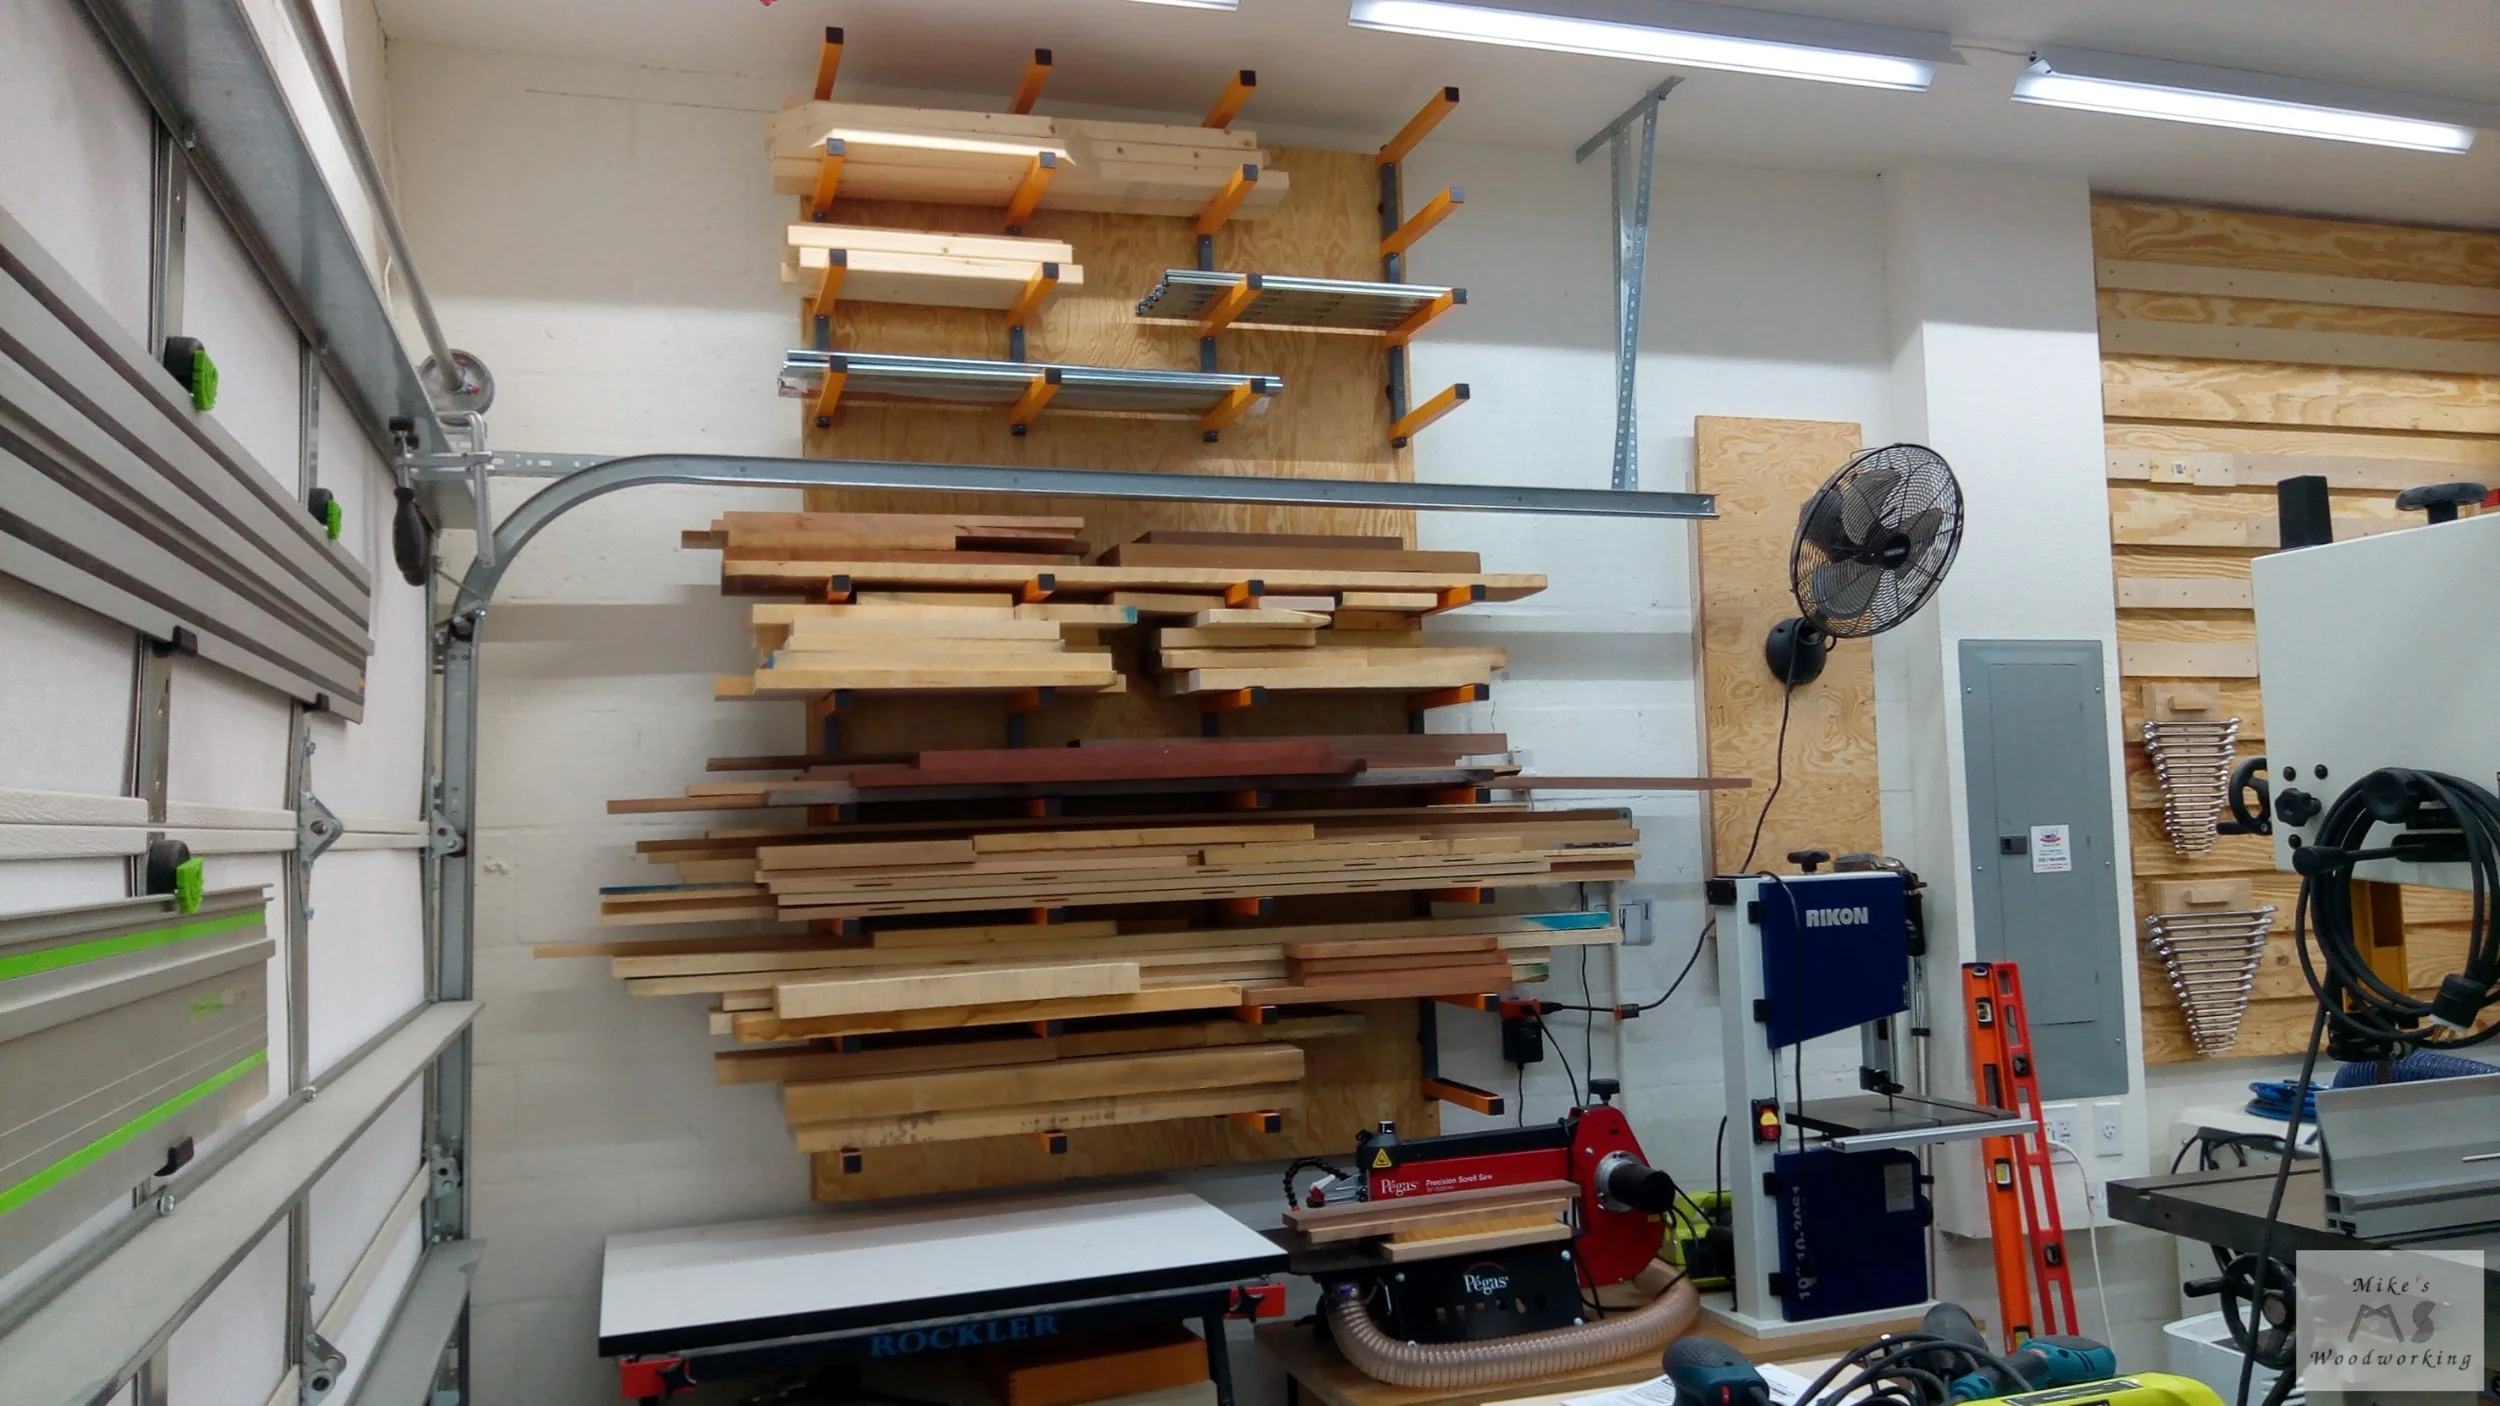
The stuff I had sitting on my Rockler material mate are now stored above the garage door rails, out of the way.
Perhaps the biggest change from November 2020, was the replacement of my old assembly table/workbench, table saw & router cabinet and miter saw station. I went with Rockler shop stands for all three units versus the all-plywood versions I had.
The new Rockler workbench is now stationary on the shop floor, whereas the old one was mobile. In addition, my Ridgid oscillating belt/spindle sander AND my DeWalt 13” planer are BOTH stored inside the workbench on sets of heavy-duty drawer slides.
The Rockler miter saw station, just as the old miter station, is stationary as well. The miter saw area now has greater dust collection/containment than the previous iteration, and the drill press was integrated into the end of the miter saw station as well.
The improved Rockler table saw and router cabinet is now much more mobile than its predecessor, and offers better storage, especially for my router bits.
The majority of the table saw centric items in that cabinet were moved to the recently built table saw storage cabinet. This enables me to not travel away from the table saw to get blades and other accessories centered around that tool.
I’ve also purchased two other tools in the meanwhile, as well. I now have a Rikon 10-3061 10” band saw and a Pegas 21” scroll saw. With these two purchases, I am now able to keep a dedicated resaw blade in my larger Rikon 14” band saw, and do all of my curved cuts on the smaller Rikon and intricate patterns on the Pegas. I purchased another Rockler shop stand to house both of these machines, and so far it seems to be working out well. The stand can be seen in the above picture, under the wood storage. It is, of course, a mobile cart. The article for it can be found here.

One other thing I changed was the position of the router table on the table saw. It is now on the left side vs. the right, giving me the space for the new table saw storage cabinet.
As for the old sanding station cart, which had the drum sander on it, it is kind of in limbo right now. I’m debating selling the Rockler material mate cart as I don’t have a use for it anymore. It was intended to help me move sheet goods from my truck into the shop, but I no longer need it for that as I just simply back up to the door and pass the material over my outfeed table and table saw and then onto my workbench. The material mate’s sole purpose right now is holding my small air compressor and its accessories.
The air compressor could fit in the old sanding station, with room for one drawer for the accessories, so that is a possibility. I’m also thinking of simply getting rid of that old stand (which was originally my router table from a LONG time ago) and building a new one for sharpening/grinding and my ROS and sandpaper. That’s still up in the air for the moment. Whatever I do, I have to keep in mind that it must fit in the back of the shop in case I need to play Tetris again, like I did at one point in 2022 (I never moved the vehicles into the garage, though).
***UPDATE: June 2023***
Well, THAT didn’t take very long. I’ve decided to make a few more changes to the workshop since only a few months ago (no big surprises there).
I wasn’t entirely happy with the new router table setup on the other side of the Sawstop. Yes, I had unobstructed infeed and outfeed, but storing the fence was becoming a problem when I wanted to use the saw. I resorted to just putting it on the floor and under the router table, hoping to not trip over/damage it. That grew tiresome quite fast.
On top of that. I never realized I would have so little room to access the maintenance door for the table saw. Whenever I have to crawl under things in smaller spaces, I will inevitably bang my head and other parts of my body, quickly angering me and discouraging me from working any further that day. That wasn’t going to work either.
In my previous update in February, I mentioned the Material Mate and my old sanding station as things I might part with in the future. Well, now is that future. The Material Mate just isn’t functioning as it was intended and only housing my air compressor and attachments…not worth it. Also, the sanding station being turned into a sharpening setup wasn’t going to work either. I simply don’t do enough sharpening to make something like that worthwhile.
Instead, I’ve decided to move both onto greener pastures and sell them. The air compressor will simply sit on the floor near the garage door and the attachments…I’ve got a plan for those.
With both of those carts out of the way, I am replacing them with two new moving shop stands…a router table and a new sanding station. To accommodate those, I’ve had to make a couple of small changes to the layout (VERY small).
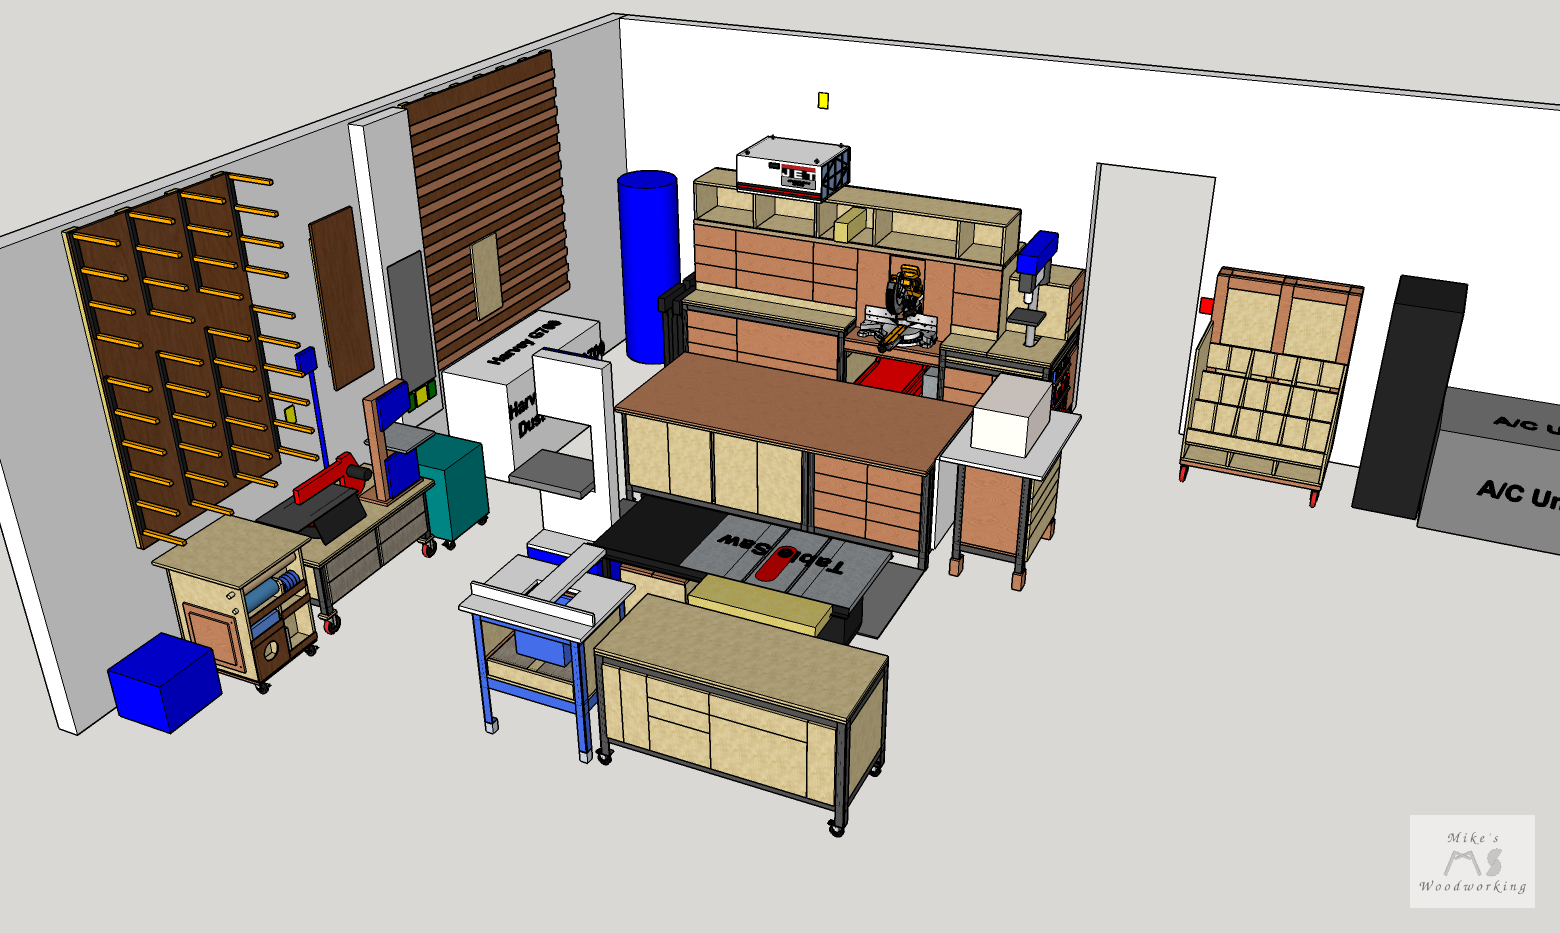
Don’t mind the wood-colored small band saw next to the scroll saw…not sure what Sketchup has going on with that.
Here you can see the air compressor on the floor near the front of the garage with the finishing cart next to it, where the Material Mate used to be.
The new router table will sit next to the Rockler Table Saw & Router Cabinet, and the new sanding station takes the place where the finishing cart was next to the Rockler Workbench. I have an article detailing both of these new workstations in a new article that can be found here.
Before I pulled the trigger on both of these new shop stands, I did make sure they will work with garage Tetris…no problems AT ALL there.

I’ve pretty much maxed-out the floor space in the garage at this point. I can’t really add anything else to the floor plan without removing something from the equation. Despite the recent changes, it does feel like I’m getting closer to having a more permanent setup now than any time in the past. Yes, I know I know, we’ve all heard this before.