
Rockler Miter Saw Station
What’s Not to Like?
Along with Workbench Version 3 and the Table Saw & Router Cabinet, my pride and joy, the miter saw station, was also something I had grown tired of as well. I say pride and joy only because it’s the biggest project to date in my shop and it has been the most useful one I’ve completed. While the final product was entirely functional, I was never fully satisfied with its overall finished look. The drawer faces and their spacing are terrible, the stop block is a real pain in the ass to use, and the spacing of the lower cabinets isn’t taking full advantage of the overall footprint in use.
The thing that always bugged me the most was the one upper cabinet that was to contain a file drawer for all of my tool manuals. When I was constructing the cabinet and file drawer, I somehow miscalculated the width needed for the file drawer and it wound up being just a bit too narrow. This meant the lone cabinet on the right was now useless for its intended purpose.
I still wanted a file drawer. As luck would have it, I’d grown tired of having the drill press residing in the open area to the right of the file drawer cabinet. The lighting was terrible in that location at the time, and I was constantly having to move my old Craftsman drill press forward and backward in order to get it out of the way when cutting long stock with the miter saw. This combination of problems led to the creation of the drill press stand and a new file drawer cabinet.
It was time to design and construct a new miter saw station.


Drawers-A-Plenty
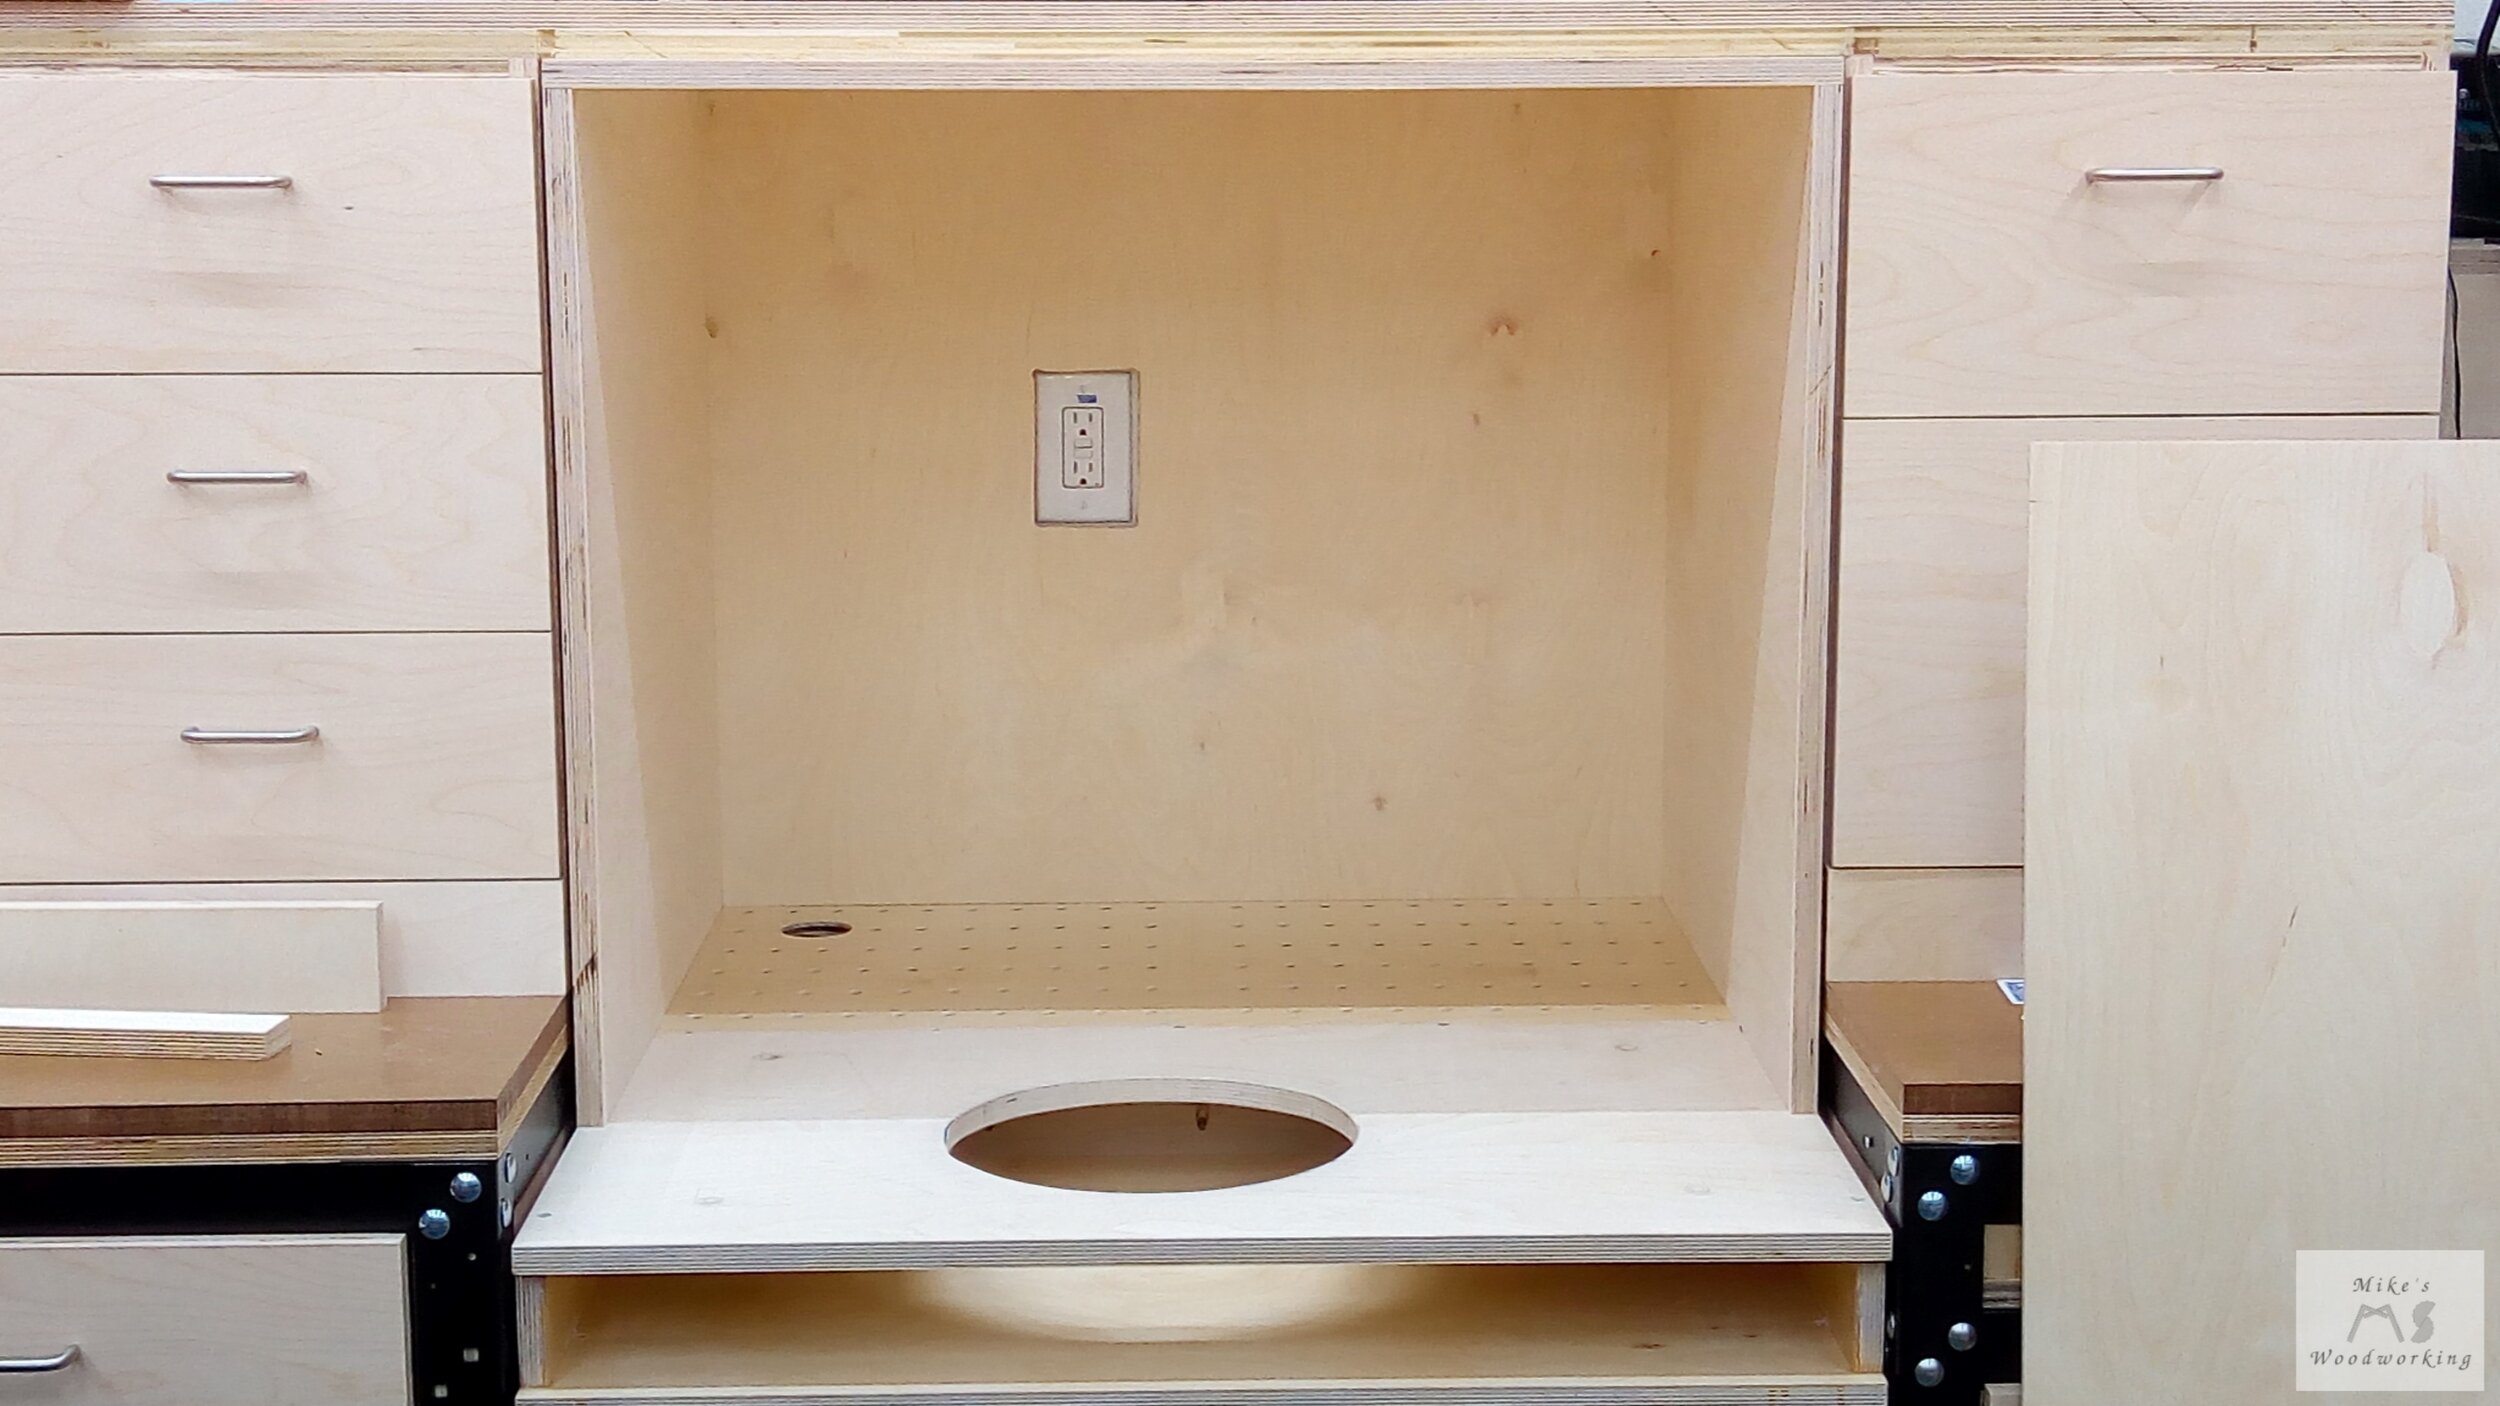
The base of the miter saw station is going to involve the greatest amount of change. The upper cabinets and the open shelving will remain mostly the same. For the base, the key change is to remove the open area between the two left cabinets. Currently there is a trash can stored under there which I use for wood scraps. However, I will no longer be utilizing said trash can in the future, so that is essentially wasted space. To better utilize the left side of the miter saw station, one single 60” W x 36”D shop stand will be installed.
The large lower cabinet on the right currently has only two large drawers with the rolling clamp storage box in place behind it. The large drawers will be moved to the left side of the miter saw station, and a set of six, 22”D drawers will replace them inside of a 36”W x 36”D shop stand. The remaining space in the back of the right shop stand will house another deep drawer, essentially replacing the large rolling clamp storage box that I have behind the current miter saw station. That was one of the things that didn’t turn out quite like I had hoped after building it. It is never rolled out of place, so having it mobile is pointless, not to mention it is extremely awkward to move around the shop given its shape and size.
With the two large wide drawers taking up the bulk of the space in the 60” shop stand, the remaining space will be divided into four more additional 34”D drawers. These four drawers will have slots cut into the sides to allow for dividers to be installed. All six of the 34”D drawers will be getting a set of heavy duty drawer slides, much like the planer and belt sander. In this case, however, the locking mechanism is not required.
The right shop stand will have one additional alteration made, and that is to accommodate the drill press. An additional set of 36” stretchers will be installed to create a platform onto which the drill press can sit and be securely fastened into place. With the foot of the drill press sitting under the top of the miter saw station, this will allow it to be placed in its desired location, without having to constantly move it, all the while the top work surface of the miter saw station remains open and clear. To allow access to the drill press, a removable cover will be installed as part of the work surface. The idea for this came from Justin Depew and his miter saw station build.
With the drill press in place, there will be a bit of open space behind it that will be otherwise wasted. To make better use of said space, a set of three drawers will be put into place. Between these small drawers, and the large one in the base, all of the drill accessories can be relocated to empty the old drill press cart. Now lets move onto the rest of the upper cabinets.
Are We There Yet?
The layout of the left bank of cabinets will remain mostly unchanged. The cabinets will only be slightly taller, but about an inch shallower. The lone two-drawer upper cabinet on the right side will be true to form of the original miter saw station with the lower one being a file drawer. Hopefully, this time, I don’t screw up the measurements.
The distance between the two shop stands is still set to be 33”. This is much wider than my current miter saw, but if I should change in the future, extra room might prove to be beneficial. One other modification for the miter saw platform will be the construction of a better dust hood, again fashioned after Justin Depew’s design.
The remaining section of the miter saw station, the open shelving, will not be as wide as the current setup, but the depth will remain the same, except for the top. I’m going to extend the top of the open shelving all the way to the wall, utilizing 2” x 2” cleats secured to the wall for support. This will provide a full platform for the JET air filtration unit. Currently, it is straddling the open storage, and I’m not a big fan of that setup. In addition, my old speakers will still be on top of the open shelving, and I might even have the shop TV sit up there instead of on the wall (that’s still a work in progress).
The open space behind the shelving will be mainly for cable management for a power strip and the speaker wires. The extra file drawer cabinet I built due to erroneous measurements will be eliminated. The remaining open space under the miter saw itself will still be for storing my lift cart (I can’t tell you how handy that thing is) and my grandfather’s old toolbox and vice.
The top surface of the shop stands will be just like the work bench and table saw & router cabinet, with one layer each of 3/4” plywood and MDF. As for the stop block system I’m using now, I will be using a piece of t-track in the top itself and will forego the measuring tape altogether. I don’t tend to use the miter saw for extremely precise cuts, so simply using a good tape measure hooked onto the zero-clearance insert of the miter saw will be sufficient.
Now that the final design of the final project is finished, it’s time to start the final build.
Hammer Time...Uh Oh, Uh Oh (SERIOUSLY Dated Myself There)
This project was going to take by far the longest of the shop stands, just from a tear-down perspective alone. I had 22 drawers to remove and store somewhere on the floor. I had all of the stuff in the open shelving area, not to mention I had to figure out a way to take down my JET air filtration unit without breaking it or me.
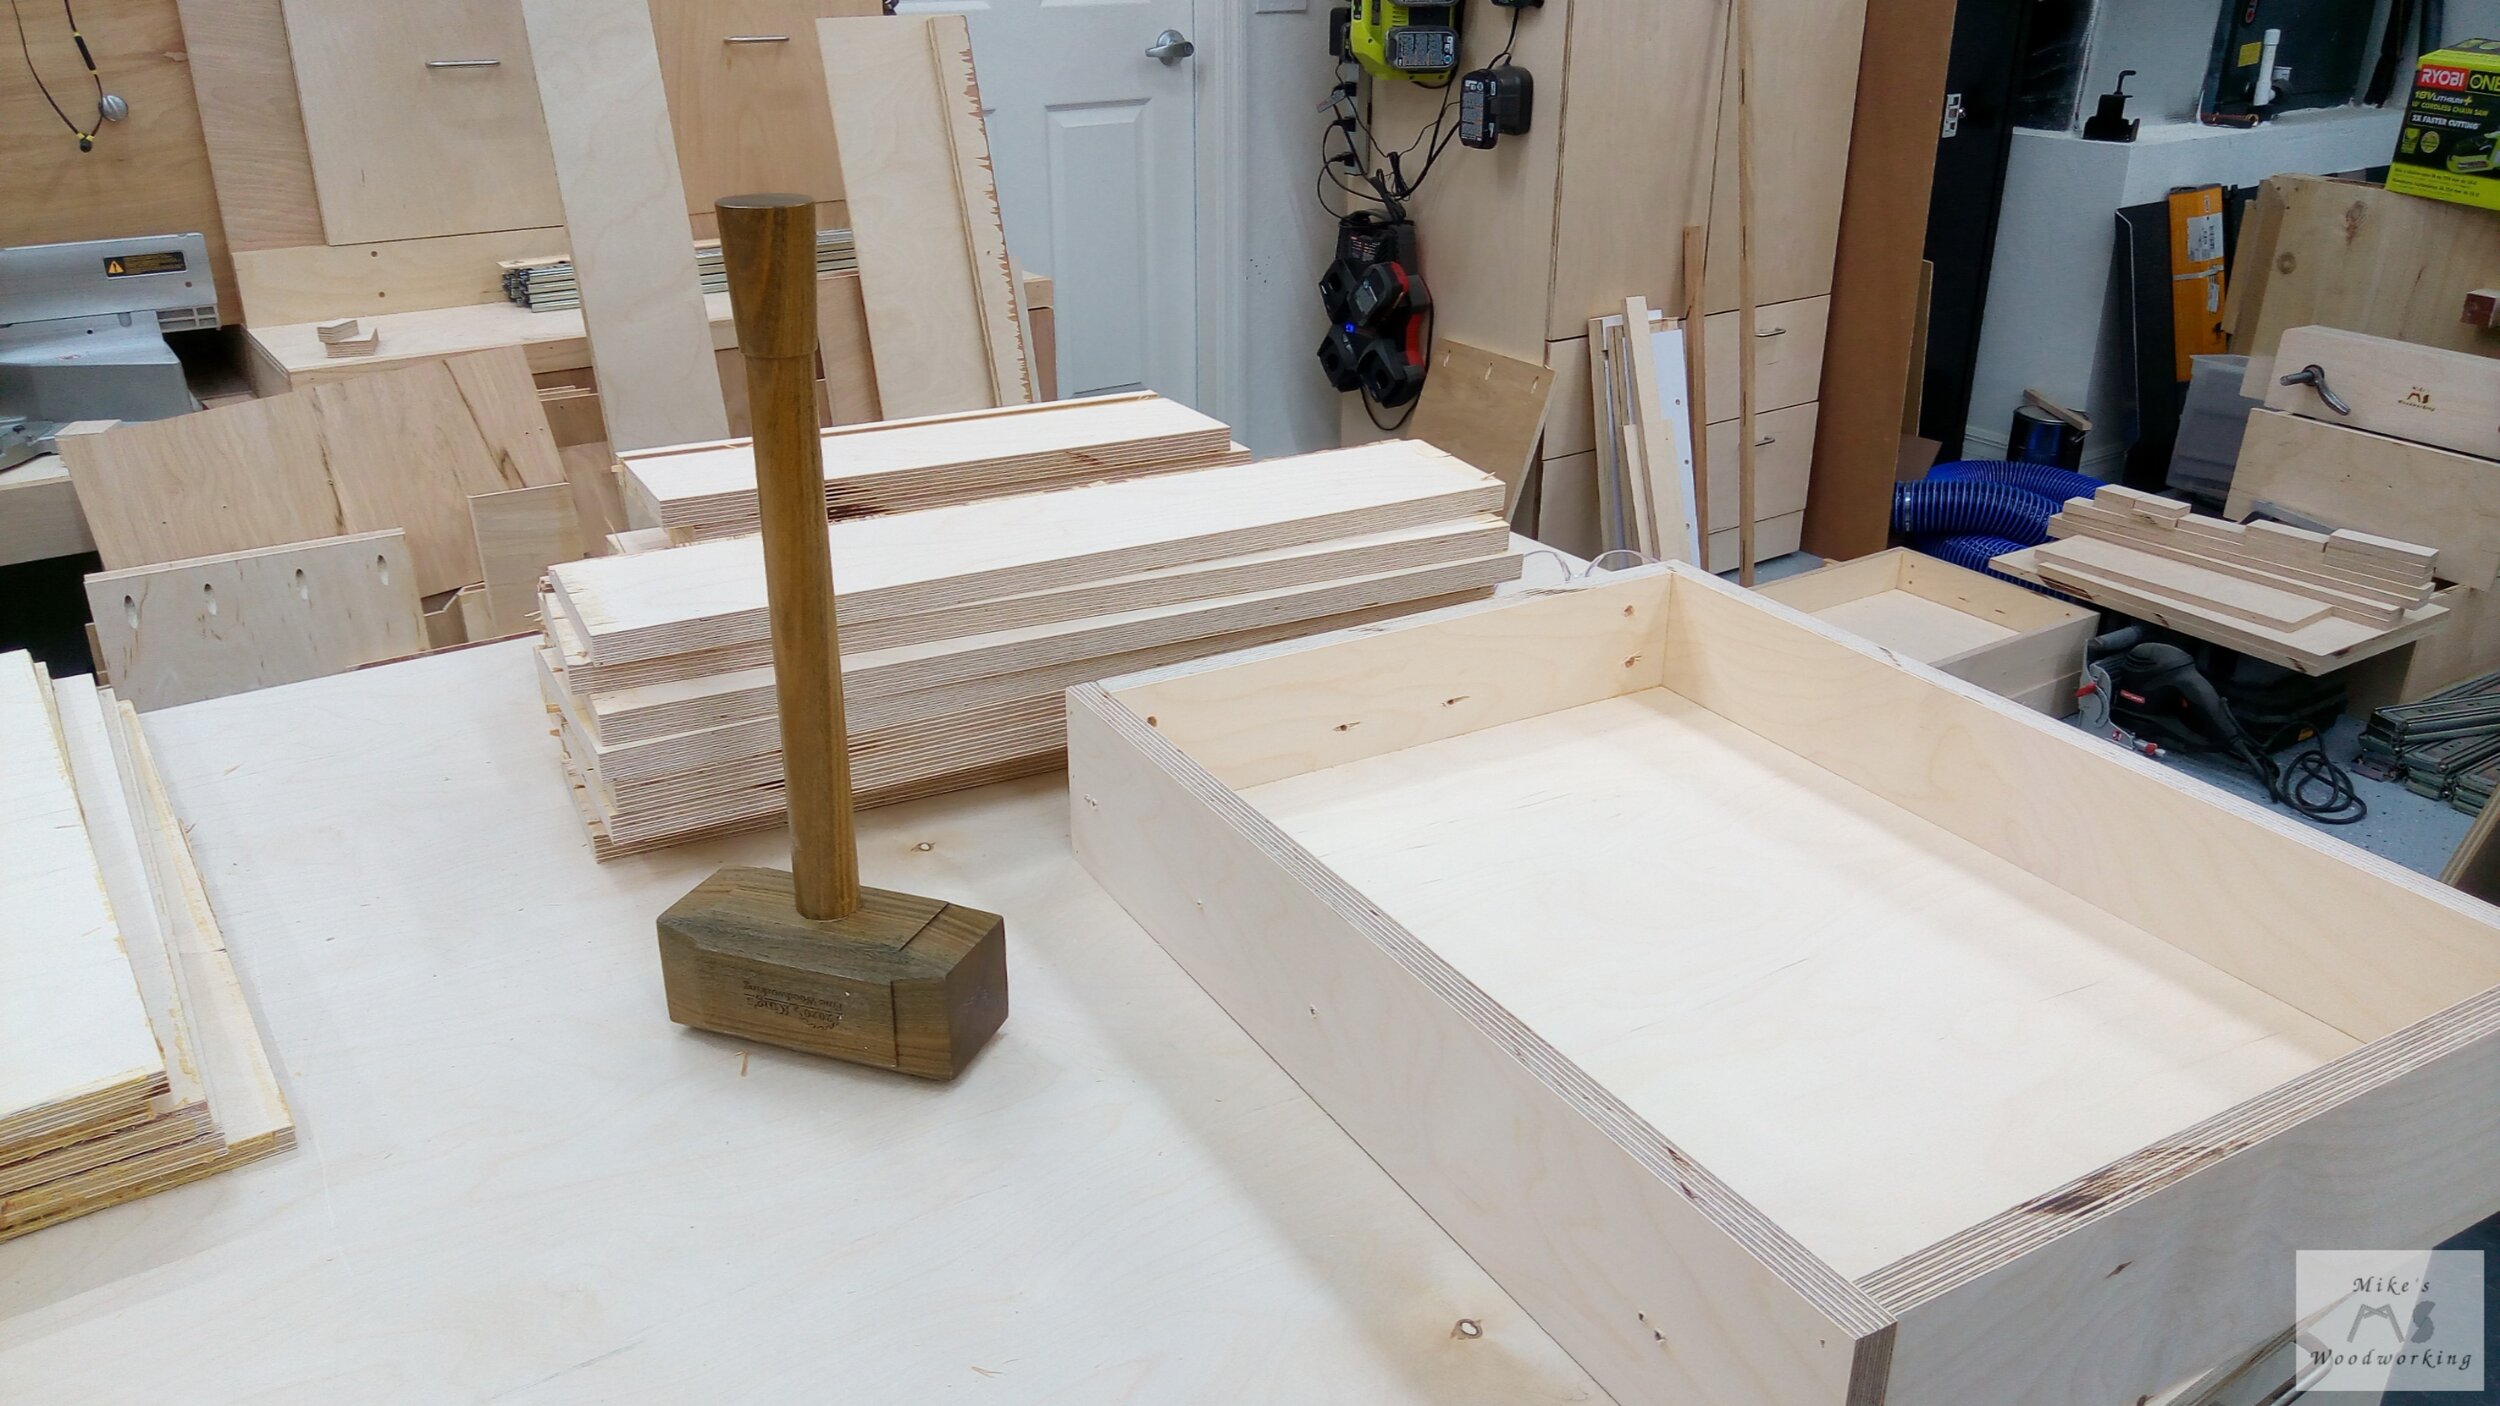
Before I could start taking out the drawers, I still had the drawers from the old Table Saw & Router Cabinet sitting on the floor. These, for the most part, were not going to be reused (save for maybe the drawer bottoms), so they were essentially scrap in my eyes. These drawers weren’t constructed like all of my other drawers in the shop. Instead of pocket screws, I went with simple glued butt joints and brad nails for the boxes, with the bottoms set in a groove for added strength.
Breaking apart these drawers was going to be a pain in the ass, which is partly why I waited to tackle this part. The fastest way to break these down was going to be the brute-force method. I got out my heavy lignum vitae Thor’s hammer mallet and started smashing (King’s Fine Woodworking FTW). I made sure to have on my safety glasses and hearing protection before I got started. With only a few blows the drawers were in pieces and I had a ton of space on the floor. I set the drawer bottoms and the sides of the large drawer aside for possible recycling for this project.
Next up I removed all of the drawer pulls and drawer faces. This would allow much better stacking of the drawers on the floor. Removing all of the drawers followed. The biggest problem was surely going to be the two large drawers. I was trying my best to not unload ANY of these drawers to save space in the shop as it was already getting crowded with junk from the previous two builds.
The top large drawer was easily removed with the help of my lift cart. The bottom one, however, was too low to the ground to allow that. I set up some scrap plywood on the floor, just high enough to lift the fully-extended drawer ever so slightly. Having two sets of drawer slides proved to be a pain in the ass as well, especially when trying to release all four at the same time (where are those two extra arms when you need them?).
My method worked well enough and I was able to remove the heavy bottom drawer and move it out of the way with the cart. I stacked the two large drawers as none of their contents were going to be needed throughout the take-down/rebuild of the miter saw station.
The rest of the drawers came out without any problems, although I almost dropped the large top/middle one as it was lopsided with its weight distribution. I stacked them on the floor in such a way as to keep possibly needed tools near the top and things like plumbing supplies on the bottom (hopefully won’t need those any time soon).
With all of the drawers successfully removed, all of the drawer slides were next. This seemed to take absolutely FOREVER. I went WAY overboard with the amount of screws for ALL of the drawer slides, both on the drawers and the cabinets. I surely won’t need to buy any more screws when I go to attach the slides in the new cabinets.
How ‘Bout a Lift?
I next needed to work on how I was going to lower the air filtration unit. You see, when I placed it where it currently resides, I used the old Air Filtration & Planer Cart to get it into place, again, with my lift cart. That planer cart has long since been disassembled and I have nothing comparable to use in its place. Given the height, its awkward size and weight, and my limited upper body strength, there was no way I could lower it on my own. My only two options were to rent some piece of equipment, similar to what I almost did when trying to remove my Harvey dust collector from its pallet, or to make another similar platform to the old planer cart. Given the cost involved, I opted for the latter.
I came up with the design seen below. It would only require four 2 x 4’s and the top from the old Table Saw & Router Cabinet. The prices for lumber (April 2021) are rather steep, but with only needing four pieces, and still having a small gift card around from Christmas, it wasn’t going to cost me much, if anything.

I got my supplies from Lowe’s and made all of my cuts based on the layout in my Sketchup model. With the way I laid things out, there would only be one short piece of scrap leftover, so I simply stashed that in my Scrapwood Storage Cabinet.
The whole thing was put together with pocket screws. With it’s braced cantilevered design, those would be more than adequate. I put the platform together in no time and set it on top of the lift cart. I left around 1/32” of wiggle room between the legs and the cart table. Even with this somewhat snug fit, the platform still wanted to slip off of the cart. I opted to secure the back side to the cart with a ratchet strap.
I rolled the cart into position and raised it up to the height of the open shelving atop the miter saw station. The edge of the platform was almost butt against the shelving. I climbed onto the base of the miter saw station and simply slid the air filtration unit right across onto the platform. The smooth top provided by the piece of hardboard gave little to no resistance. The ratchet straps held fast and the platform never even thought about tipping. I lowered the cart, wheeled it out of the way and moved the air filtration to my workbench, where it will reside until the miter saw station is complete. Given how strapped I am for space in the shop at the moment, I moved the platform into the spare room in the house until I need it again to replace the air filtration unit.
Getting Kinda Tight in Here
I can finally finish emptying everything from the open shelving and take those down. With those out of the way, I can start removing and disassembling the upper cabinet boxes. With each layer removed, I started to vacuum everything to avoid a cloud of dust hitting me in the face when removing higher items.


All that was left were the lower cabinets. I first removed the miter saw and set it on the floor out of the way. I should not be needing it for the remainder of this project, at least not until I’ve got it back in place. There was a ton of sawdust behind the miter saw, so I absolutely had to take care of that before going any further. There’s a 4” dust collection port connected to the shelf behind the saw, but it’s really only good for containing the airborne dust behind the side panels, and not so much for collecting the bulk of the dust produced by the saw. This is the main reason for the redesigned dust hood.
Since I was running out of room to store things on my workbench, I decided it would be best to remove only the left side of the miter saw station for now. I could keep some of the other stuff that was stored in the open shelving, including my old speakers, on the right side.

When I finally got to breaking down the lower cabinets, I had completely forgotten that I glued all of the pocket hole joints together to make sure everything held under the immense weight of everything else on top of them. Thor’s hammer to the rescue once again. After knocking loose a couple of the stretchers, I noticed that the outer veneer of the plywood was just peeling back in large pieces. The veneer was barely thicker than a piece of paper. All of the lower cabinet sides were essentially scrap and weren’t going to be reused much, if at all.
With the left side cabinets now out of the way, I vacuumed the floor and got to assembling another 60” x 36” shop stand. This one went by far the quickest of the three 60” stands I put together (repetition will tend to speed up production after a while). With the shop stand put together and locked into place, I left the leveling feet at their lowest levels until the other stand was assembled and in its final position. I put the old top on the 60” stand temporarily and moved a lot of the stuff back onto it from the workbench. The 36” shop stand was next and the same steps followed.


Both stands are now in place on the floor and it was time to level them. I started with the 36” one first as it was at the higher point on the floor. I raised it up about 1/2” from the lowest position and leveled front to back and side to side. Next I could do the same for the 60” stand. I positioned it my desired distance of 33” from the smaller stand and leveled it in both directions as well. With both stands level to the floor, I could bring up the 60” stand to match the 36” one. This only took a few minutes and they were both locked into position. I marked around each leveling foot on the floor with a Sharpie in case they had to be moved.
Mistakes Were Made
I got the side panels for the 60” shop stand cut and installed first. The remaining piece from the old workbench top was used on the left side, facing outwards, since it wouldn’t really be seen much, if at all. I wound up cutting and fitting all of the side panels at the same time. This went quickly and without much incident. With the 36” stand, the panel on the right side was not full length as I needed to leave an area in the back of the stand open for a drawer.
Since the 36” stand was more complex to construct, I focused on it first. The bottom went in first. I opted to go with an additional form of support for the bottom of the miter saw stands. The 60” would still have the two leveling feet in the center of the front and back long rails, but I wanted to have an additional means of support for the middle of the bottom panels. I cut a couple of pieces of scrap 2” x 2”, drill a hole in the bottom at the drill press, and hammered a tee nut into place. I screwed in a bolt with a nut between the head and tee nut. This 2” x 2” was then screwed into place as close to the center of the bottom panel as possible, and then leveled with the floor. With this additional “foot” in place, it would help with any potential sagging of the bottom panel over time, especially with the wider 60” stand’s bottom. I failed to add these pieces to the workbench, so I might attempt to add them in the future, although it would be tricky to accomplish.


Next I measured, cut, and installed the back panel for the six front-facing drawers first. Next was the divider panel between the two sets of drawers. Everything was installed with pocket screws once again. The hardest part was getting everything lined up and as square as possible.
Next up was the rear panel which was the side of the rear drawer box. This was a little trickier to install than I originally thought. I screwed up with its design in Sketchup, so I had to make changes on the fly again. Instead of a full 3/4”+1/2”+3/4” panel, I wound up with just a single 3/4” piece instead. It was secured to the bottom and the left side panel with more pocket screws. To secure all of the vertical panels in place, more stretchers were attached to them, spanning the side panels. This locked everything in and made for a solid box.


With the 36” stand’s drawer boxes done, I cut and installed the platform for the drill press. I needed to removed three of the metal rails to get it into place (clearly didn’t think that through when putting the stand together). A small piece of plywood was cut and set in place on top of the middle divider of the front drawers that provided additional support for the drill press platform. The added weight of the drill press might cause the panel to sag over time, so any added support might curtail that a bit longer.
I installed all of the front drawer slides and went to install the rear drawer…slight problem there. Like I said, when I drew this up in Sketchup I made a mistake with the 36” stand’s design and it bit me with that rear drawer. I had figured on a set of 34” drawer slides, just like the larger 60” stand. However, the opening was about 1/2” shorter than the length of those slides, so I couldn’t use them. I had to order a set of 32” slides, delaying me a bit on installing them. Oh well, no one to blame but myself for that goof…moving on.
I went back to the 60” stand and got that one finished up. The bottom and divider panels were cut and secured in place (no back panel on this one). Next I got to installing the heavy-duty drawer slides. Nothing much to go over with that, other than the fact that those slides are freaking HEAVY.
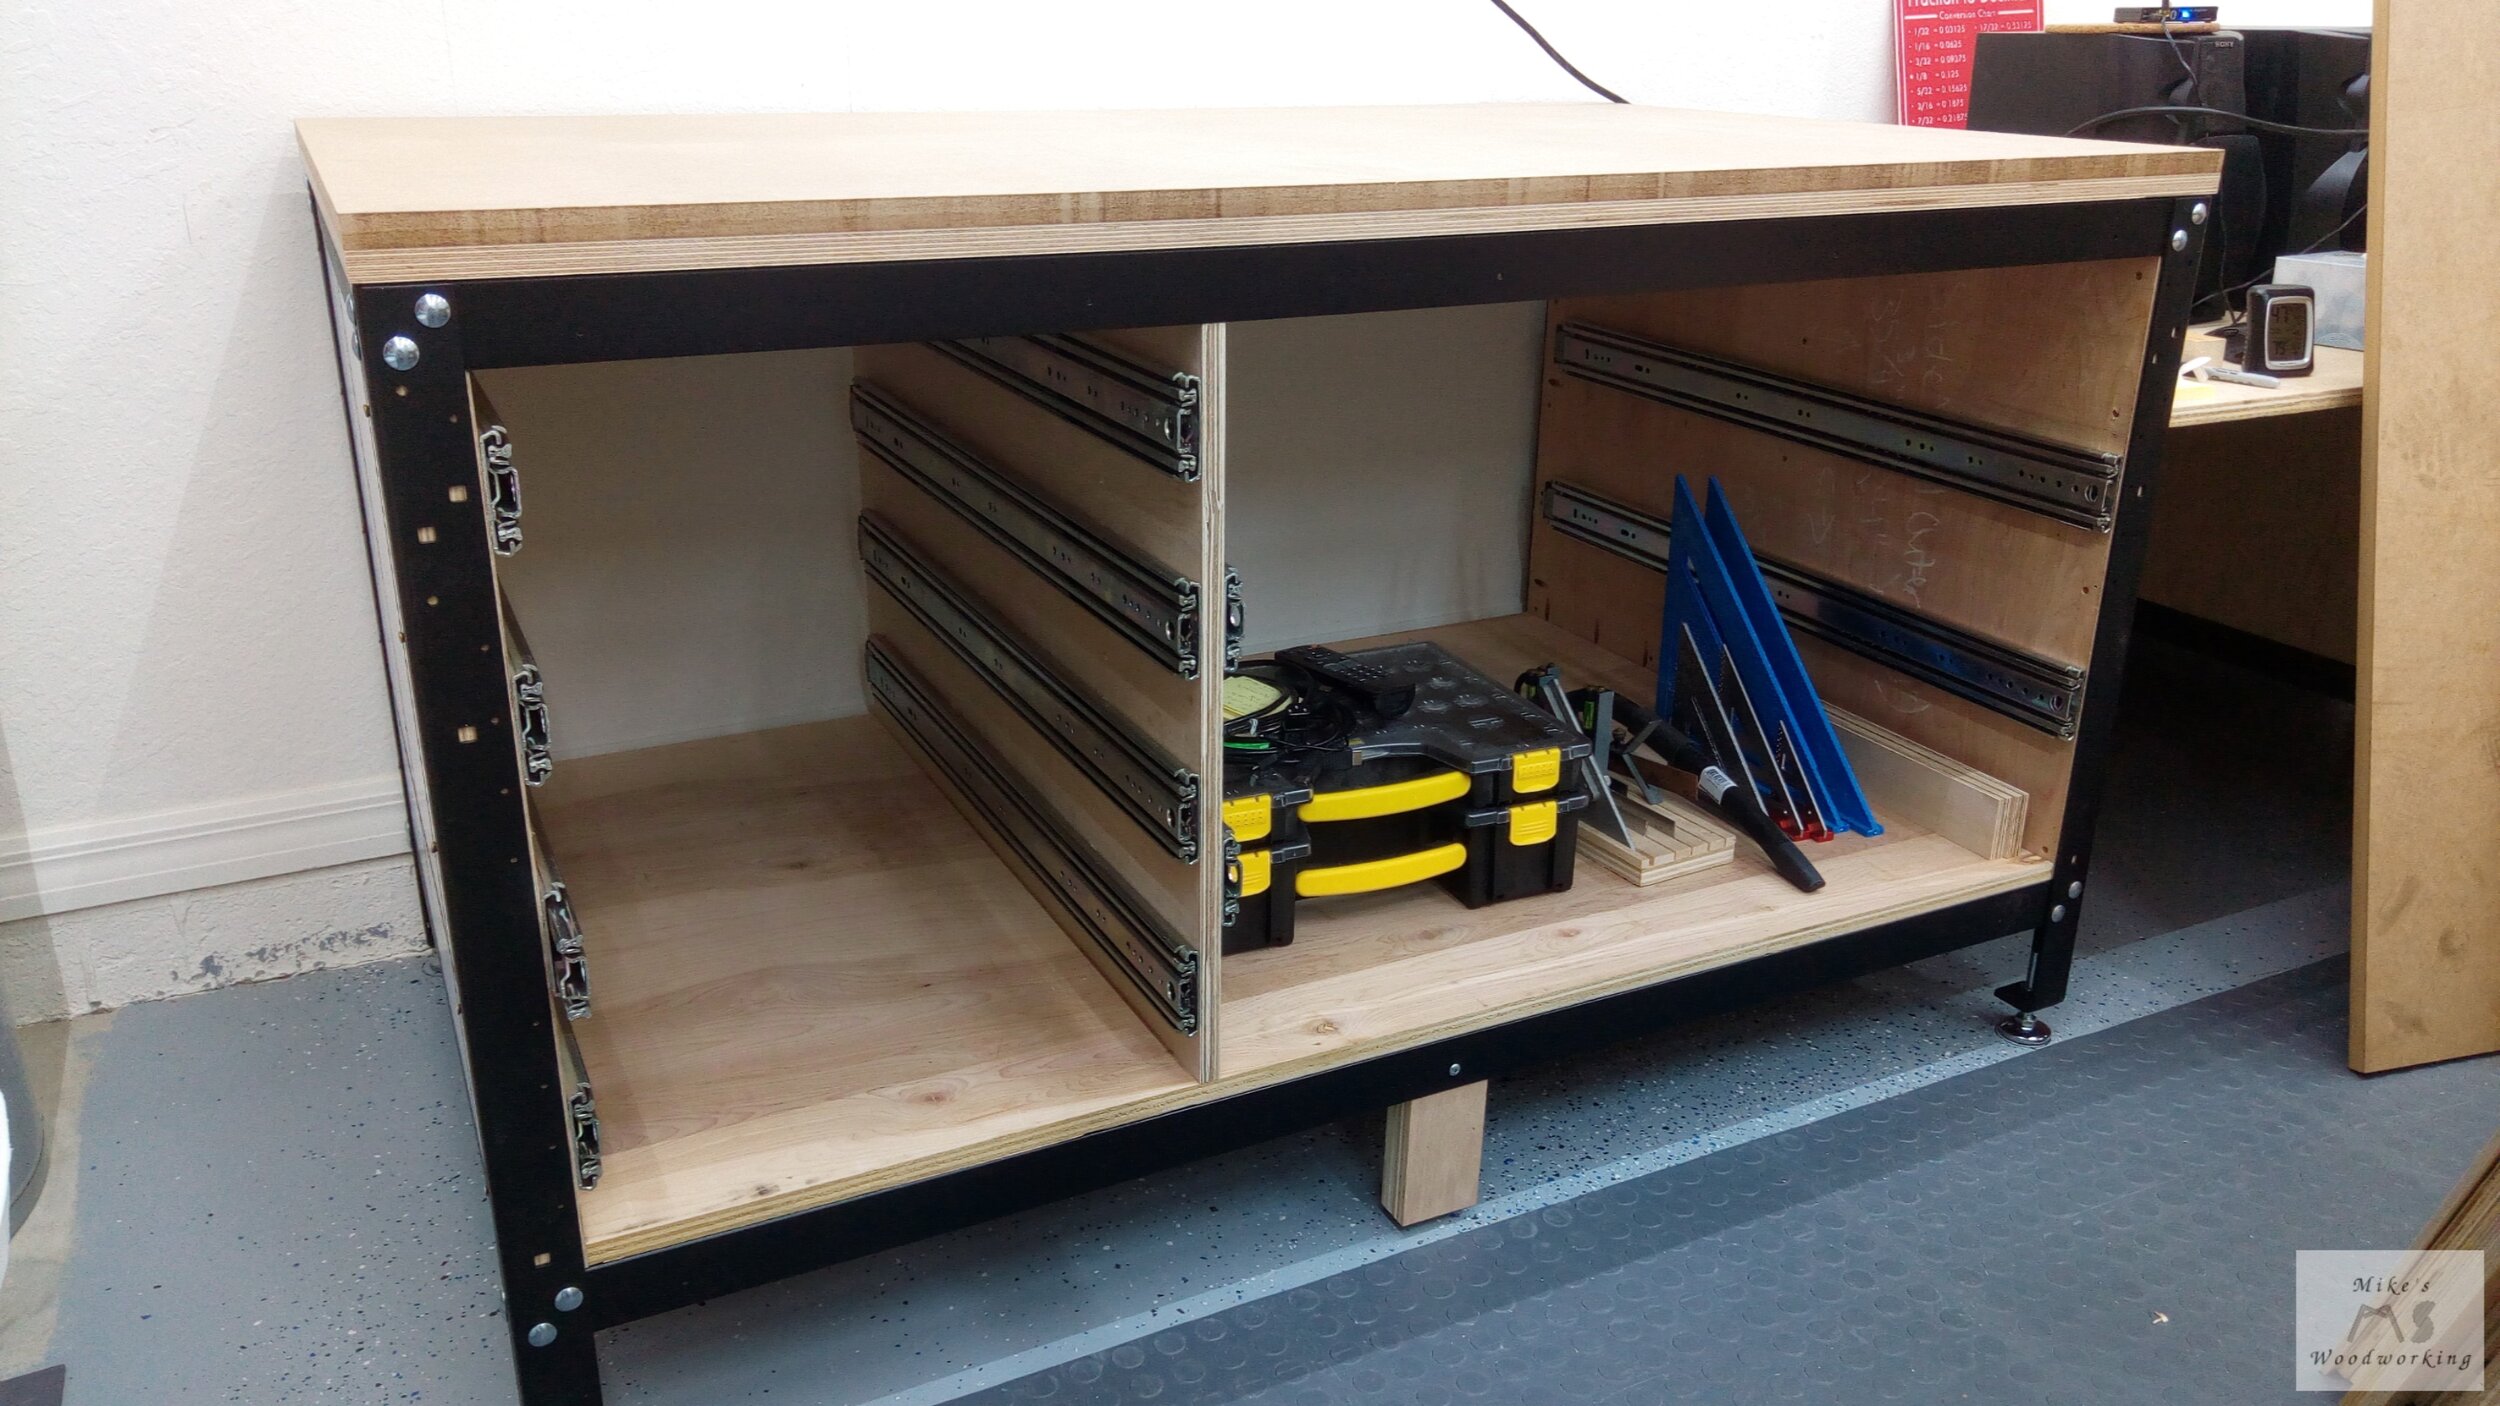
Pay no attention to the finished top in this picture (out of order pictures…again).
Once I finally got the last set of 34” drawer slides installed, it was time to get the drill press into place. This was a mere formality with the assistance of my lift cart…again. I locked it in place with two bolts and it was now time to work on getting the tops done.

To Top It All Off…Again
I had already cut the plywood tops for both stands to their final sizes, so now it was time to do the same for the MDF pieces. I didn’t want to deal with cutting the MDF to exactly the same dimensions at the plywood, but instead left the pieces 1/2” oversized in both directions. By doing this, I could simply and easily screw both pieces together and then take my router with a flush trim bit and get the MDF to perfectly match the plywood.
Now that I’ve got both now EXTREMELY heavy tops put together, all I needed to do at this point was secure them to the rails on the stands. This was easy on the 60” stand, but the 36” one provided a bit of a challenge. For one thing, I needed to cut a section of the 36” top away in order to make it removable for access to the drill press base. By essentially removing one corner, I’m removing some of the strength of the top as a whole. Not only that, but the cut-away section would have nothing to sit upon once put into place, other than one corner. I needed to cut two support pieces out of some scrap plywood and secure them in place before attaching the top. But if I secure the support pieces in place first, I’ll have no access to the holes in the rails for securing the top. I can’t freakin’ win here.
I had very little room between the drill press shelf and the top of the rails. I really only needed access to two of the holes. As long as I have two screws in place, the top isn’t going to move around. With the addition of the file cabinet drawer section, and the weight of the open shelving on top of that, the sheer weight of everything would keep the 36” top section in place. I had to get my right-angle drill attachment out to get these screws in place. The only screws I had that would work were 3/4” Phillips-head screws…not my first choice, that’s for sure. I managed to get both screws (sorta) secured to the top, but I couldn’t get them completely tight. I was starting to strip the screws out so I just left them in about halfway. Like I said, it was enough to prevent the top from moving around.
Something else I wanted to do was attach some filler strips to close the gap between top and drill press rails. I had already affixed the one for the rear prior to getting the rest of the drill press rails into place (I didn’t want to have to move this stand again). The two sides weren’t too much trouble, but I ran into a little snafu on the front section. Because of how far forward I had the drill press, I could not install a filler piece that was 3/4” like all of the others. I’d have to use a piece of 1/2” scrap for this instead. For the time being, I’ll leave it open as it’s not critical to the overall function of the stand.
With the filler strips and top in place, now I could fasten the two supports into place. I opted to just use pocket screws on these, just in case I need to access under the top in the future. Now I could focus on the removable section of the top. I laid out all of my measurements and double-checked them before making any cuts. With there only being one piece near the middle of one end needing to be removed, I took care of this at the band saw. I was starting to get into a rush, something I’m constantly trying to prevent in the shop, and I overshot the curve I had planned for the opening. It was supposed to closely match the radius of the drill press support, but I wound up just cutting it square instead. It was more of an aesthetic look more than anything, so no big deal.
I put the removable top into place and it fit like a glove. There was one problem, though. The drill press top was not level with the rest of the top on the stand. To remedy this, I installed two screws into the rear support block and drill corresponding recesses into the drill press top. This would allow me to make fine adjustments to get everything level in both directions. This worked like a charm.


Seriously…More Drawers?
With both miter saw station tops finally completed, minus a coat of shellac, I could now focus on all of the bottom drawers for both stands. I started with the six 22” drawers for the front of the right stand. Just as with all the others, pocket hole construction was in play once again. The drawers came together quickly and installation was a breeze. Only 1/4” plywood was used for the bottoms of these drawers.


Now came time for the six 34” deep drawers for the left stand. The biggest challenge was going to be the two monstrous nearly 34” square ones on the right side of the stand. Because of their size, I opted to use 1/2” plywood for the bottoms on these. The two large drawers went together rather quickly, except when I realized that I wanted to cut grooves into the sides to allow for dividers to be installed…well shit.
I’d only used pocket holes and no glue, so it wouldn’t be too difficult to disassemble the drawers. However, it dawned on me that it might be easier to just leave the large drawers together and cut the grooves in place with my trim router. Since I was using some scrap hardboard for the dividers, I could use a 1/8” straight-cutting bit in a couple of passes to make the grooves. One drawer was getting just one set, while the other three sets.
I laid out the grooves’ locations and used one of my big 12” speed squares as my straight edge. This worked like a champ and the grooves were cut in no time, all without taking apart the drawer. Thankfully I hadn’t installed the bottoms at this point, because THAT would have been a whole different set of problems.

With the grooves finished, I cut and installed the bottoms with glue and brad nails, as I’d done with all of the other drawers in these projects. To say these two drawers were big and awkward would be an understatement. I got the bottom into the stand and it fit like an absolute dream. After all the problems I’ve had in the past with sizing drawers just a shade too wide, I’ve certainly learned my lesson on that front. I attached the drawer slides with PLENTY of screws and gave the drawer a test run. It slid in and out, a full 34”, without a hint of binding. I quickly installed the other large drawer and it was a perfect fit as well. Now I can get the other four deep drawers built.


These drawers were more of the same, except that I actually remembered that I wanted to cut the grooves BEFORE I starting putting them together. I laid out the grooves so that they would be more or less symmetrical from front to back. This meant that I could easily cut the groove at the table saw with my crosscut sled. I’d have to make two passes on the sled to complete the cut, as the blade was not as wide of the hardboard panels.
I came up with an easy system to make my life easier. After making the first cut, I’d flip the drawer side end for end and make the second cut. I’d do this for all of the other drawer sides as well. Then I could take the first side and make another narrow cut, adjusting the stop block ever so slightly. Once the width of the groove was dialed in, I would make the rest of the cuts on the other pieces. This continued until I got all of them cut on all pieces. Overall, it was a pretty quick operation. Pocket holes to the rescue for the drawer construction. I went, again, with 1/2” plywood as these were very long drawers. The install was much the same as their larger cousins.


All that was left was to cut the dividers for all of the drawers. Since I made four sets of grooves in the large drawers, I cut four dividers, knowing that I wouldn’t likely need all of them right now. If organization should change in the future, I’d be ready. For the smaller drawers, I just cut up the rest of the hardboard I had until I had about a dozen-and-a-half of the dividers. This would be WAY more than I’d need right now, but I’d be ready for changes in the future (like THAT’S ever going to happen…cue eye roll here).

The final drawer to construct was the drawer on the side of the 36” stand. This was to replace the rolling clamp drawer I had behind the old miter saw station. This time, however, I wouldn’t be storing clamps in this drawer. It will house a lot of the lesser used drilling accessories I have. Construction of the drawer was nothing too complicated. I only needed to make a couple of cuts on the scraps I had to get everything to the correct sizes. More pocket holes, again, and I had the drawer box completed. Once installed, the bottom of the Rockler Miter Saw Station was now completed. Before I could continue onto the upper cabinets and open storage, I needed to apply a finish to the MDF tops.


FINISH IT!!!
My choice for sealing the MDF was shellac. From most places I read about sealing MDF from outside moisture, shellac was pretty much the consensus choice. It’s easy to apply and it dries fairly quickly, allowing multiple coats to be applied in a shorter time than with other finishes. My only problem was that I’ve NEVER applied finishes with anything other than spray lacquer to this point. This is going to be interesting.
The largest can of shellac I could find locally was a quart. I wound up grabbing two cans since I was going with two total coats on all three projects. I started with the miter saw station as the tops were already cleared off. It’s recommended to use thinner coats as this makes the finishing process easier in the end. I applied one coat to each stand’s top, making sure to get all of the edges of the drill press top. I let the shellac dry for a little over an hour and then came back with some 220-grit sandpaper to give them a light sanding. This gave the finish a bit of a white look, which I guess is normal after the first coat.
I cleaned off the tops with the vacuum and a clean lint-free shop towel and applied a second coat. I let this dry overnight and came back the next morning to check the finish. It was still a little rough to the touch, so I gave it a very light sanding with 220-grit again and it was now silky smooth. Overall, I need A LOT of work on my brushing skills. The look of the finish is absolutely terrible, but it’s more function over form at this point. I just want the MDF sealed, and I’ve gotten that accomplished.

Blowouts Aren’t Just for Tires
With the tops of the miter saw station stands finally sealed, it was time to move onto the upper cabinets. I started with the three on the larger stand first. Because of the loss of that same 1” as before, the upper cabinets would be slightly different than my model measurements. To make things easy on myself, I simply made the two smaller outer cabinets the same size as my drawing, and the larger one would simply be the difference between the two cabinets and the overall width of the top.
Since all of the cabinets would be the same overall height and depth, I batched out all of the sides at the same time. For the stretchers I did the same thing, at least for the width (3”). For the lengths, the smaller cabinets’ stretchers were all cut to the same size. I put those two cabinets together and placed them side by side on the top. With one side flush against the left edge of the top, I put the other two cabinet sides butt against the cabinets and took the measurement from the sides to the other edge of the top. This would give me the exact length needed for the large cabinet stretchers.
As a last minute addition, I also cut some 1/4” plywood to size to make backs for all three cabinets. Since they would not be flush against the wall, I didn’t want the chance for dust to find its way into any of the drawers (still unlikely, but just in case). The back panels also gave me another means of squaring all of the cabinets better as well.
I pushed all three cabinets together and got them all flush with each other on the front and screwed them all together to make one unit. Now I can simply get them even with the edges of the top and back (or as close as I can anyway), and secure them to the top with some pocket screws. I tried using 2-1/2” pocket screws on the 3/4” plywood, but the screws started to blow out the sides of the cabinet right at the base of the cabinet (big mistake on my part). I wasn’t sure the screws would have a good hold in only the MDF, so I figured the longer screws going into the plywood would be better. They did hold, but the aforementioned blowout wasn’t part of the plan (lesson learned).

Are You Tired of Drawers Yet?
The cabinets were in place, so now was time for the drawer slides. Each row of drawers were going to be at the same level, so installing them was quite easy. I gathered all of my measurements and found some scrap plywood that made for the right sized spacers and I was off to the races. Since the cabinets didn’t share sides, the placement of the screws was not an issue.

Next up was the fun part…constructing nine drawers comprised of three different batches of plywood. I was trying to reuse as much old materials as I could to avoid having to spend a fortune on materials. For the three large drawers, the sides were made from Baltic birch. The other six drawers were made using scraps of plywood purchased from both Lowe’s and Home Depot. I was careful with my layout of the materials during this step as I didn’t want to be left with any drawers that wouldn’t fit properly.

Here are all of the parts for the nine drawers cut to final height. The variance in the internal plies of each batch of plywood made for easier sorting and cutting.
The sides of all of these drawers would be plywood that was all from the same batch, guaranteeing they are the same thickness. Where the real different would be seen was when cutting the front and backs of the drawers. Since this measurement was made using offcuts from the same material, I had to make up three sets of spacers when cutting the various fronts and backs.

Here are the spacers I used when cutting the drawer fronts/backs. Upper left is Lowe’s, upper right is Home Depot (PureBond), and bottom is Baltic birch. Measuring w/calipers showed a difference of up to .010 from one batch to another.
After taking my time in laying out all of my drawer stock, I made all of the cuts and assembled all of the drawers. There were no problems whatsoever with the finished drawers. They all fit into the cabinets with ease, much to my delight. It really does pay to take ones time in the layout phase of tasks such as this.


The file drawer cabinet was next on the agenda. I absolutely WAS NOT going to make the same mistake I made with the first miter saw station this time around. Instead of building the drawer to fit the cabinet, I was going to build the cabinet around the drawer. HA HA, take that conventional construction!!!
I checked the measurements of the old file drawer (the second one I made, not the first erroneous one), and decided to add 1/8” to give the file folders just a little more space to move side to side. This would be the only drawer where I would be using 1/2” material. I would have used 3/4” plywood, but the plastic file runners I bought only came in sizes that fit 1/2” drawers.
Construction went par for the course, with one exception. This time around, since I was using 1/2” plywood, I opted to use the Kreg Micro-Pocket Drill Guide. This would allow me to drill smaller holes in thinner material. This worked like a charm. With the drawer now together, I cut the file drawer runners to length and put a few file folders into the drawer…smooth. This was so much better than the old drawer where I simply cut a runner into the plywood. The folders had plenty of room to move and slid around with ease.
Building the cabinet was a piece of cake with the drawer finished. I simply added 1” to the width of the drawer and that was my stretcher measurement. The sides had already been cut to size when batching out the previous three cabinets so once the stretchers were cut to final length the cabinet went together quickly. Again, a back was added to aid in squareness and dust prevention in the drawers.
Before installing anything in the cabinet, I wanted to get it secured to the top of the miter saw stand. I used my longest track saw track to align the file drawer cabinet with the other cabinets on the other stand. This would guarantee everything is aligned properly.

I installed both sets of drawer slides next and built the upper drawer for the cabinet. I put both drawers into place and they worked out great. The file drawer was a tiny bit tight when initially installed, but it slides with no binding at all. There was one final cabinet to make now, and that was the small rear drill press cabinet.
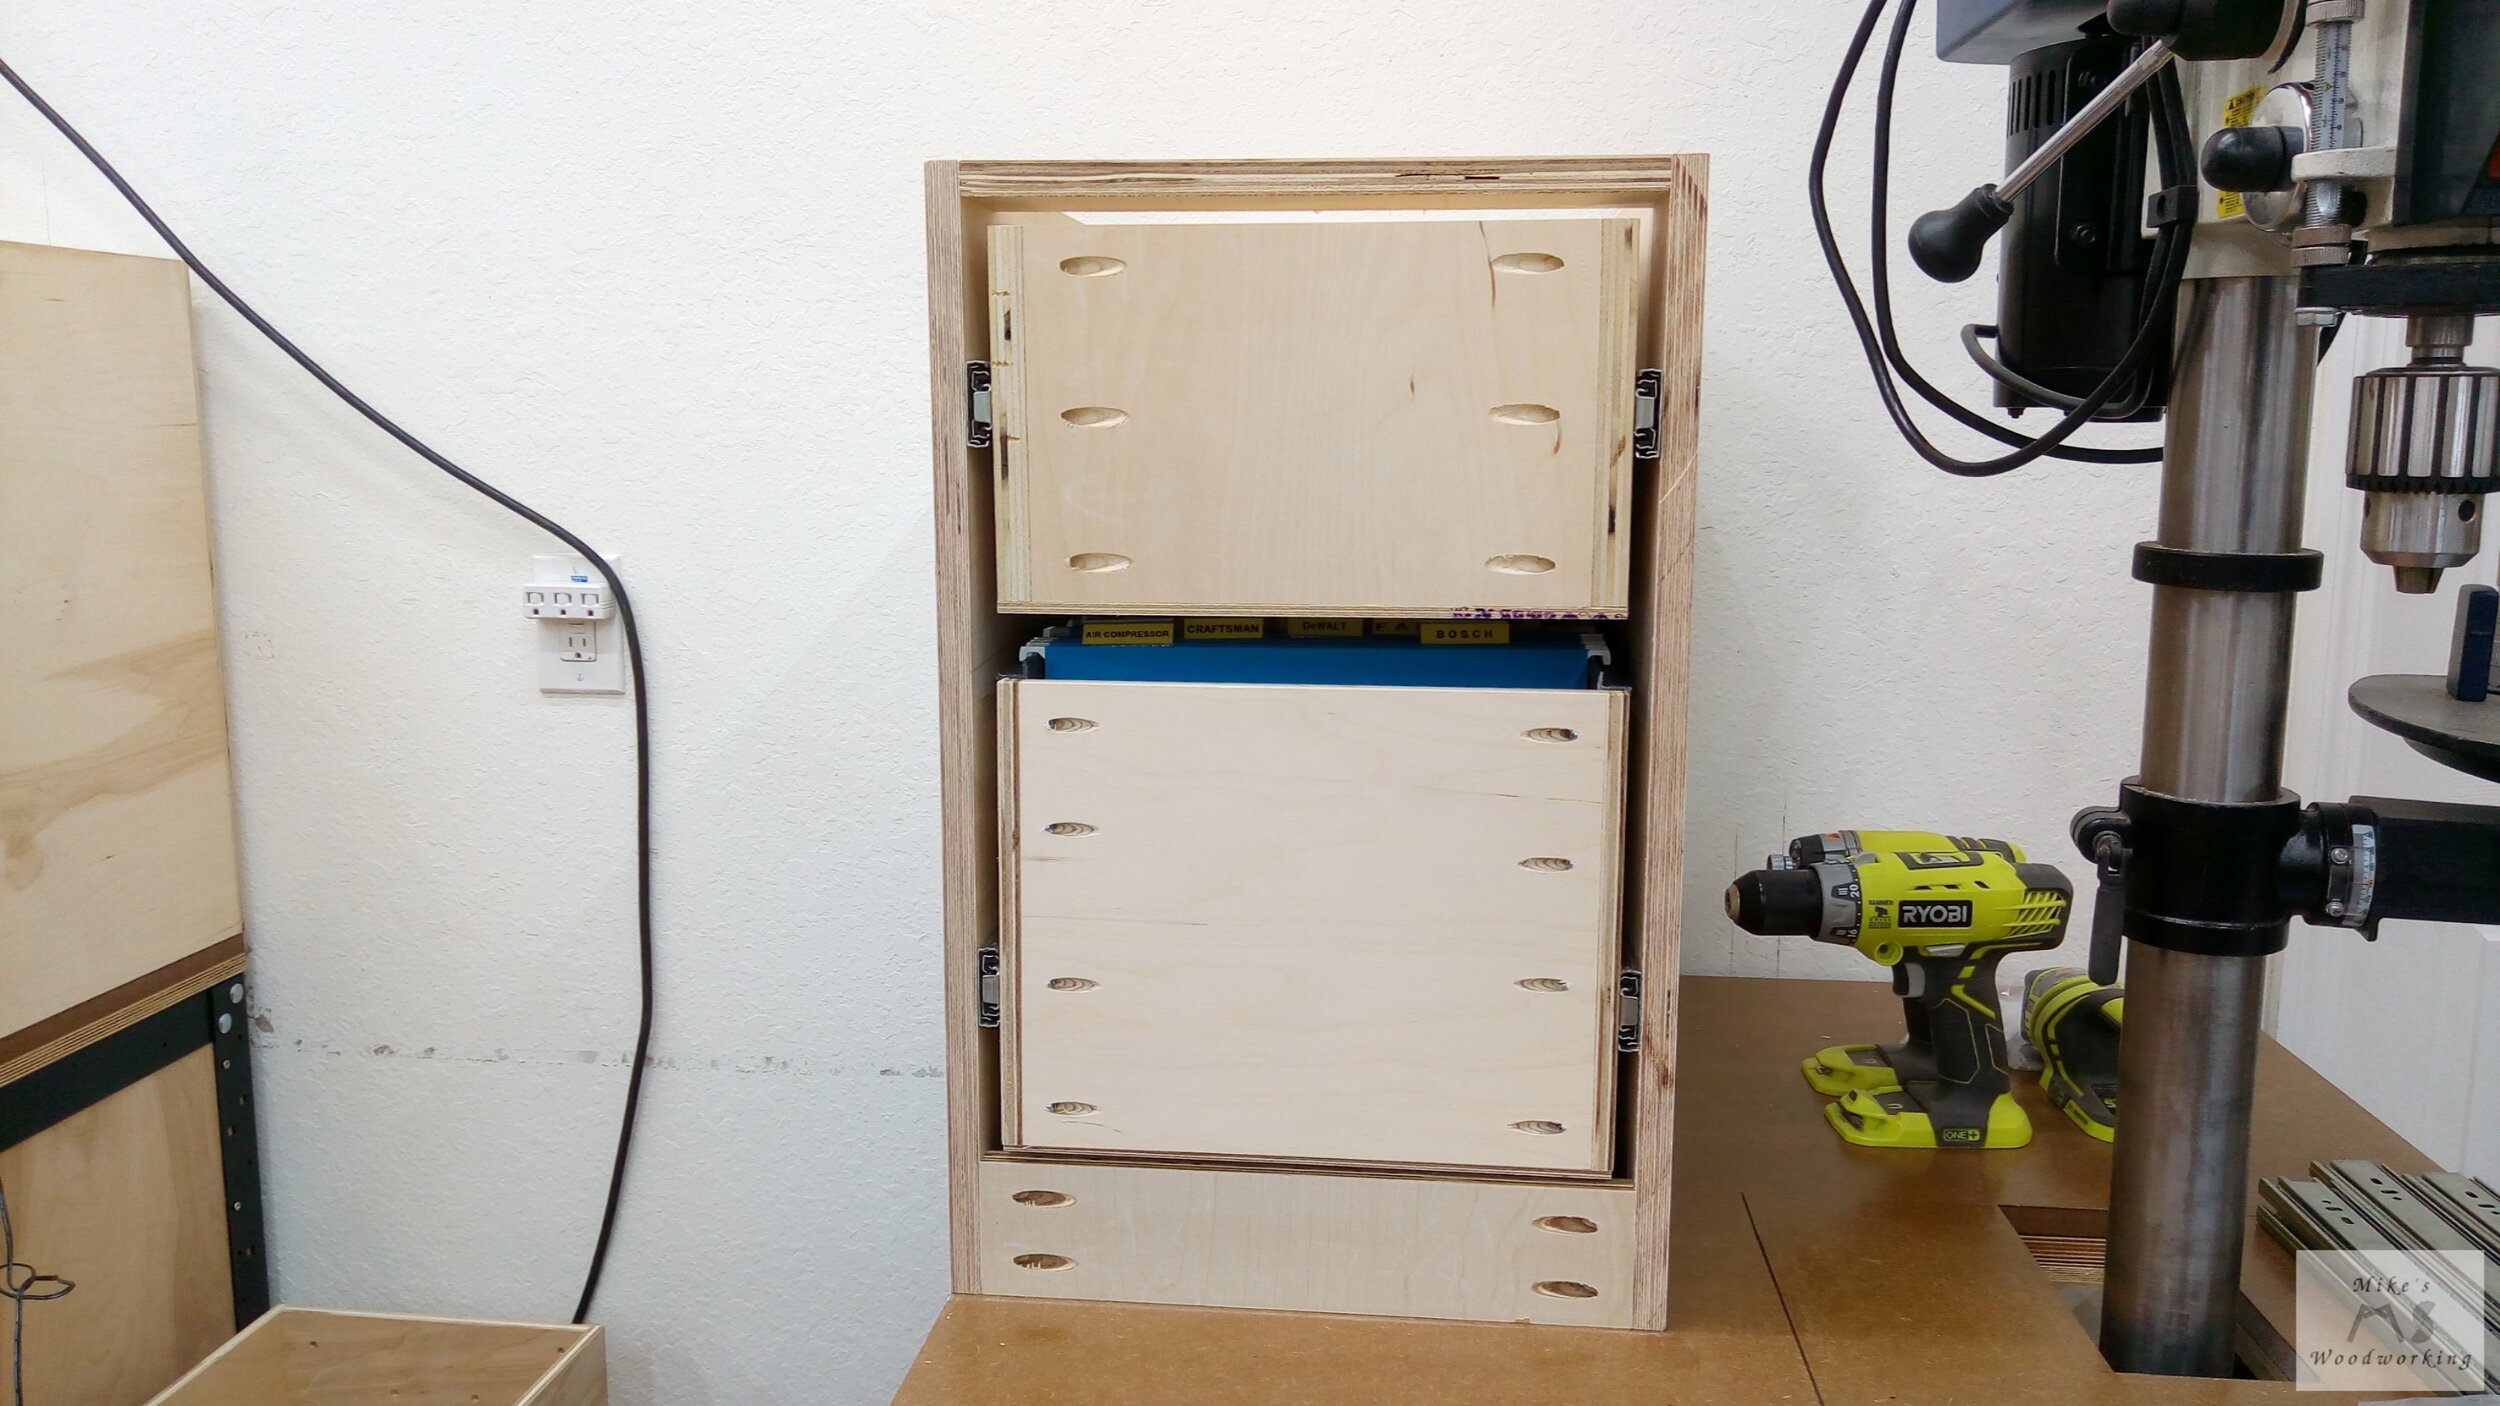

The drill press cabinet was simply more of the same as the previous few upper cabinets, with the exception of no plywood back being employed. It was going to be installed flush to the side of the file drawer cabinet. For the depth of the sides, I took a piece of plywood that would be used for the trim and set that against the side of the file drawer cabinet. I then measured the distance to the edge of the top and that was my measurement for the sides. The height was basically the distance from the bottom of the rear of the drill press minus about 1”. The overall width would be 16” (something that actually held over from my Sketchup drawing).
This cabinet went together and installed quickly, with one modification. Since the one pocket screw in the back of the file drawer cabinet side was protruding just a tiny bit, I had to cut a small recess in the bottom rear stretcher to account for this. Once that was done, it slide right into place, fully flush with the cabinet side. I secured the drill press cabinet to the top and the other cabinet to hold it in place.
The drawer slides went in quickly, but I realized there might be a small problem when going to install the drawers. Because of the cabinets location (right next to the door jamb), it might make attaching the slides to the drawers difficult. After fully extending one of the slides, I saw that I could simply open the door to the laundry room and stand there to fasten the slides to the drawer…PHEW!!! Once the drawers were installed, I also made a mental note that the drawer faces would not be able to span the width of the cabinet (again, because of the door jamb).


We’re Getting Closer…
Now that the upper cabinets are completed (minus the drawer faces), next up was to construct the open storage shelves once again. There are only going to be a total of five bays in this version of the open storage; in the original miter saw station there were seven. Over time, however, I wound up taking one divider out to make room for my laptop and other computer accessories. Since the Rockler Miter Saw Station is a bit shorter overall, this eliminated one more bay.
The overall construction of the open storage will differ slightly from the old version. Instead of only covering the open storage, the top will now extend all the way back to the wall and sit upon a 2” x 2” cleat secured to the studs. This will allow the air filtration unit to be fully supported underneath versus straddling the open storage in the old setup (I was never too keen on that idea). Because of the extended top, the back of the open storage will not be secured to the top (only the dividers and bottom panel).
Much like the original, the new open storage is comprised of two parts, one large unit and one small unit. The larger one is on the right and spans the actual miter saw shelf and future dust hood; the smaller is on the left. All of the dividers were cut from scraps from the old miter saw station and were the same dimensions, except for an added 1/2” in depth (no particular reason for that change, really). All were batched out at the same time using the panel-cutting sled and rip fence on the table saw.
The smaller section was quite simple to put together. The only measuring needed for the dividers was to find the center of the bottom panel and secure one divider to that mark. The left compartment would be the new home for all of my wood glue bottles and other items of this type. The right section would be for all of my Ryobi battery-operated drills/drivers and nailers.
The larger section required a bit more measuring to complete. The two ends were attached first. The compartment on the right was going to house my Makita track saw and Woodpeckers track square, same as the old setup. The only change I made to this was to factor in having the batteries still connected to the saw. Previously, I could not leave the batteries connected as there was just not quite enough room. By placing the saw with the batteries and the track square systainer into place on the bottom panel, I could easily mark out where the best location was for the next divider.
The next section was going to be for my laptop and its accessories. The previous space was a little too small, so I laid everything out to allow enough breathing room for everything. Once marked, the next divider was attached. This completed the larger open storage unit.
Next up was to get everything on top of the upper cabinets. With the tops not attached yet, both units were extremely heavy. They were both placed on top of the upper cabinets, lined up flush with the front of the cabinets, and secured in place with a few screws into the upper cabinet stretchers.
Before cutting the tops to final dimensions, I first measured the distance from the front of the open storage to the wall. The right side of the large unit was just a little closer to the wall than the left side of the small unit. Part of this was the wall not being perfectly square, part of it may have been my own setup of the cabinets. Whatever the case, I cut the top panels to all measure the same depth as the shortest measurement. With the cleats extending out from the wall by almost 2”, that gave me a little bit of wiggle room.
After getting the cleats secured to the studs, and the panels cut, I went ahead and attached them with a combination of pocket screws (from the dividers) and a few screws through the top and into the end dividers (no pocket screw access). Now that the tops were secured, I could drill a hole in the back of the smaller panel to allow the cord for my power strip to pass through and plug into the outlet that is higher up on the wall. I also drilled a hole in the back of the large open storage unit to allow all of the power cords and cable to connect to my laptop.


Once the tops were in place, I could finally start to repopulate all of the open storage and clear some space off my workbench again. The middle compartment currently houses all of my old combination squares and my speed squares, but that is slated to change. Eventually, I plan on hanging all of the speed squares on the back of the workbench panel, next to the hardware drawers.

Next on the agenda was to get my air filtration unit back on top of the open storage. I retrieved the platform I built earlier from inside the house and strapped it to my lift cart once again. I transferred the air filtration unit from my Rockler Material Mate cart to the workbench, and slid it all the way over to the already in position platform.
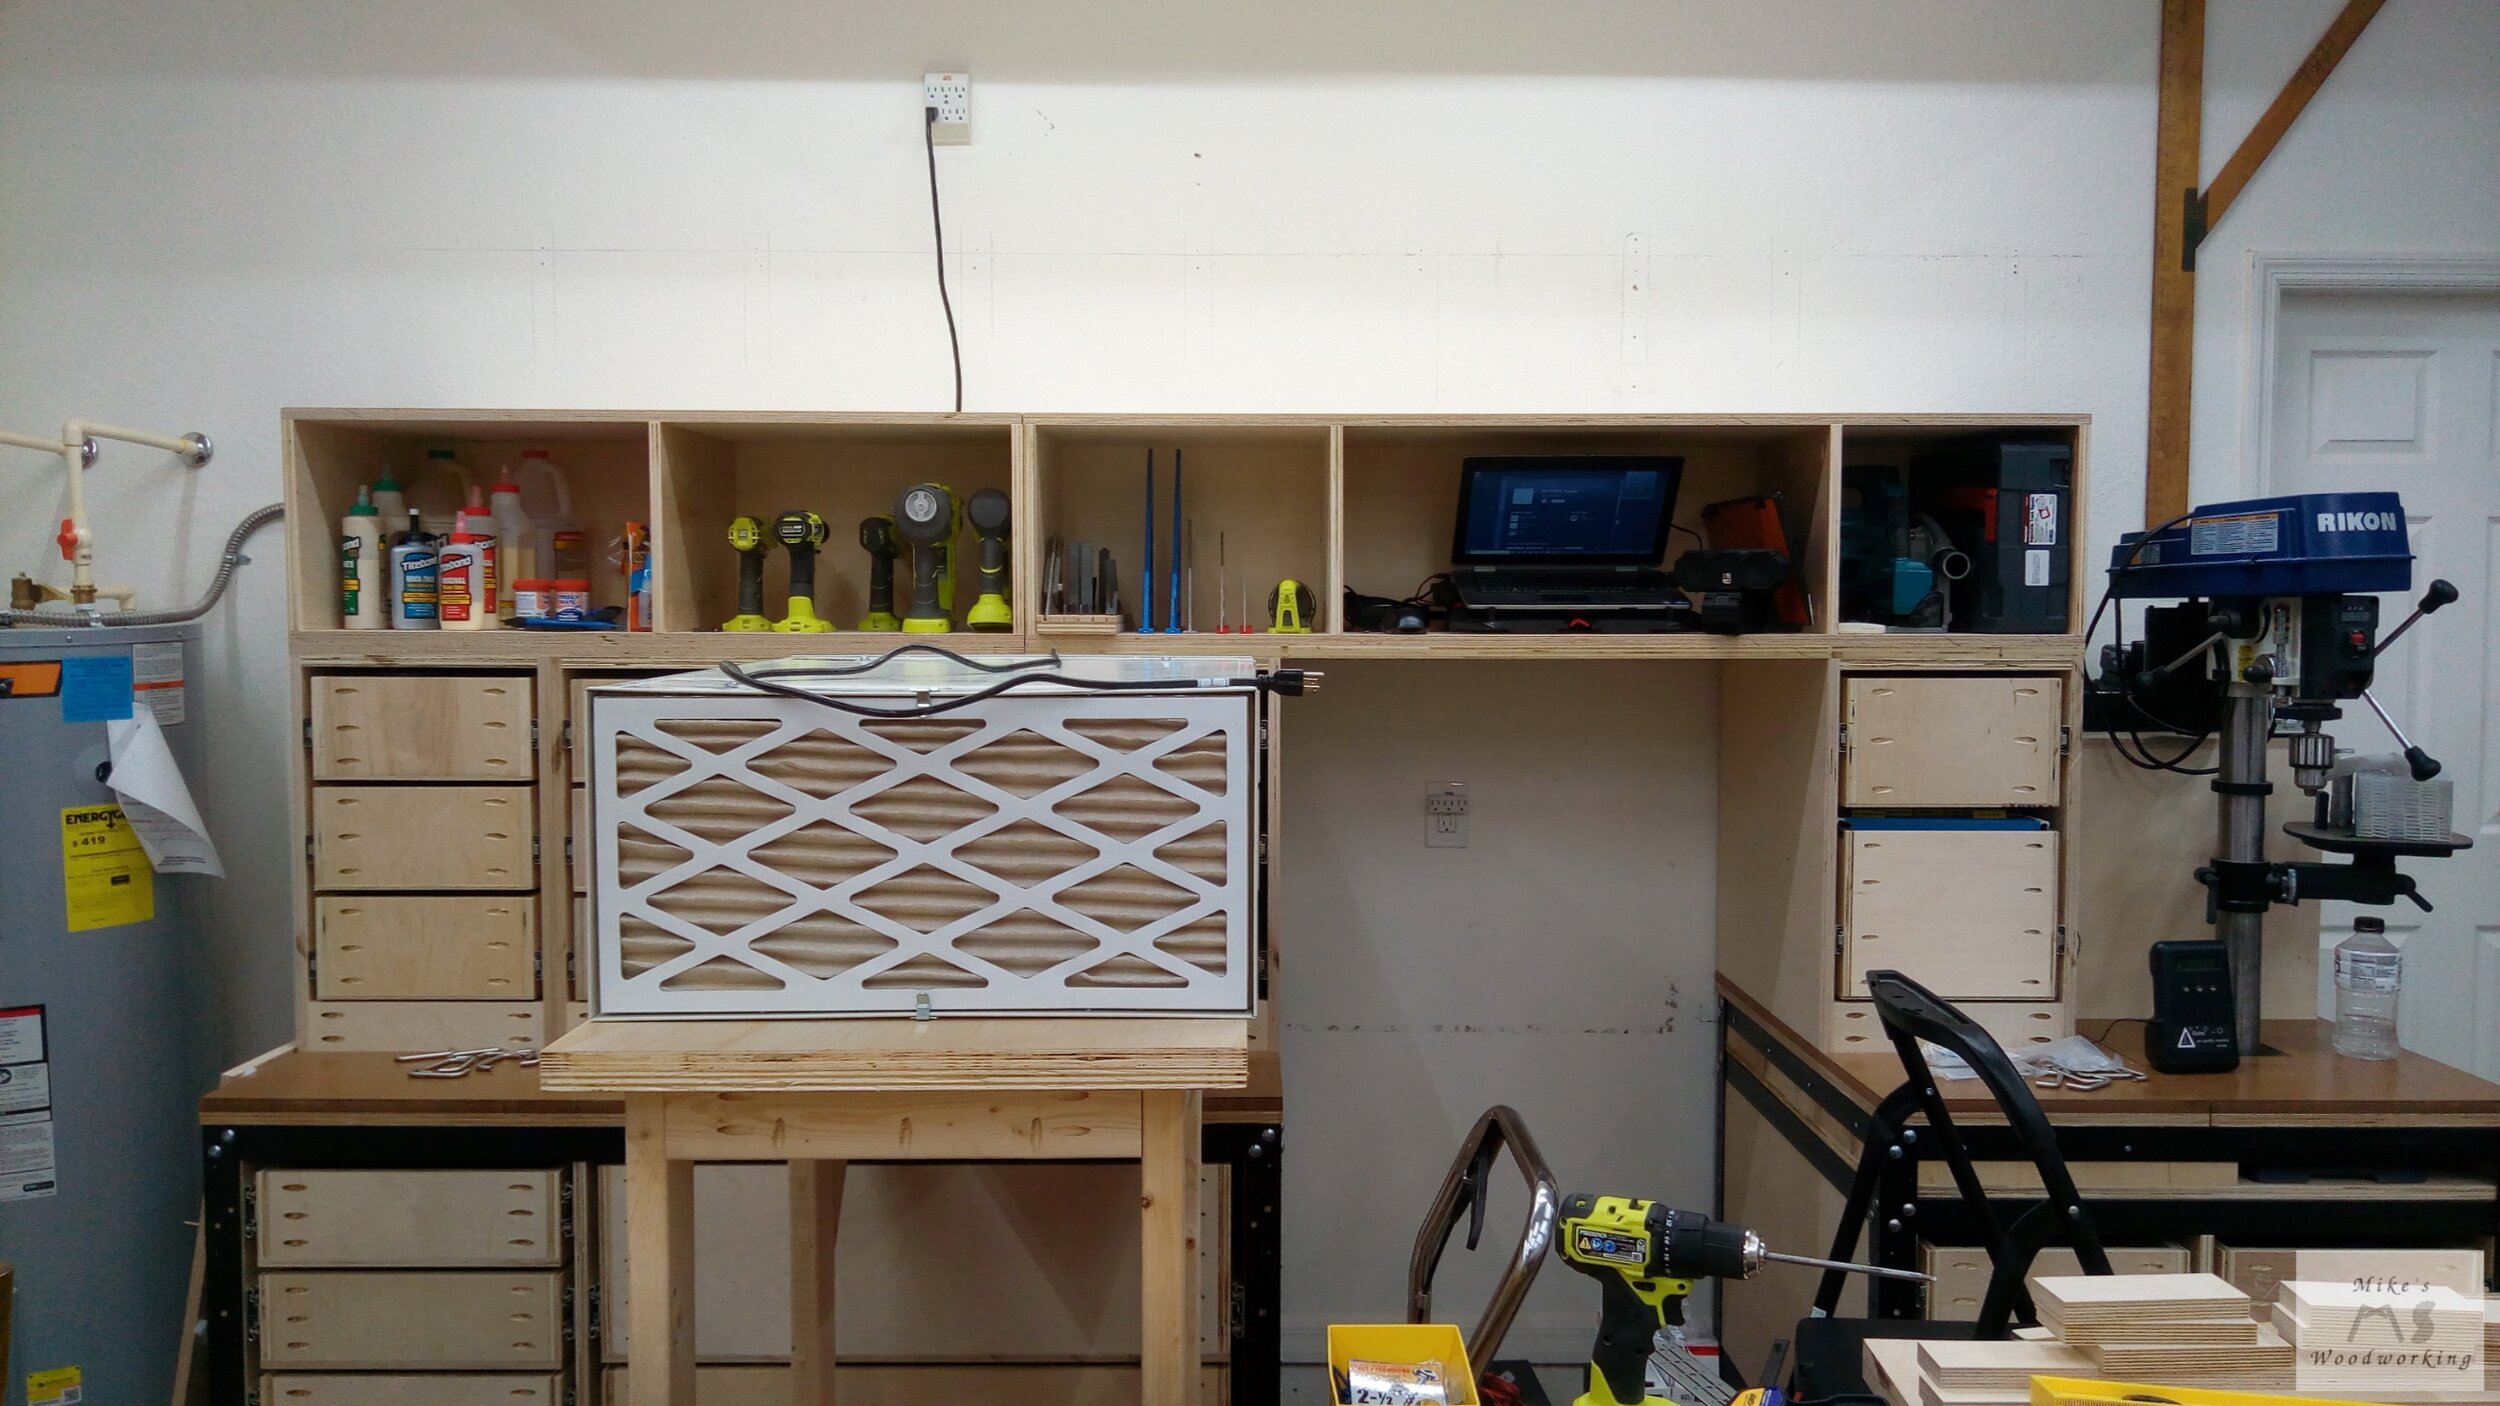

I raised the cart to its maximum height, and began wondering why it wouldn’t reach the top of the open storage. It was then that I realized that I had raised the miter saw station up a little higher when I was leveling the bases, accounting for the couple of inch difference.
Once I got the air filtration unit up onto the open storage, I went ahead and spun it around 180°. In the previous setup, I had my old set of speakers on top and on either end of the open storage shelves. Well, in the process of hooking those back up, the speakers decided to finally die on me. I can’t complain, really. Those speakers were well over 20 years old and I’d LONG since gotten my money’s worth out of them. To replace them, I bought a couple of small wireless Bluetooth speakers and they actually worked out better than the old speakers.

By turning the air filtration unit around, the exhaust was now blowing out into the open shop, instead of blowing against the wall, and I could move it all the way to the end. I hated that the exhaust was always blowing against my TV in the previous configuration, causing it to rock on the wall all the time.
Next up was to get my old TV back into position. Since taking it down in the shop, prior to starting the new miter saw station project, I wound up using the old wall mount bracket and installed it in our spare room for the small TV we have over our treadmill. I instead put the TV in place sitting on its own base this time around. I moved it forward a bit and it seemed to be just fine. I’ll use some pipe strapping to hold it in place to prevent it from falling on me in the future.

After I took the above picture, I noticed that the top for the larger miter saw stand was sagging a bit in the middle. Upon closer inspection I could see that the metal rail was not actually sitting on the divider like I had originally planned. It was down by a good 1/16” - 3/32”. It was the end of the day, and I didn’t want to try and fix this problem at this point in the afternoon, so I left it until the following day. This gave me some time to think about a solution. I slept on it and a simple fix came to me.
First, I would need to remove the large upper drawer from the cabinet. Because these heavy duty slides are all one piece, that meant that I had to remove all of the screws from the sides of the drawer to take it out. With my trusty lift cart in place to hold the drawer, removing the screws was a cinch.
Next up I took one of my Bessey parallel clamps and reversed the clamping jaw. This would allow me to use it as a spreader to jack up the front metal rail. For the rear rail, I couldn’t use a clamp, so I simply wedged in a piece of 3/4” Baltic birch plywood. With both rails lifted into the proper position, I took a measurement of the space between the under side of the metal rail and the top of the plywood divider. I cut two square blocks out of Baltic birch scraps and slid the blocks onto the dividers. I slowly backed off the clamp and removed the rear wedge and the rails held firm in their new positions. With the added leveling feet on the lower front and rear rails, as well as the one I added to the center of the bottom panel, there should be no further problems (fingers crossed).


It’s Time for a Break
***Note: By the time I began to work on the drawer faces, I was well worn out after my first long week in the shop in a VERY long time. I don’t really have any pictures for this stage of the build, other than the finished product***
The last major part in this stage of the build was to cut and install all of the drawer faces. Like with the Rockler Workbench and Rockler Table Saw & Router Cabinet, I was going for a continuous grain look throughout (minus the side drawers).
I had one sheet of plywood slated for all of the front drawer faces, so I had to be very careful in making my cuts so as to keep the grain oriented the correct way. I started with the bottom drawers first. I cut the sheet of plywood into two pieces (upper and lower drawers), then cut the lower drawer section into three panels.
The first panel was for the four deep drawers on the left. I, again, used my Woodpeckers combination square blades as the spacers. These four drawer faces went together rather quickly and with little fuss. Next were the two large drawers. I’ve always had problems with large drawer faces and them being all wonky and cockeyed. This was before I had proper crosscutting sleds for my table saw. I gathered the critical measurements and made my cuts with a combination of the rip fence and panel-cutting sled. After installing the faces, these came out just as good as the first set, and the grain flowed quite well. It was a little off because of more cuts having been made on the first set of drawer faces, but that was to be expected.
I moved over to the right side of the miter saws station to install those faces next. All six drawers were the exact same size, and the dimensions of each row of drawers were exactly the same. This made cutting very easy. I made one small mistake on one set of the drawer faces, but it was easy enough to fix. I starting making a cut, but about 2” in I realized I forgot to change the rip fence. Mistakes will begin to become a theme as I continue.
I trimmed off the small sliver from the erroneous cut and just pressed on. I finished the final six lower drawers and the bottom cabinets were finished (minus hardware). It was lunchtime by this point, so I would tackle the upper cabinets after I ate.
Once I got some food into me, I set out to finish the rest of the drawer faces before the day was done. I cut the large panel into four smaller panels, one each for each section of drawers. The upper left faces went much like the first set on the lower cabinets. When it came to the wide middle drawers, this is where things started to go off the rails with the rest of the day. Even after having marked all of the panels with how they would be cut (each row of drawer faces would be the same height), I somehow managed to have the middle panel oriented 90° from where is should have and I cut the drawer face in the wrong direction.
To say that I was pissed off would be an understatement. There was no salvaging the panel to finish this set of drawers. My beautiful continuous grain was out the window and I was consigned to using some scrap plywood for the middle drawers. After cutting these to their proper sizes, I installed them and moved on to the next section.
The drawer faces on the right could not be flush with the sides of the cabinet, else they might interfere with the dust hood that still needed to be built and installed. I opted to cut them 1/8” shorter than originally anticipated. These last three drawer faces went in without issue, and I could move on to the final set of front drawers…the file cabinet drawers.
The file drawer faces were more or less a repeat of the previous drawers. I left the faces 1/8” from the side of the cabinet that would be next to the dust hood. By this time, I was already whipped after a VERY long week. I decided to just soldier on and finish the final four side drawer faces to just get the job done.
The three smaller drill press drawers were quick and easy to install. Despite my attention to detail starting to wane, I did manage to remember that I had to cut the drawer face a little shorter on the right side so as not to interfere with the door jamb. The larger lower drawer was the last one to go in, and thankfully it didn’t put up too much of a fight. After my longest day in the shop in a few years, all of the drawer faces were finally installed. The following Monday, after a very restful weekend, I finished off the drawer faces with the drawer pulls. The miter saw station was nearly completed at this point. After wearing myself out more than I should have, I took a week off from the shop before proceeding further.


A HUGE Mistake Was Made
After taking a week off from the shop, I got started on the final portion of this massive project…the miter saw shelf and dust hood. As I stated earlier on, I’m building this based on the plans and design of Justin Depew. Because of this, I’m not going to be able to give exact numbers for a lot of things as they were part of Justin’s paid plans. In addition, I’ve had to alter his plans a bit as his were for his regular compound miter saw, whereas I have a sliding one.
I double-checked my measurements for the space between the two miter saw station stands. Because of the design of the metal legs and rails of the stands, I had to account for the head of the carriage bolts in my measurement. This knocked down the space between the stands to around 32-1/2” (that was a little less than I needed, but I wanted some wiggle room). The distance front to back was around 36”.
The top and bottom of the miter saw shelf assembly were carbon copies, so I cut those out at the same time. Next were the sides, back, and middle divider for the dust drawer/down-draft sections. With those pieces cut and secured to the bottom with pocket screws, I could work on the two cleats that would support the entire miter saw shelf/hood assembly.
Because of the weight of the saw and all the plywood for the shelf/hood assembly, I went with a double lamination of Baltic birch plywood for these cleats. This would give them excellent strength and allow me to firmly secure them to the sides of the work stands. To get them in the correct locations, or at least as close as possible, I set the miter saw shelf on my Rockler Workbench with the saw on top of it and measured down from the miter saw to the workbench. This would give me the distance from the work stand tops to the tops of the cleats. Using my lift cart, once again, I was able to get the cleats into their approximate position. With my combination square set at my needed measurement, I tacked the cleats into place with a couple of 2” brads. I double-checked everything one final time and then secured the cleats firmly with some 2-1/2” screws into the sides of the work stands. These things weren’t going ANYWHERE.
I hadn’t attached the top of the miter saw shelf at this point, as I needed to make A LOT of modifications to it first. Nevertheless, I set the miter saw shelf onto the cleats and placed the miter saw on top. I checked how level the top of the miter saw was with the work stands, and they were off just the tiniest bit. I could easily use some shims to get them to the correct height later on. I then tried moving the saw to 45°…RUH ROH!!!

During the design phase of the entire project, I never took into account moving the saw to 45° when setting the locations of the upper drawer cabinets. On the old miter saw station, there was a gap of a few inches between the sides of the upper and lower cabinets. Those allowed for the saw to make those miter cuts without issue. I had eliminated those buffer areas to give myself the extra drawer space in the upper cabinets, failing to realize that it would affect the operation of the miter saw for larger angled miters.
Based on where I had the saw on the shelf, I could turn the saw to the left and make a full 45° miter, provided I took off the dust collection hose off the back of the saw. Turning the saw to the right I couldn’t even make it to 40°. No matter how I repositioned the saw, there was no way to have the saw hit both 45° marks. I just kind of sat in the shop for a few minutes and wondered what my next course of action would be at this point of the project.
After a few minutes of contemplation, I came to the conclusion that it simply didn’t matter if I could hit 45° both ways or not. About the only use the miter saw sees is the breaking down of larger rough stock into more manageable pieces. I’ve stopped using it for fine cuts as I don’t seem to get great/consistent results with the saw (I use my table saw sleds for this now). I would be using the saw for straight cuts 99.9% of the time…time to move on.
HOLES…THEY’RE EVERYWHERE..AAAAAAAHHHHH!!!
With the miter saw adjustment fiasco now behind me, I needed to finish the top of the miter saw shelf. Where the bottom needed only one modification in the form of a 4” hole for the dust collection, the top was a whole different story. I needed one 2-1/4” hole that would connect the Rockler FlexiPort hose to the miter saw, and a TON of 3/8” holes that would act as a down-draft table to collect the finer airborne dust. In addition, I needed to cut a hole under where the miter saw would sit to allow any dust to fall into the drawer that will be under the saw.
I started by getting the saw into place where I wanted it and marking where the outline of the saw would be. Then I could measure for the location and diameter of the opening under the saw. After screwing up the marking of that hole three times with my compass, I made sure to mark the correct one with a marker.
The down draft section was a bit more complicated. I needed to drill out a number of holes that would correspond to approximately the same area of the 4” dust collection port on the bottom of the miter saw shelf. This came out to be around 120 holes, not including the 2-1/4” one I mentioned previously (in retrospect, I probably should have included the area of 2-1/4” in my calculations).
Needing all of these holes to have an even spacing, I figured on a grid that was six holes deep and 20 holes wide. I laid out my grid with my longest Incra ruler and a combination square. Once the grid was established, I punched a small starter hole in with my awl at each intersection. Even though I would be using a brad-point drill bit, this would give me a definitive starting point for each hole.
Before I began cutting ANY of the holes in either the top or bottom, I decided to apply a couple of coats of shellac to both sides of the down-draft area of the top, and the entirety of the bottom. I really liked how slick the finish was on the shellac after a light sanding of the second coat, and I figured this would allow the dust to find its way to any one of the holes a bit better.

The application of the shellac seemed to go a bit better this time around on the plywood as compared to the MDF of the tops. I’m not sure if that was due to the difference in the materials, or if I just got a little better with my brush strokes (or maybe a bit of both). At any rate with the finish fully dried, I went about drill/cutting all of my holes.
For the 2-1/4” and 4” holes, I opted to go with a hole saw to make these cuts. Since the 2-1/4” was for a hose fitting, I wanted it to be as uniform as possible. The 4” didn’t need to be perfect, but I figured I’d just get better results than with the jigsaw. The 2-1/4” hole wasn’t too bad to drill out, but that 4” one nearly broke my wrist a couple of times when cutting that one. I made sure to run my drill at a much slower speed, given the size of that hole saw. I got both holes drilled out and they came out great. I sanded the edges on both sides and they were good to go.
Now it was time to drill all 120 of the 3/8” holes for the down-draft section. I could have just clamped the panel to my workbench and simply drilled out the holes while the plywood was overhanging the bench. This would have resulted in a lot of blowout on the back (even with Baltic birch), so I decided against that. Instead, I put a piece of scrap plywood under each row of holes and drilled them out that way. This all but eliminated the blowout and resulted in very clean holes. Once those were done, I went around to each hole (on both sides) and ran a countersink to soften the edges.
The hole under the miter saw was almost 12”, so there was no way of cutting it other than with a jigsaw. I hate using a jigsaw, especially the one that I have. It’s just the cheap Ryobi one that came with the tool kit I bought a number of years ago. On top of the tool not being that great, I’m still not very good with using a jigsaw either. I drilled a starter hole and slowly made my way around and finished the cut. I tried my best to stay on the marker line, but I strayed away a few times (again, a combination of a shitty saw and below average skills with it).


And Now, To Top It All Off…
Now that all of the holes have been drilled, it’s time to get the dust collection drawer/downdraft table secured into place. I could not secure the top into place just yet as I needed access to the bottom in order to secure the assembly in place on the cleats. Only six screws were necessary.

Next up was the top portion. Given that I couldn’t see the top’s position in relation to the sides nearest the wall, I did my best to align everything evenly. Once lined up, I used six more screws to secure the top into place along the sides, with a few more into the divider between the down-draft section and the dust drawer.

The only major thing left was to install the dust hood. The hood is comprised of four pieces: two sides, a back, and a top. I made sure to make very careful measurements when it came to these four parts. The two sides and top share a common dimension with their depth, and the sides and back share a common dimension with their height.
Because of the size of these parts, I couldn’t safely use my panel-cutting sled on the table saw to make square cuts. Instead, I used my track saw track with the track-square attachment to make things easier. First, I cut off the rough factory edge of the plywood on one side with the track saw. Then, I could reference that new fresh edge to make a cross cut at a perfect 90° to the first cut. This gave me a perfectly square corner that I could used against my table saw fence to give me guaranteed square pieces.
The sides and top were cut first, again, as they shared a common dimension. Next I cut the sides to the exact height I required. Given the measurement of the opening, and the thickness of the top, I set the fence just shy of that mark (a bit of wiggle room). As the back had this same dimension, I made that cut as well.
The width of the top was dictated by the width of the bottom section that was already in place, so that cut was made next (about 32-1/2”, in my case). The only thing left was to cut the back piece to its final width. This needed to be a very specific measurement based on the width of the opening (32-1/2”) and the thickness of the two side pieces. I set my table saw at 32-1/2” and measured the thickness of the two sides with my calipers. Thankfully, it came to an exact number I could easily reference with the rip fence. I made the cut and the dust hood was almost ready for assembly.
Before going any further, I wanted to make sure everything was going to fit into place. I slid the two sides into place and pushed the back all the way against the wall (almost, there’s still an outlet there) between them. Things were looking good so far, finally it was the top. I got the top in place and it would sneak into place by the smallest of margins. It went it snugly, but I didn’t need any added force to push it into place. It fit, dare I say, LIKE A GLOVE!!!
With confidence in everything fitting properly, I needed to figure out how to attach everything together. The back fit in between the sides, so pocket screws from the back into the sides would work there. The top would sit on all three of those pieces, so the back would need more pocket screws, and the sides would need them as well. All of the pocket holes would be on the outside of the dust hood as it afforded the most material into which to bite. Plus, all of the pocket screws would be hidden by the cabinet and wall anyway.
I carefully laid out all of the holes and got everything put together again. Maneuvering this monstrosity into place was no easy task. It was beyond awkward and was still a little flimsy on the front as the sides could still flex a bit. As with most odd tasks in my shop, it was the lift cart to the rescue once again. I got the dust hood moved from the workbench to the miter saw station and got ready to push it into place. It felt like it wanted to get stuck at the top on the left side, but it was able to slide in without further issue. It was a nice tight fit and would serve as a great way to mitigate the cloud of dust that the miter saw can create.
I took the dust hood back out as I still needed to cut the opening in the back for the outlet on the back wall. I opted to wait until the whole assembly was put together before cutting the hole. This would allow me to make a more accurate measurement to lay out the hole prior to cutting. With one of my rulers, I took the measurement from the left side of the down-draft table to both sides of the outlet cover. I used another ruler placed against the outlet plate to give me a clear line from which to measure. I also made note of the location of the top and bottom of the plate as well.
I took the dust hood out one final time and set it back onto the workbench. With the measurements in hand, I laid out for the outlet plate on the back of the dust hood. I gave myself around 1/8” buffer all the way around in case things didn’t quite line up properly once getting the hood back into place. This cut was going to call for the jig saw again, but in a vertical position this time around. I’m already not great with a jig saw, and that’s on the horizontal plane.
I drilled holes in each corner so as to negate the need to turn the saw while cutting. I made the four “straight” cuts as best as I could, and the final cut led to the piece falling to the floor. One side of the opening wasn’t quite on my line, so I tried to sand it back a little bit just to make it a bit more even. Once back on the down-draft table, the dust hood was slid back into place once again. It was pushed all the way back to the wall and the fit was pretty good. If I’d made my cut on the left side more along the line, it would have been a perfect fit. It still sits flat against the wall, in the end, so it doesn’t really matter.
I was almost done with the dust hood now. I still needed to secure it in place. I could have used pocket screws, but the angles of the hole would have meant the screws were not grabbing into a lot of material. Instead, I simply went with the method employed by Justin Depew and attached a few blocks to the sides and back (via pocket screws) and screwed the blocks into the top.
With the dust hood secured in place “permanently” (we all know things will likely change in the future…they always do), all that was left was to get the miter saw secured into its final location. I had previously screwed it into place prior to installing the dust hood (didn’t think that through at that moment), so I simply put the saw back where it was and used the same screw holes.
I used a couple of copper pipe straps to secure the bulk of the power cord against the back of the dust hood. This would keep it from possibly covering any of the down-draft holes, while still giving it the ability to move with the saw (which likely won’t ever happen). Finally I used a Rockler FlexiPort hose cut down to size and inserted the one end into the down-draft table and used the largest attachment head for the miter saw dust collection port. Again, this still gave me the flexibility to move the saw from side to side while still providing dust collection (although at limited angles).


I Can See the Finish Line
The last pieces of the miter saw dust hood puzzle are the removable panels that flank either side of the miter saw. This closes the open space even further providing that much better fine dust mitigation. I first cut two panels that were the proper width to cover the open space on either side of the miter saw (between 10”-11”). Then I took the time to measure all of the different twists and turns from the bottom of the saw to the top of the fence. I laid out these measurements on each panel and made those cuts on the band saw. The final results are shown below.

The removable panels are just resting against the hood at this point.
There are a few small gaps along the sides of the saw, but I was NOT going for a perfect form-fitting at this point. The panels will close off the vast majority of the open space, and that will suffice just fine.
Next up were the addition of the side wings which attach to the back of the removable panels. All of my measurements were loosely based on calculations made in Justin Depew’s PDF plans, which I filled in quite a while ago. Things have changed in this build since the beginning, so some of those numbers aren’t really valid anymore.
I opted to use MDF for the side wings. The width of a piece of scrap I had was perfect for this application, plus I wanted to use up some of the MDF anyway. I attached the side wings to the removable panels with pocket screws.


The panels were, for all intents and purposes, done. The only thing left was to figure out a way to attach them, but still have them removable. The original plans by Justin called for the panels to be attached with some star knobs on top, but this was not an option for me because of the limited space above the dust hood top. The only way I figured this would work is with the use of some rare earth magnets. Since I’m using 3/4” plywood for everything, a few 1/2” magnets in the right places ought to have enough holding power. I headed off to Rockler and found some 1/2” x 1/8” rare earth magnets which would be perfect.
I set the panels into place and marked, on both the dust hood and the panels, where to place the magnets. With a 1/2” forstner bit, I carefully drilled a hole in each location on the hood panels. I went a little at a time and tested the magnets to make sure I wasn’t going too deep. Next I made the corresponding holes on the removable panels. On the right-side panel, I needed to add a strip of 1/2” plywood to the back as the panel sat behind the fence when in its proper place. I would drill the holes for the magnets into these strips instead.
To hold the magnets in place, I knew something like super glue would not provide enough long-term holding power. With the prospect of repeatedly removing the panels ever present, I went with epoxy instead. I picked some up while I was at Rockler getting the magnets. With the epoxy injected into each hole, and a magnet carefully placed in each hole, I slid the remaining stack of magnets off, leaving the lone one in place. I put a little too much epoxy in a couple of the holes, and it oozed out a bit, but it was easy enough to wipe off. All of the magnets went in without issue, and I decided to leave them to sit overnight, ensuring plenty of time for the epoxy to cure.


While the epoxy was curing, I still had to make the dust drawer below the miter saw. This was relatively simple to build. I had plenty of scraps from the previous Rockler projects laying around, and I quickly through the drawer together. Nothing special here, just pocket screws and brad nails (no glue at all). This wasn’t going to be subjected to any real force, so glue wasn’t necessary.


The next day, with the epoxy plenty cured, I decided to give the magnets a shot and see how well they held the panels in place. I made sure to keep my fingers away from anywhere they could get pinched, knowing these magnets have a strong attraction. I got the left panel into place and it snapped in quite nicely. It wasn’t a super strong attachment like I’d anticipated, but it held its own quite well. The same went for the right panel. It was easy enough to remove both panels by just tipping them backwards from the bottom. I was worried I might need to add a knob or something else to remove the panels, if the magnets were too strong, but that wasn’t necessary.

The final pieces to make were the hinged panels that enclose the open space above the miter saw when it’s in the down position. Again, the measurements I had from the original plans were used, but I had to cut each panel by a couple of inches to make them fit properly. Luckily, I had a couple of piano hinges laying around that I simply cut to fit with some tin snips.

To fill in the small gap beside the hinged panels and the side wings, Justin called for simply using some duct tape attached and formed using a dowel. Because I was using 3/4” vs 1/2”, like in his plans, this didn’t really work for me in this situation. Instead, I cut a couple of pieces of vinyl tubing and used the duct tape to attach that to the hinged panels. This sealed off the gaps quite well. I needed to use two different sizes of tubing as I didn’t quite get the hinged panel centered in the opening. To attach the hinged panel to the miter saw, I used a combination of a large book ring and a zip tie. There was no other convenient method of attaching the panel, plus I needed to make sure it would work when the saw was slid all the way out.

The dust hood is now finished. The lone remaining item to more or less complete this build was to make a groove in the top of the 60” top on the left side of the saw to accept some t-track so that I could still incorporate a stop-block. Cutting the groove was a piece of cake. I simply ran my router, with a 3/4” straight-cutting bit, along the front of the upper cabinets, all the way across. I had one long piece of t-track and two smaller pieces that filled the gap perfectly. With the tracks secured into the top with #6 x 1” screws, and the use of my old stop block (which needed a little sanding on the runner), the miter saw station build was now complete, save for some trim along the front edges (to be done at a later date).


With the dust hood finished, this brings an end to the functional build for the miter saw station. As I said, the trim still needs to be added, but that is not essential to the miter saw station’s functionality.
I have provided an overall wrap-up of all three Rockler projects and that can be found here.
***UPDATE: June 2023***
The Rockler Miter Saw Station was the last of the trio or Rockler Workshop projects, and it was the most labor intensive. I was getting severely burned out towards the end of it, causing a few mistakes along the way. Thankfully, none of these mistakes were detrimental to the actual function of the project as a whole.
The biggest faux pas during the whole build actually took place in the design portion. I neglected to take into account the space required to turn the miter saw to 45° in either direction, and the box wound up just a bit too small. I can still turn it to one side (I don’t remember which), but I’ve yet to need this function in the preceding two years.
As of now, the miter saw is used almost exclusively for the breaking down of rough lumber. I simply don’t trust this saw enough to make extremely accurate cuts. I leave that kind of precision work to my table saw with the use of sleds.
The Justin Depew dust collection enclosure works very well at limiting the amount of dust accumulating on the miter saw station as a whole. There will always be some small bits that get strewn about, but it’s nothing like it was in the past. The drawer under the miter saw works great for collecting all of the dust that falls between the throat plate.
Not having a measuring tape for my stop block hasn’t been a problem either. As I’m working with rough lumber, I don’t need super accurate cuts. Just running a tape measuring off of the insert plate and locking the stop block at my mark is more than sufficient.
The drill press back on the miter station has worked out great thus far. Having the drill press base sitting below the top was a great move as I’ve needed that space frequently when breaking down long boards. Also, not having the mostly stationary drill press cart on the shop floor has freed up much needed space.
Going with the long heavy-duty drawer slides for the base stands was definitely the right move. It’s been nice having access to ALL of that space. I haven’t needed most of the dividers I made for the drawers, but I’ll have them should things change in the future.
And, lastly, much like the Rockler Workbench, I have not installed the hardwood trim on the front edges of the two tops. The shellac has held up remarkably well, and I just don’t use the top enough to bother with the trim.
Overall, I’m very happy with this new miter saw station. It functions exactly like the old one, only it offers some much appreciated improvements, mostly the greater dust collection and the deeper drawers.
I don’t anticipate needing to change anything with this workstation in the foreseeable future.