
Finishing Station
Back in June 2018, when I was in the planning stages of my miter saw station, I figured on applying a finish to the whole thing to give it some protection. With that in mind, I bought an Earlex Spray Station HV5500 from Rockler. I really wanted to get a handle on how the thing worked by using it on some shop projects before using it on nicer things. However, like all things planned, this didn’t quite happen. I never wound up applying a finish to ANY of my shop projects. In fact, the only finish that had been applied to anything was some pink paint to the cancer ribbon frames and some rattle can lacquer for the Air Force seal frame.

In all of that time since I’d bought the Earlex, it was still in its original box sitting under my miter saw station, along with a bag of other accessories I bought along with the sprayer. I was in the middle of reorganizing my shop and I wanted to do something with the Earlex. I needed to find it a permanent home where it would be fully assembled and its accessories would be at the ready WHENEVER I finally got around to actually using it.
It was around the time of this shop reorganization that I watched a video by Steve Ramsey at Woodworking for Mere Mortals where he mentioned the new Ultimate Mobile Finishing Station he made. He had detailed plans and videos on its construction as part of his new Weekend Workshop course. I really liked the overall design, so I went ahead and paid for access to the course and quickly downloaded the plans and Sketchup file he included with all of the projects.

Steve Ramsey’s finsihing station
Change it Up
Steve’s finishing station had storage on both the front and the back for various items. On the front there were sections for rags, foam brushes, tape, gloves, common chemicals for finishing, paper towels and a roll of kraft paper. I liked the layout and look of this section, so I decided to leave that alone.

On the back side, there was a single door which covered a set of three shelves which could store anything from paint and finish cans to more rags to whatever else was needed. The design of the back of the finishing station was where I decided to focus my attention to tailor it to my needs.
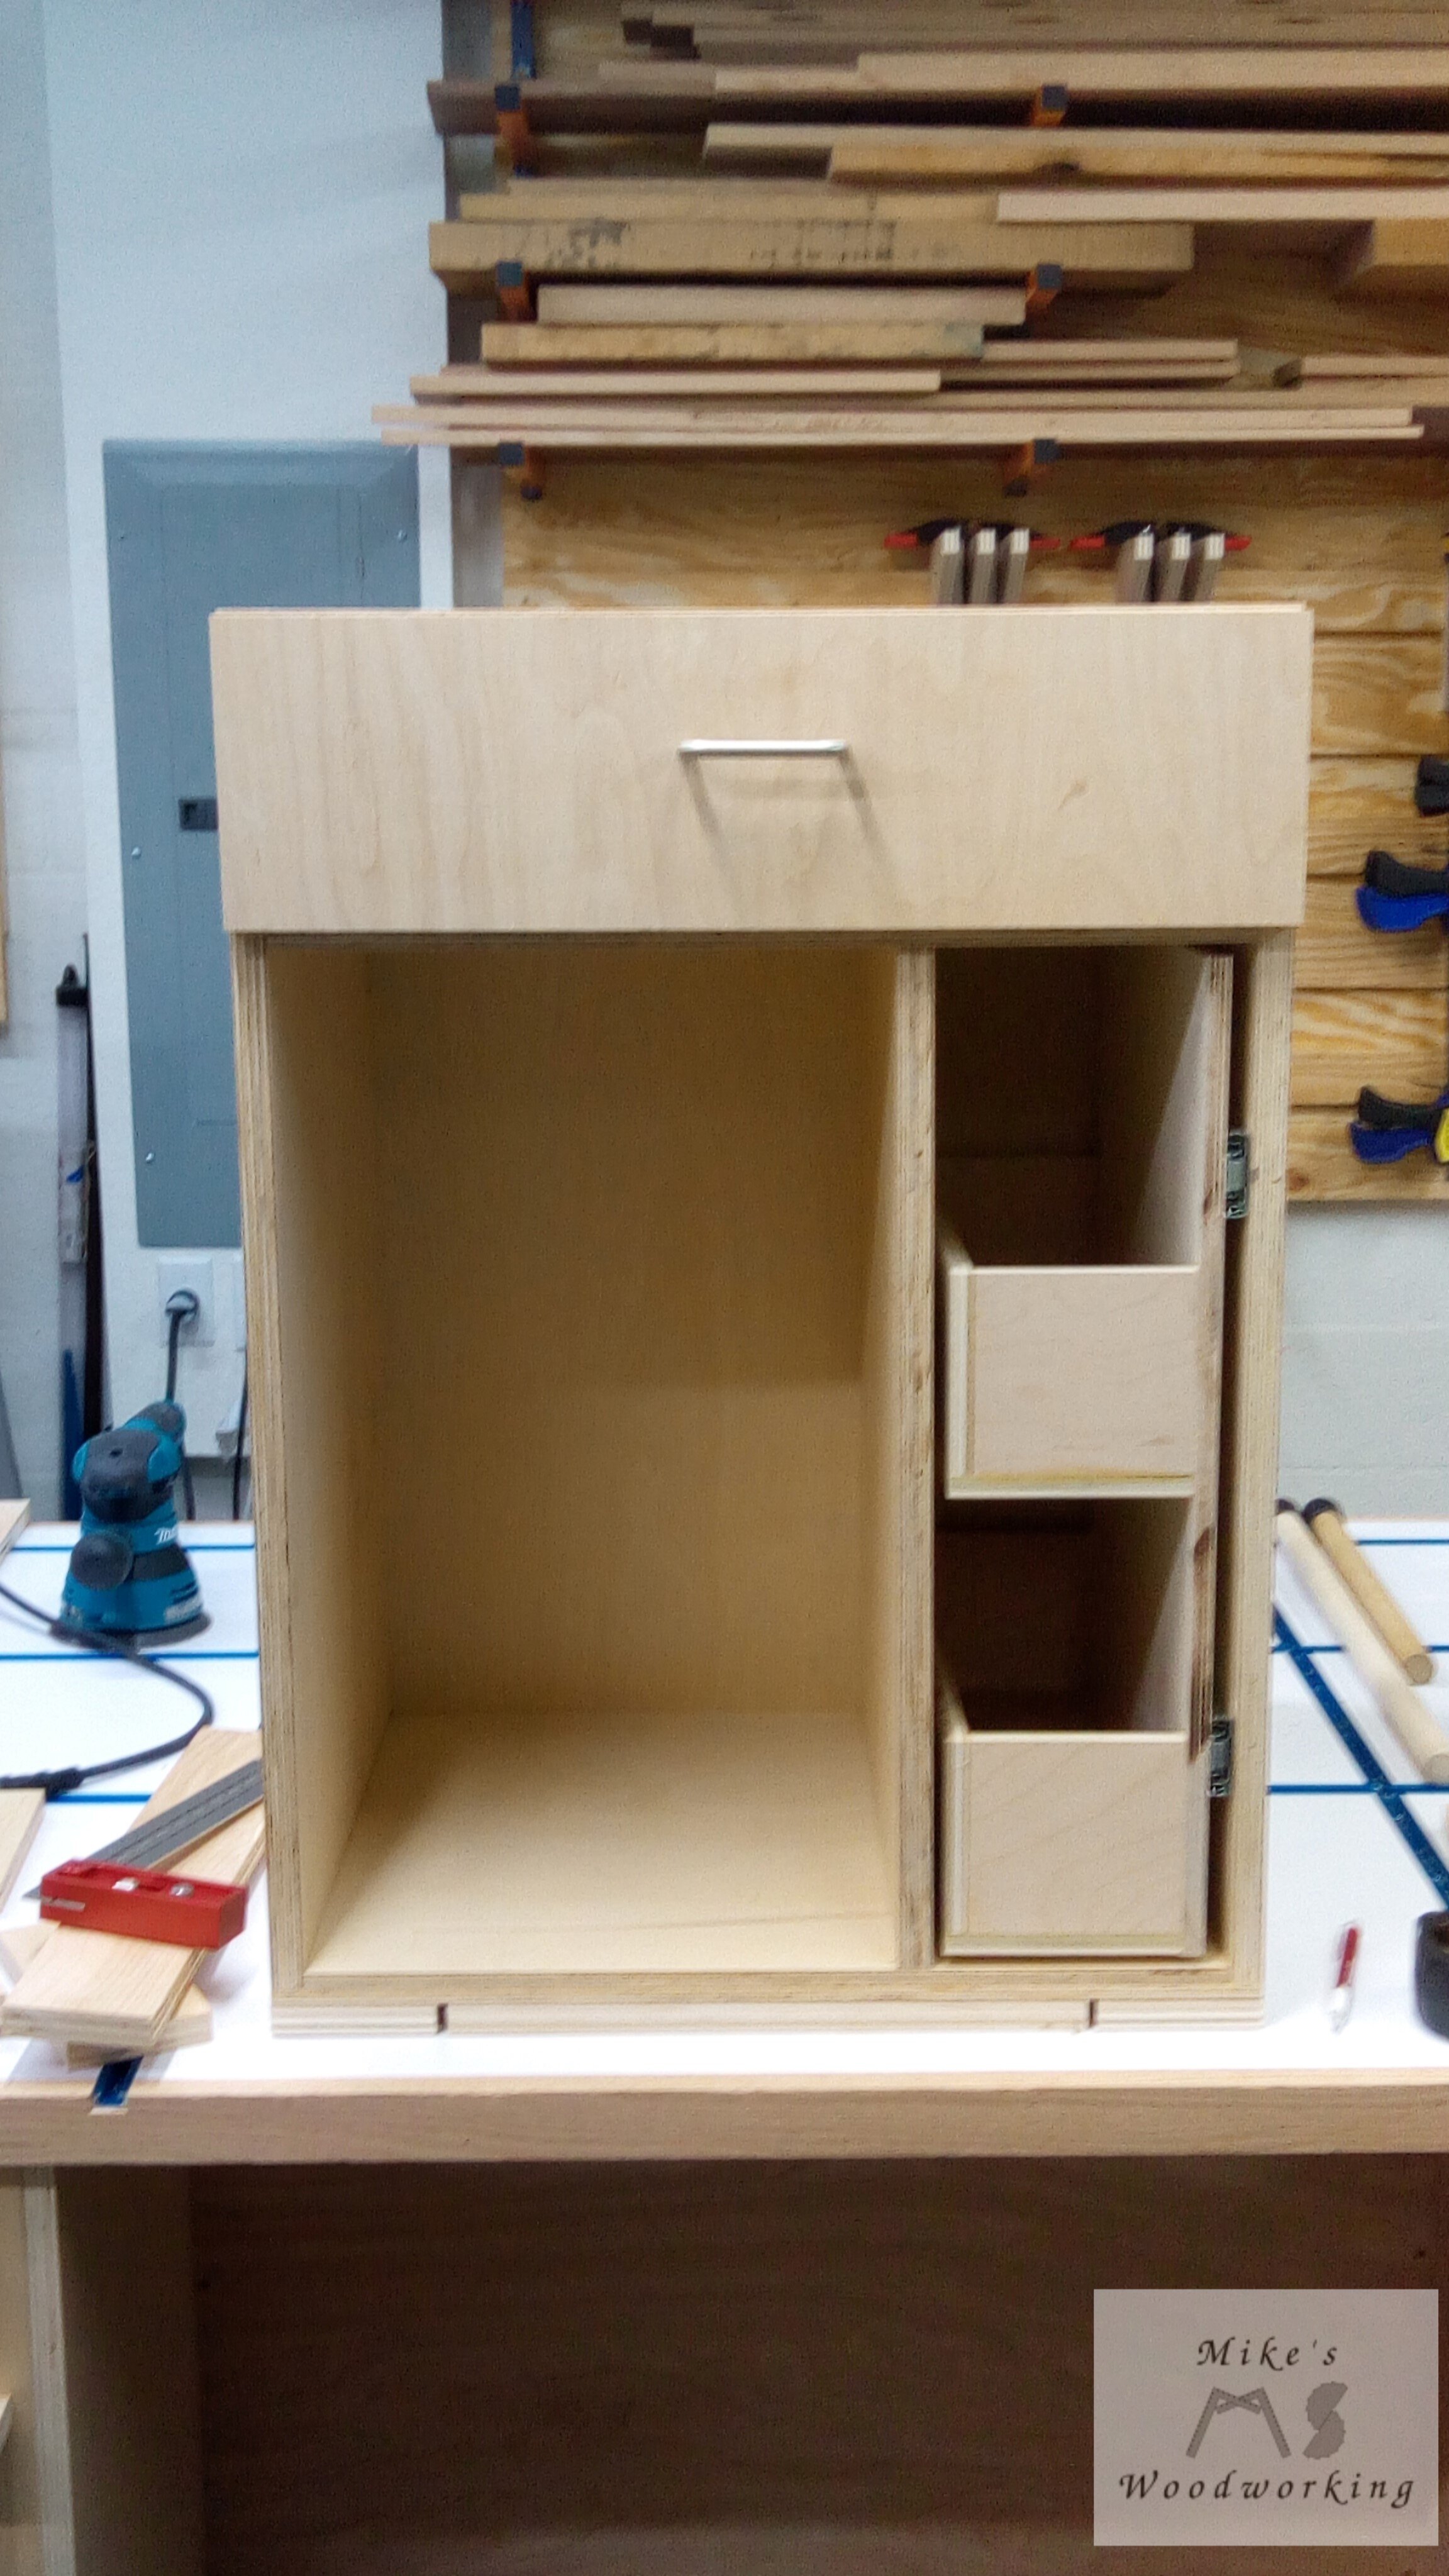
After a lot of messing around in Sketchup, I decided to go with what is pictured below. I would have a single drawer on the top. This would hold the accessories for the Earlex as well as a set of bench cookies and points for finishing projects. In the lower section, I still had a door, but it was only around 2/3 the size of the original. Behind it would house the fully-assembled Earlex and that’s it. The other 1/3 section remaining would be a vertical pull-out drawer. In this drawer I could store small paint cans and cans of spray paint/lacquer. The overall dimensions for my finishing station were slightly larger than Steve’s due to the modifications I needed to make.


I was very happy with this new design so I went down to Hardwood Lumber & Millwork to grab my supplies. I don’t even much bother with Lowe’s and Home Depot for full sheets of plywood anymore. The quality is always better at Hardwood Lumber & Millwork.
Pocket Screws Aren’t Real Woodworking (says so many “real” woodworkers)
The plywood breakdown was pretty simple. For the carcass of the main cabinet, there were a total of five pieces: left side, right side, top, bottom and divider panel. I separate the sides as individual pieces as they are not identical parts. The sides needed one common hole drilled into them to hold a dowel for the craft paper. The left side needs another hole for another dowel which only goes about 2/3 of the way across the cabinet. I marked for all of the holes and drilled the common one with both sides clamped together. This ensures they will line up once the cabinet is put together. The single hole was drilled in the left side separately.
The construction of the carcass relies entirely on dados and rabbets. The two sides each need a single dado cut to allow for the divider panel. The top and bottom panels each got a rabbet on opposing sides and a dado running perpendicular to the rabbets for the divider panel. I laid out all of the rabbets and dados carefully before I even did any setup on the table saw. I wanted to make sure that all of the dados for the divider panel matched on both sides and top/bottom pieces. With all of the dados marked, I set up the dado set in the table saw and got the correct width for the plywood I was using. This is one drawback to using the dado stack with plywood. No two pieces of plywood are going to be the exact same thickness. The dados were cut without incident and I moved on to cutting the rabbets. The height of the dado could remain the same, but I need to add a sacrificial fence to the table saw to allow putting the fence right up against the blades. After a couple of tests, I got the rabbets dialed in and cut those as well.
This was the first moment of truth for this project...the dry fit. I hauled the top, bottom and sides over to the assembly table and got them clamped together. Everything looked pretty good, so now I could measure for the vertical divider. I had to wait to cut the vertical divider to proper width and height to allow for the dado depth not being exactly like the Sketchup plans (I’ve made this mistake before). After sizing the vertical panel, I took the top off of the carcass, slid the vertical divider in place and replaced the top. Drumroll please...IT FITS!!! All of the extra time I took to size the dados and rabbets paid off in spades. After the problems I recently had with the scrapwood storage cabinet and the table saw & router cabinet, I didn’t want to be hammering things in place or having to over clamp everything. The fit of all five parts was, dare I say, perfect.
Pocket Screws Make Woodworking Easier
Next up was to assemble this thing. The carcass was going to be held together with only glue for this project. This was partly why I needed to make sure everything fit really well. Because of the proper fit of the parts during the test run, I was going to glue it all up at the same time. I formulated a strategy and got all of my parallel clamps at the ready. I was only using Titebond I on this glue-up so I didn’t have a lot of time to futz with things. Thankfully, my plan worked out great and I got the entire cabinet glued together without any incident. I left it and the 12 parallel clamps to sit overnight.


After removing the clamps, everything was still looking good. Next up was to get the various divider pieces for the front cut to size and put together. I just used pocket screws for these since there were no real stresses being put on these joints.

For the back of the cabinet, I first needed to cut to size a shelf to divide the drawer space from the rest of the storage space. This was easy enough and with the aid of a couple of spacers I got it screwed into place from the outside of the cabinet. Next up was another shorter vertical divider to separate the Earlex from the paint drawer. Again, nothing mind-blowing for this construction either.
All of the rear space was now divided up, so it was time build the drawers. The accessories drawer was easy...just another pocket hole drawer there. The vertical drawer for the paint cans was a bit different. Both holders were just small boxes made from 1/2” plywood scraps. I only used glue and brad nails to hold things in place. I got the boxes put together and then laid them spaced them out on the drawer panel to make sure I can easily add/remove spray paint cans. I glued and clamped these in place. After the glue dried I installed both of the drawers and moved on to the small door.


Shaker...Not Stirred
I decided long before I starting actually building this project that I was going to make a simple framed door with a hardboard panel. After watching a video by Marie at DIY Montreal for making a shaker-style door, I wanted to give that a try. I’d never made this type of door before and it would be good practice. The step-by-step process laid out in the video made for easy following. Overall, the process wasn’t too hard, just really tedious. Making a ton of small cuts to creep up on the perfect fit was very tiresome. To make matters worse, I was done with the stiles and almost done with cutting the grooves on the rails when I made one final pass over the blade, not realizing the rail sat on a tiny piece of material and caused the groove to be cut incorrectly. I decided to just start from scratch and redo the whole frame of the door (more practice). After a ton more trial and error, I got both rails and stiles cut with a good fit. I sized the hardboard panel and glued up the door. My first shaker door was done, but not without issue. I’ll try these doors again in the future, for sure, but for now I’m glad I’m done with just this one.

Hanging the door hinges and drawer slides was a pedestrian affair. I was using the same hinges as the last few projects and the drawer slides were old ones I’d used before. The drawer faces were of no bother either. They were cut to size and installed with no issue (for once). The door was hung on the hinges and adjusted for proper fit. The cabinet was essentially done. Only the top, front panels and lazy susan were left.

Will the Finishing Station be...Finished???
The front panels were a breeze. I just used more of the scrap hardboard I had on hand. They were sized, glued and pinned in place.
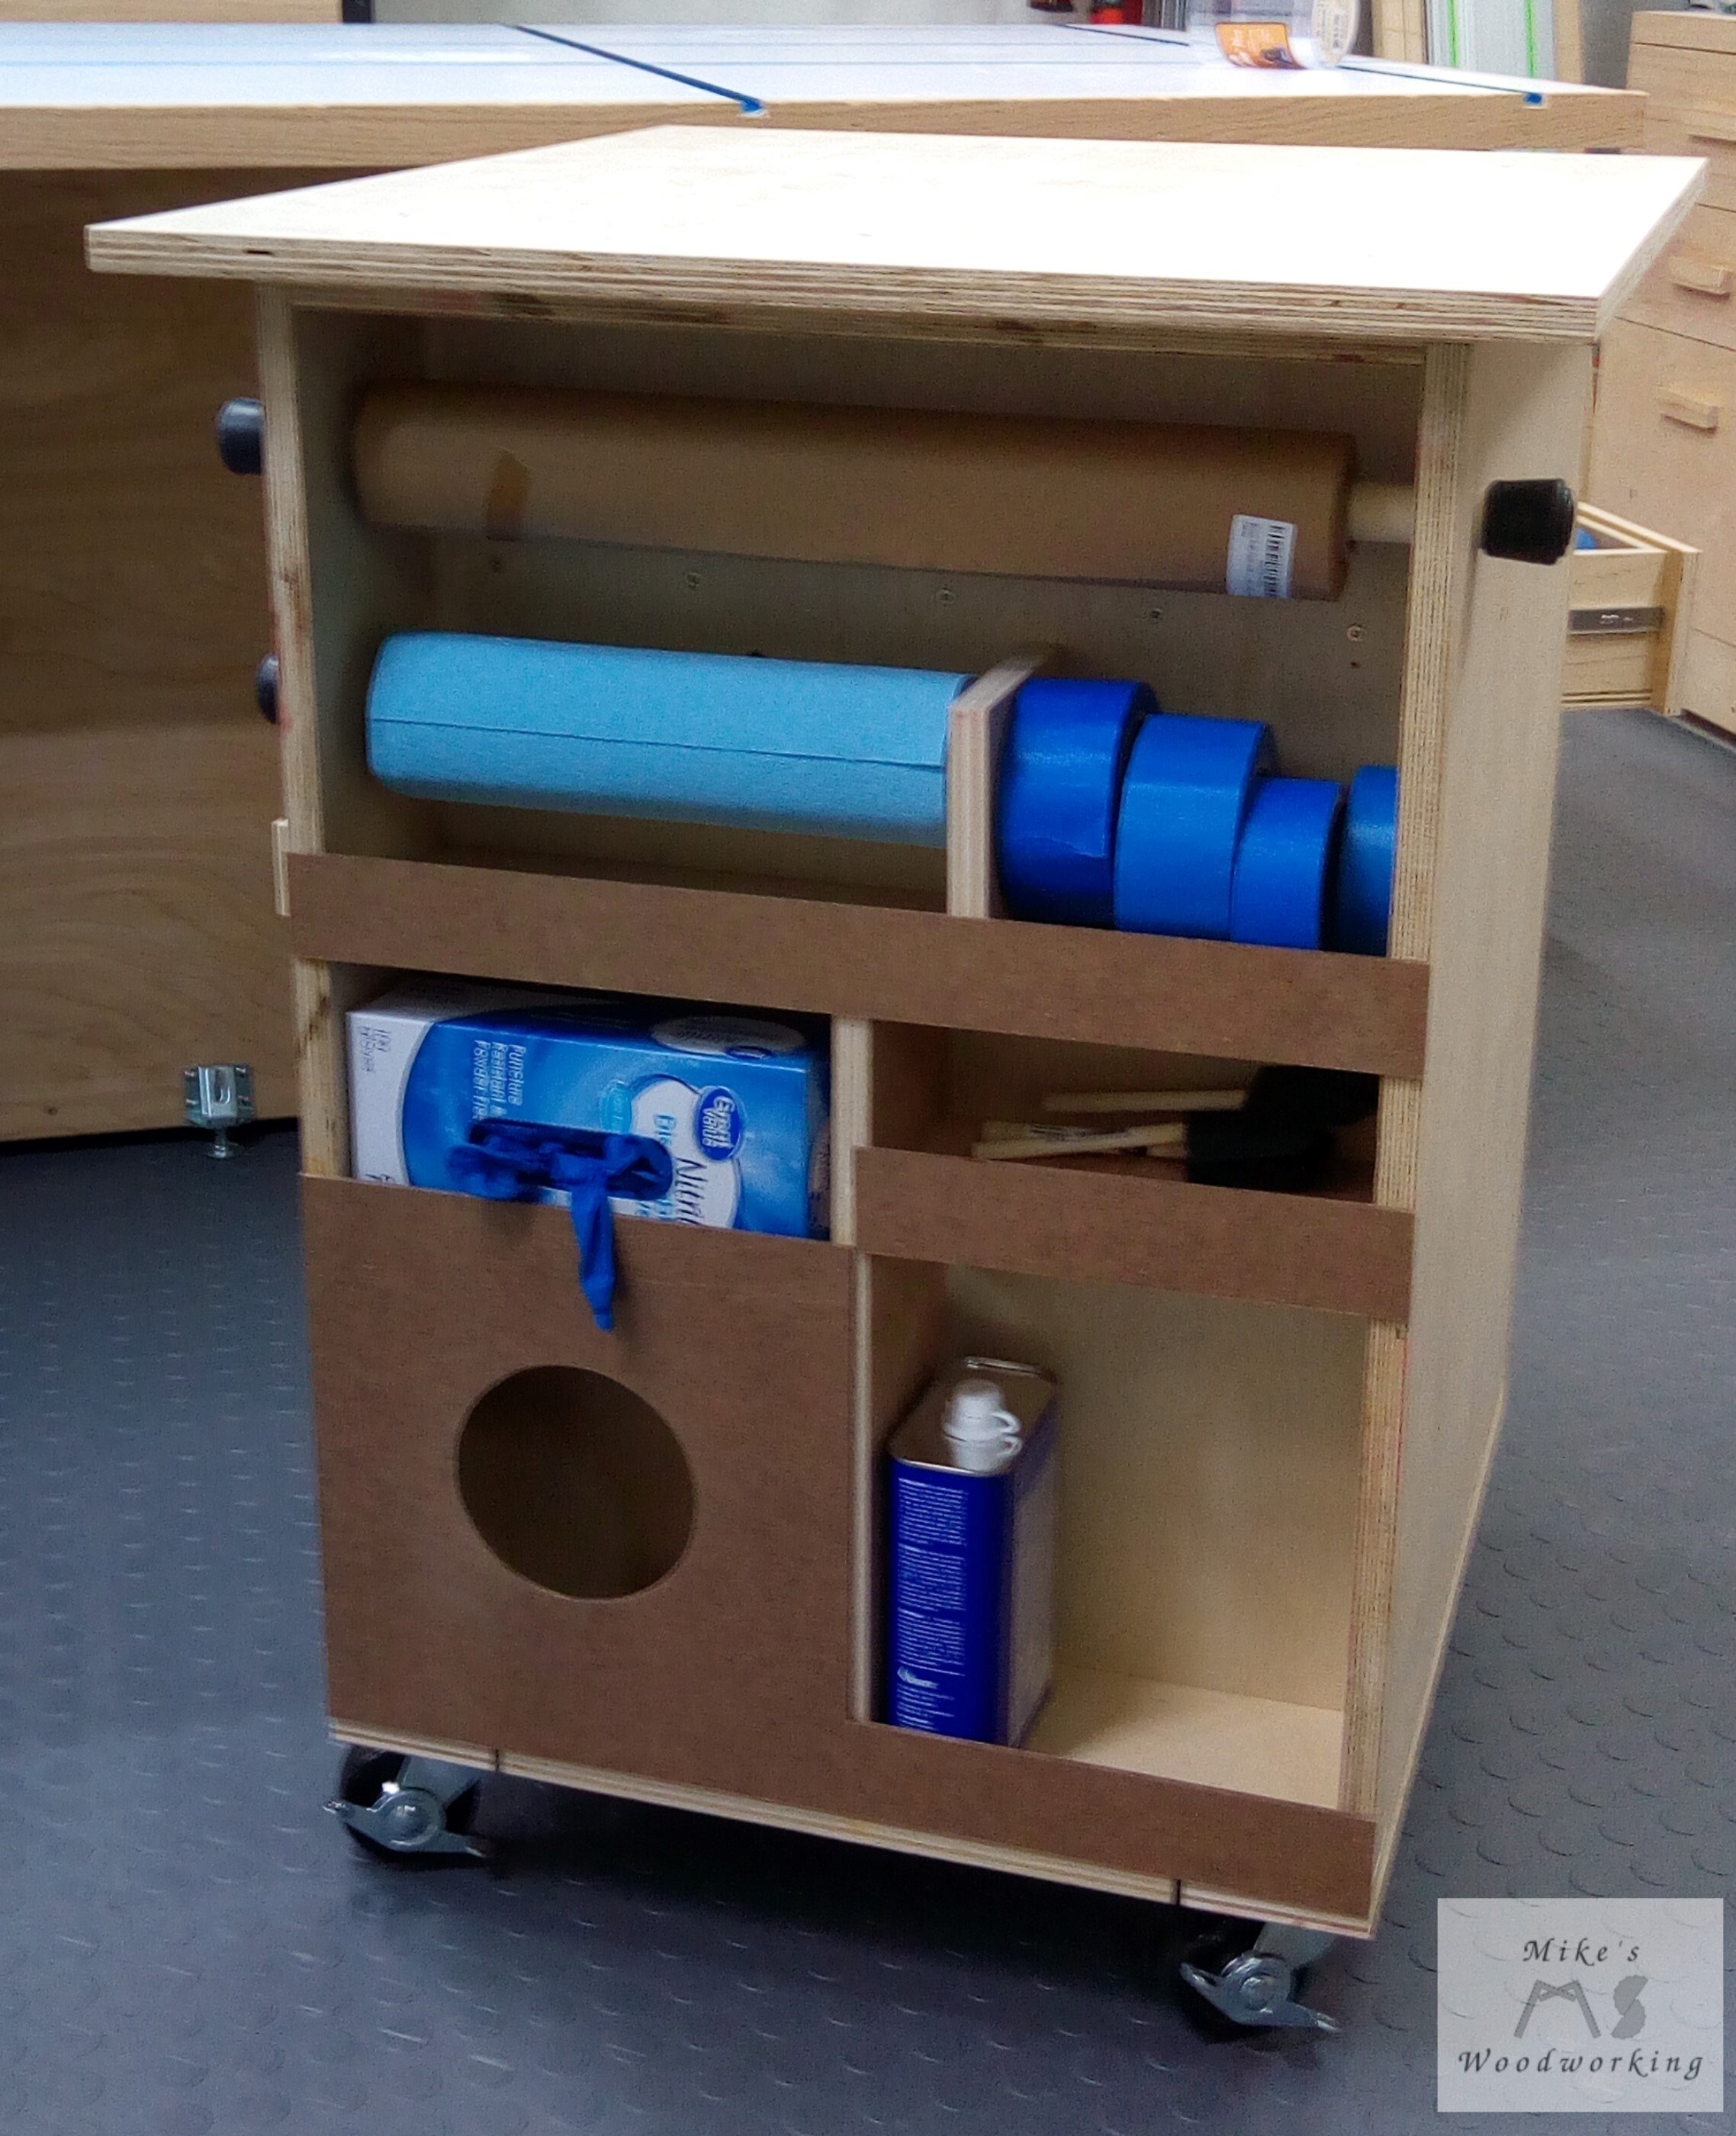
The top was easy as well. I got it spaced evenly and attached it to the top of the cabinet with a few screws. I got the lazy susan hardware from Lowe’s and attached it to a couple scraps of plywood. I sanded all of the large pieces as I went and finished sanding the remaining pieces as they were installed. With the addition of some casters, the finishing station was now complete. I hung the lazy susan on one side and added the accessories, Earlex and paint in their respective sections of the back.

I haven’t added a lot to the front just yet, but I did make sure to get a roll of craft paper and add the paper towels and rubber gloves. After a couple of weeks I decided to actually put a couple of coats of wipe-on poly on the top of the finishing station and the lazy susan. These are going to highly abused surfaces with various other chemicals, so some semblance of protection is in order.


I can’t praise Steve Ramsey’s courses and plans enough. They are very well organized with the right mixture of written instruction and visual reference for any level of woodworker to follow. If you only want/need just one set of plans for a project in one of his courses, the price tag might seem a bit steep. However, with the amount of material included in the overall package, the tips and tricks he shows along the way and just his overall knowledge, the price is well worth it in my eyes. Not to mention it goes a long way in supporting him to continue putting out all of the great free content he regularly posts on YouTube.

This was a fun project to make. I got to try my hand at a shaker door for the first time (with room to improve on my skills), and my glue-up went together better than I could have hoped. I likely won’t be using this finishing station until I finish part of my next project which is a bunch of picture frames, but I look forward to trying the finishing station out for the first time. At the very least, I now have a permanent home for my paint sprayer that is off of the floor and closed off from getting a load of dust on it. Wins all around.
***UPDATE: February 2023***
It’s been close to three years since I made the Finishing Station. It is still in regular use in my shop, mostly when it comes to smaller projects like picture frames. The lazy Susan has been completely covered in lacquer overspray from all of the many frames and COG puzzles I’ve made, among many other projects.
I don’t really use the section for housing rags, so it’s not an entirely perfect project. I STILL haven’t used the HVLP sprayer I have behind the door, and the vertical drawer actually isn’t big enough for all of the spray cans I have. Frankly, the amount of storage space in both drawers has been outgrown entirely.
My ultimate plan is to have a separate finishing area in a shed in our back yard. Whenever that actually happens, I plan on making a custom storage solution for all of the various finishes I have on hand. I don’t think I would disassemble the Finishing Station at that point, though. It is still quite functional for small projects.