
Rockler Table Saw & Router Cabinet
What’s Not to Like?
Along with the old workbench, I’d grown tired of my table saw & router cabinet. It was originally under the left storage wall in the old shop layout. However, the layout changed so the cabinet was moved into position as an outfeed table, part of its initial design in case it was needed. However, despite my forethought, the cabinet cannot be lowered any further with the leveling feet to make it completely useful as an outfeed table. On top of that, I ran into a couple of snafus during the build and those just really soured me on the project as a whole.
The cabinet’s mobility is also an issue, when it arises. Despite utilizing the same Rockler workbench casters as the old workbench, the cabinet is front-heavy and wants to tip over when trying to roll it around (definitely not ideal). The design of the drawers was the only redeeming quality in the end (certainly not enough to make up for the other problems).

The Table Saw & Router Cabinet when it was in its original position under the left storage wall.
Concessions Must be Made
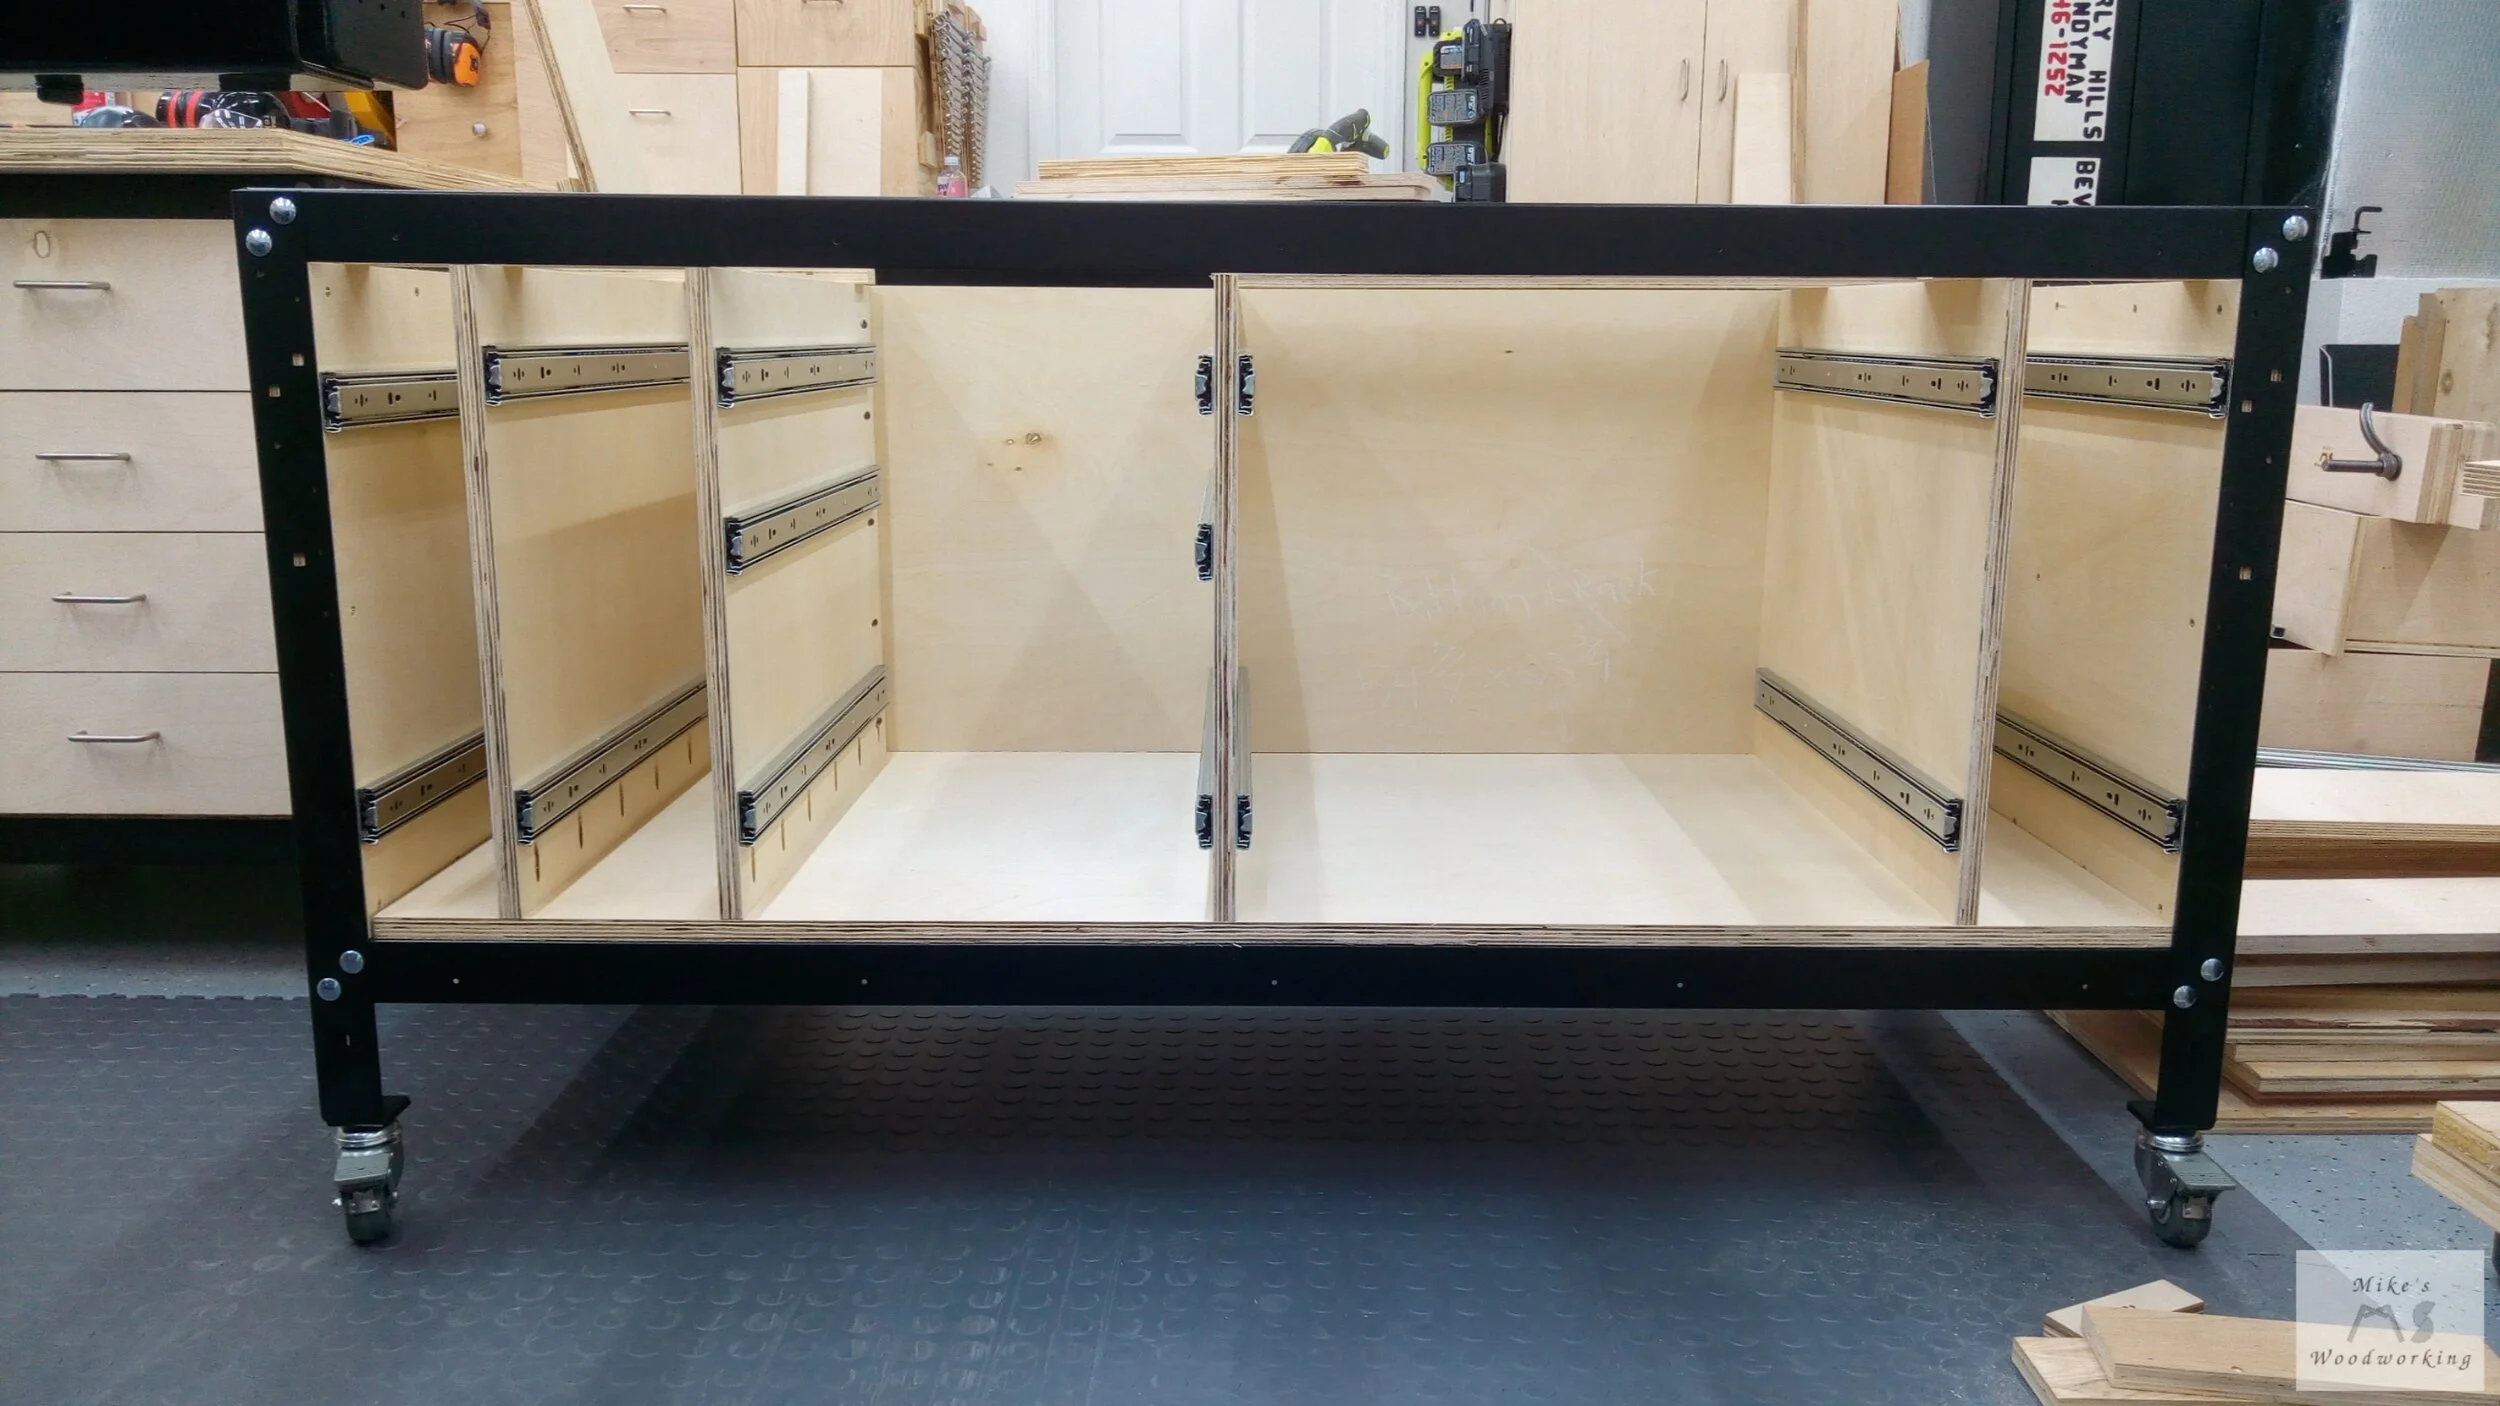
The table saw and router cabinet, as it currently sits, is 48” W x 24” D and 33-3/4” H. It is essentially two 24” traditional cabinets screwed together to make one big cabinet. The replacement stand will still be 24” D, but I want to increase the width to 60”, just short of the full width of the table saw. This will give me the opportunity to expand the drawers and divide items a bit better.
For the height, I originally was going with the 32” shop stand legs, a single layer of 3/4” MDF for the top, and the leveling feet. To make the stand mobile, I would somehow attach the Rockler workbench casters I had in use for the current cabinet. However, the more I looked at it, I wasn’t too keen on that idea. Instead, I went with the 28” shop stand legs and would install a set of Rockler stem casters in place of the leveling feet. The top would get the same dual-layer treatment as the workbench with hardwood trim encasing it (minus the side facing the table saw). By decreasing the usable height of the cabinet, I would lose two drawers, which was not ideal.
With this cabinet permanently on casters, leveling the top to the table saw will be problematic. Instead of attaching the top to the frame of the shop stand, I’m going to try making it adjustable by means of six carriage bolts. It’s hard to describe what I’m going to do, so once I get to that point, I’ll show what I’m talking about.
There will still be a vertical drawer for the saw blades, only this time I’ll be hanging the dado blades, chippers, and shims as well. The case in which they currently reside just takes up too much room, and I don’t want a dedicated drawer just for that. Next to that will be another vertical drawer which will house the rest of the accouterments for the table saw (Sawstop brakes, throat plates, etc.)
The next two banks of drawers will be the same setup as the current ones, with the one deep drawer to house my various routers. To finish off the drawers, the one on the right will again be vertical. Contained inside will be a specially designed setup to house all of my router bits. This design is one I saw James Hamilton at Stumpy Nubs Woodworking Journal. This will allow me to organize and sort the bits I currently have much easier, while leaving me with a ton of room for expansion in the future.
The table saw & router cabinet design is now complete…onto the build!!!
Different, But Same
I’m not going to get into the basic construction of the Rockler Table Saw & Router Cabinet, as it is essentially the same as the Rockler Workbench. The overall size of this work stand would be 60” x 24” (not really 60”, as we’ve already learned). The one major difference with this stand was the height of the legs. Instead of 32” with leveling feel like the workbench, these would be 28” with locking casters (as mentioned previously).
Because of the loss of an inch or so from the overall width, I had to make a couple of slight alterations to the layout. I didn’t want to change the vertical drawers as they were already close to their limits with space minimization. I opted to just narrow both columns of drawers by roughly 1/2” to make up the difference. Losing that little bit of space wouldn’t really matter.
The narrow openings between the vertical drawers meant that I needed to install each of those sets of drawer slides first, before installing the next partition. I learned this the hard way with this cabinet’s predecessor. Each of the partitions were install with pocket screws into both the bottom and back panels. Once both left side vertical drawer slides and partitions were installed, I needed to install the divider next to the router bit drawer next.
When getting the partition for the router bit drawer in position I noticed a minor problem. When I drilled all of the pocket holes, I failed to take into account that this partition should have had the bottom holes drilled on the opposite side from all of the other panels. The amount of space between the side and the partition wasn’t too small as to make it impossible to install the pocket screws, but it did make it a bit cramped.
With the vertical drawer openings and slides out of the way, I could install the final partitions for the two banks of traditional drawers and install those slides as well. Like the Rockler Workbench, I had two sets of slides that were to be installed at the exact same level. Instead of altering the height on one side, I simply left them all the same and used some of the other screw holes available on the slides.
Now that all of the drawer slides are installed, it’s time to construct the drawers. For the traditional drawers, it was more of the same (pocket holes). All of these drawers were built from the different parts of the carcass of the old cabinet, so no new material was needed.
Is Any of This Thing Like the Design at This Point?
The saw blade drawer was up next. The panel for the drawer was set on the workbench and a location for the saw blades was laid out. My original plan was to have the 12” miter saw blades in a different vertical drawer than the other blades, but I changed the layout to fit all of the 10” and 12” saw blades in the one drawer. It was a little cramped, but I got it to work. All three hangers for the blades were reused from the old cabinet, again, only requiring a new one for the shims (a mere formality to construct).

All of the blades just barely fit in this drawer. I’ll likely put a rubber band or something similar around the dowels to keep things from working their way loose.
The second vertical drawer was going to require a bit more tinkering to get everything to fit. The miter saw blade was removed from this drawer already, so more room was open. However, after I had created this layout in Sketchup, I had made changes to my table saw in the form of an Infinity throat plate with removable inserts for various blades. I now had to contend with fitting both of the old SawStop throat plates, as well as the new throat plate inserts for the Infinity setup. On top of that, I’d purchased the similar setup for my miter saw, so I had those longer inserts to contend with now.
I originally planned on hanging all three of my SawStop brakes separately, but there wasn’t enough room for that now. After double-checking the width of the opening, I found I could stack the two dado brakes together with a little room to spare...phew, one problem down.
There was going to be no way to hang the SawStop throat plates vertically, as I had originally envisioned, so I devised a way to hang them horizontally instead, underneath the brake cartridges...problem two down.
Finally, I was left with a few inches of space toward the front of the drawer to store the Infinity throat plate inserts. I didn’t need individual holders for these, so just some kind of “pocket” would suffice. I ultimately came up with what is seen below. The left “pocket” holds the miter saw inserts and the right one the table saw inserts. Given how infrequently I change blades on the table saw, I shouldn’t need more inserts than I currently have. If I should have another accident and break a blade, that insert will be removed from use anyway.

I used some scraps to make the SawStop throat plates. I’ve still got a little bit of free space next to the brake cartridges for future use, if needed.
Bits & Bits & Bits...You Get the Idea
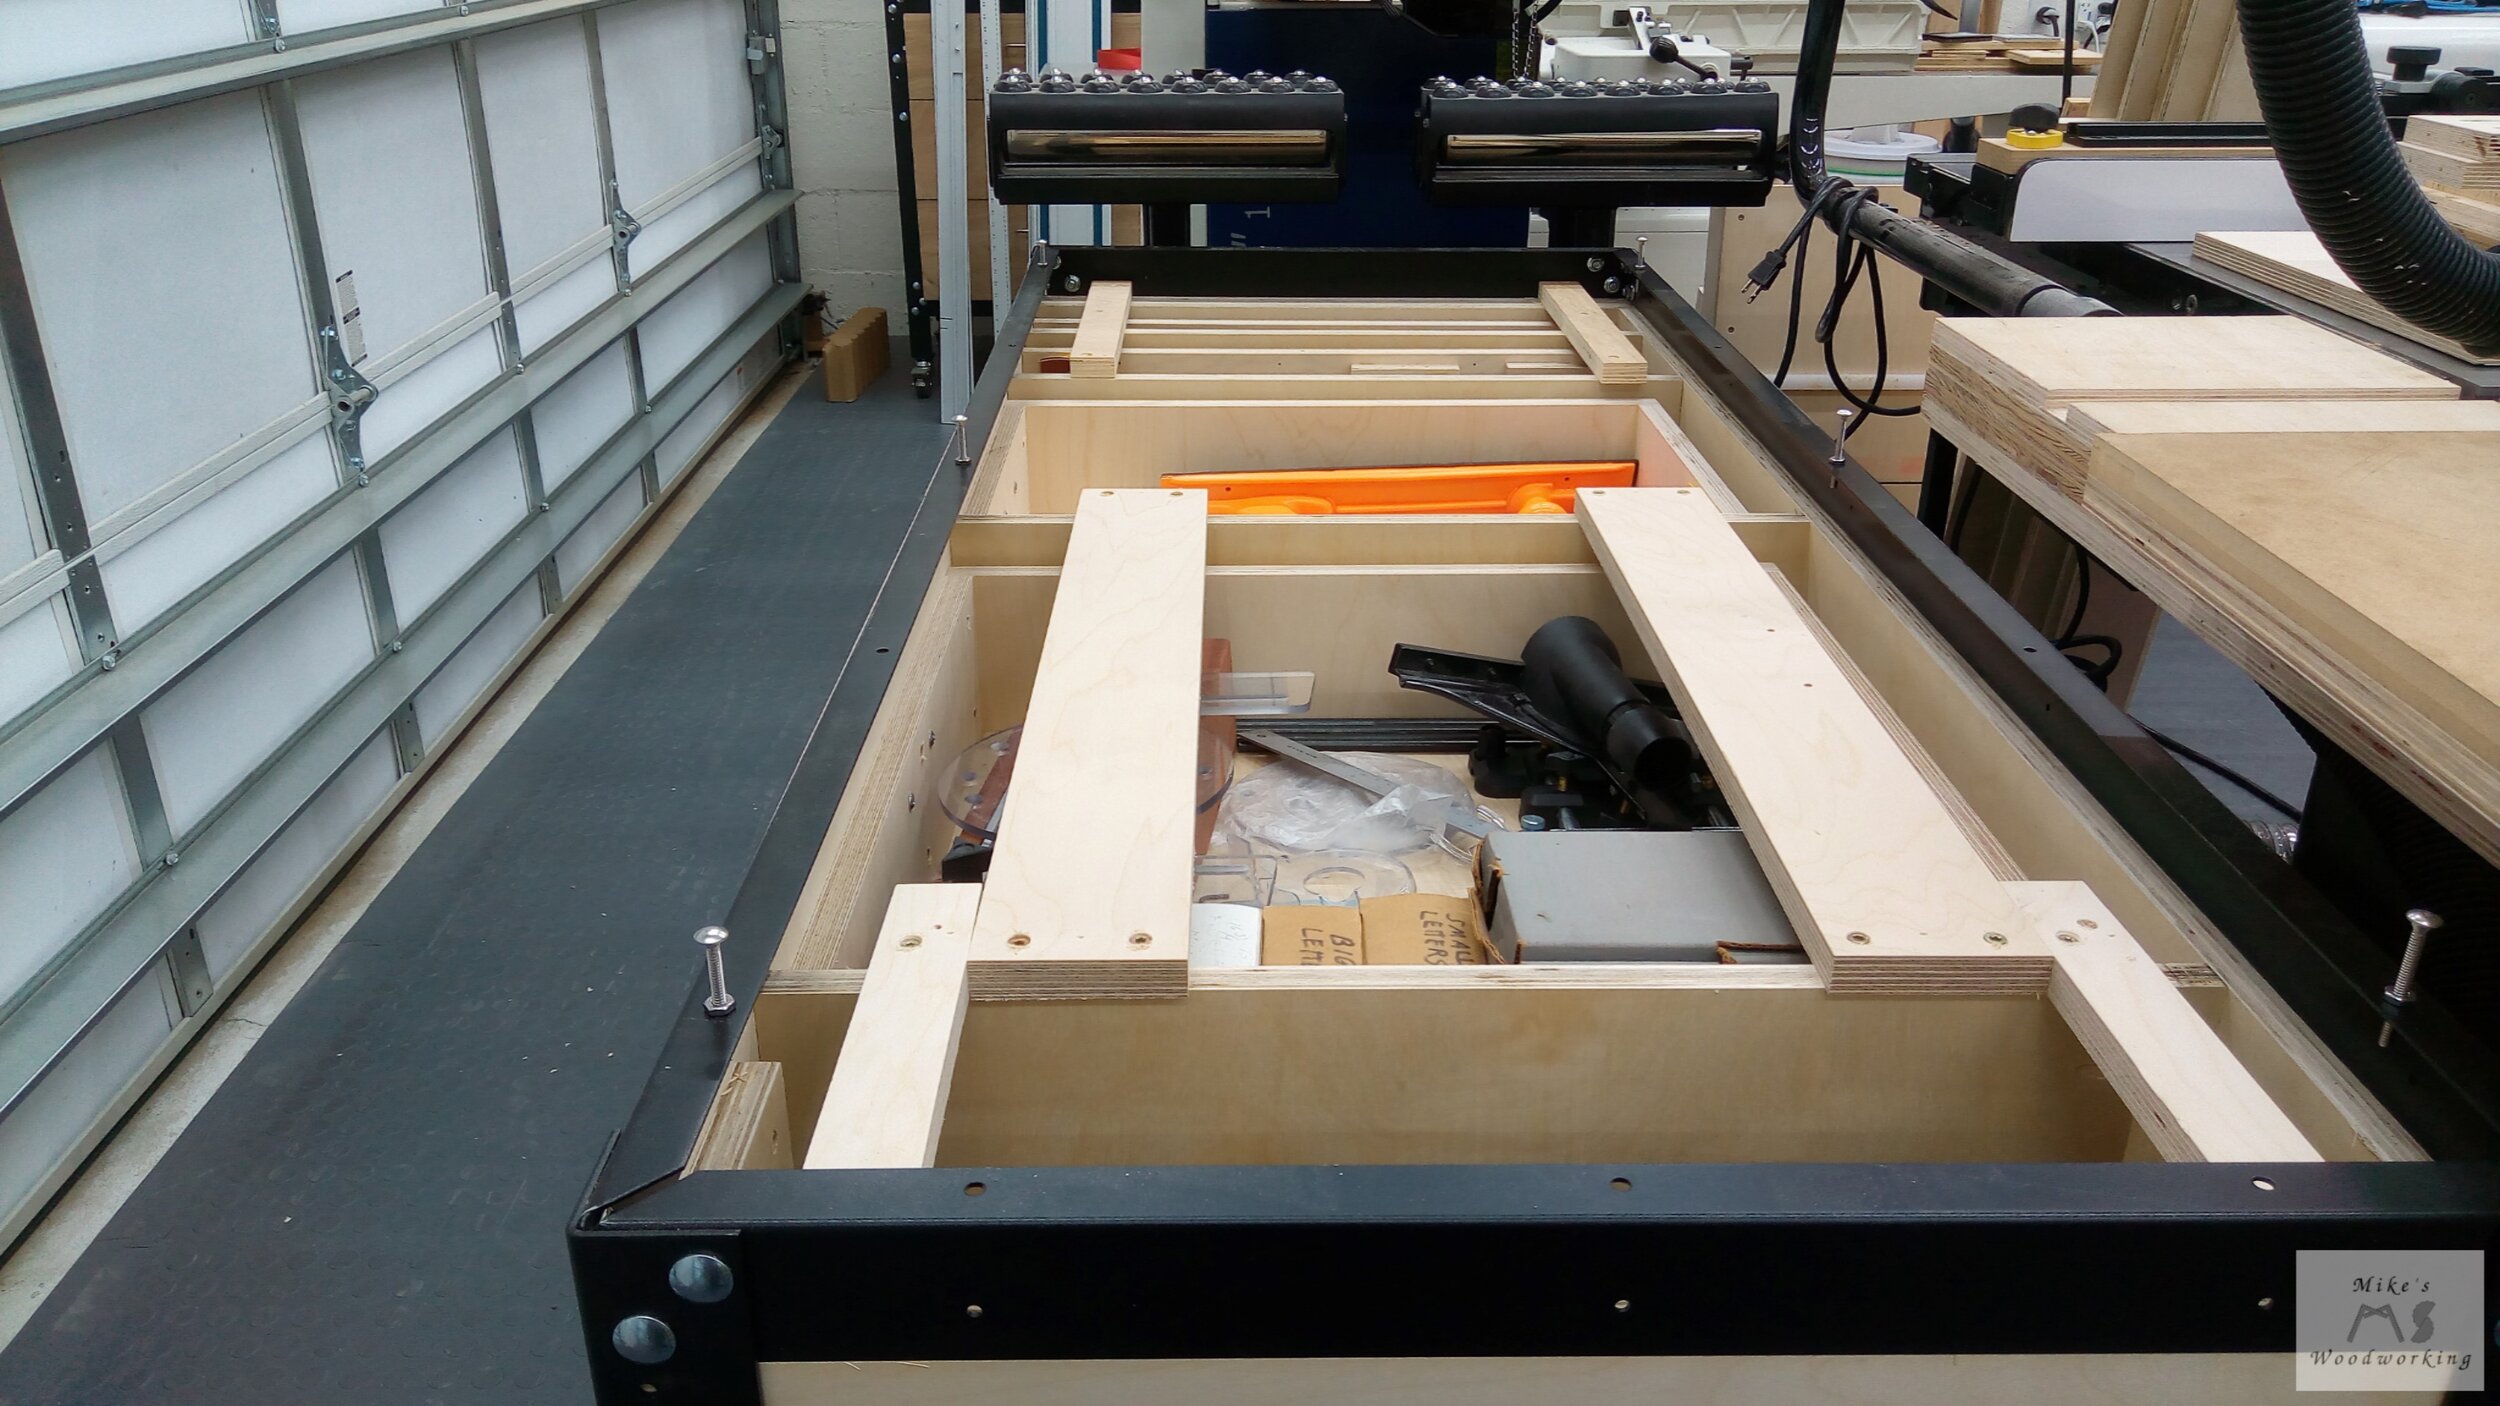
The most challenging part of this shop stand to build was surely going to be the router bit drawer. Its design was based solely on the Router Bit Rack made by James Hamilton at Stumpy Nubs Woodworking Journal. While James’ rack was much larger and meant to hang on a wall, mine was merely a scaled-down version of the same concept. The only other changes I made on mine were the choice of materials. Whereas James called for hardwood for a good portion of the parts, I went with some scrap Baltic birch plywood instead.
I can’t get into the specific details and measurements in this article, as these were a set of plans I purchased and not mine to share for free. By far the most difficult things to make were the bit rails. Multiple passes through the table saw and one final pass on the router table were required to make these specialty pieces. I made sure to make a few extras in case I screwed up during installation. When it came time to fasten the bit rails into place, I had to be careful when drilling screws as I was using plywood. I made sure to drill pilot holes first, and even then I had a couple of splits occur on the ends of the rails. I removed those screws and only used three in the middle of each rail. The bits won’t be that heavy, so those screws will offer more than enough holding power.

Here is the completed router bit drawer. I left some space on the bottom for two drawers to house miscellaneous router bit parts. These drawers are just simple butt joints, glue and brad nails.
The bit holders were their own challenge, although nowhere near as difficult and tedious as the bit rails. Most of the router bits I currently have are 1/4”, with only a couple of ½” ones. I plan to slowly replace a lot of the 1/4” ones over time, so I don’t want to have a bunch of specific holders for each and every size router bit. I opted to go with the Rockler Router Bit Storage Inserts as a compromise. These called for full 3/4” material with 5/8” holes. I, again, was using 3/4” Baltic birch plywood for these. I was worried that the inserts would protrude too far out the bottom of the holders to be installed into the bit rail system. After pushing one of the Rockler inserts into place, I noticed the amount of protrusion was minimal and did not effect operation on the bit rails.
I had a good 40 router bits (most from a Craftsman set I bought a long time ago), so I was going to require at least that many bit holders, with having a number of extras in the event of new bits being bought down the road. I opted to make over 50 of these bit holders to leave some extras. Using my crosscut sled, with a Katz-Moses stop block, made quick work of cutting all of these pieces to equal size. To drill the holes, I put together a simple jig that I could clamp to my drill press. All I had to do was simply slide in a bit holder blank, drill the hole, remove the blank and repeat...about four dozen times. With the jig, it went quite quickly and gave me consistent results.


We’re on the Level
All of the drawers were finally built and now hung inside the cabinet. The soft-close slides worked like a dream, just as they had in the old cabinet. I loaded everything back into the drawers and took stock of the project to this point. Because I was utilizing another set of 60” stretchers, I had a sneaking suspicion that there was going to be some deflection along the middle of the front rail, and I was correct.
With this being a mobile work stand, this does present a bit of a problem. I wasn’t too keen on the leveling foot setup I installed on the Rockler Workbench that spanned over two feet in front of the stretcher. Not only that, but because of the way it was installed and the shape of the rails themselves, the leveling feet on the workbench were causing the stretcher to bend outwards a bit. Having two feet on the front of the workbench was a bit excessive anyway. Just one foot, facing inwards instead of out, would be better.
I went with a much smaller and simpler design for the leveling foot. It had a much smaller footprint (no pun intended there), and was still easily accessible given the clearance between the stretcher and the floor. I installed a second leveling foot on the rear of the workbench to handle any deflection there, although little if any was present.
With these new leveling feet working, I opted to implement the same setup on the table saw & router cabinet. I only installed one on the front as the rear had a fixed panel attached to the sides and bottom providing rigidity and strength. The leveling foot provided the required support when the stand was stationary. If I should need to move it, I can simply raise the leveler slightly, move the stand where desired, and drop the leveler once again.
Having the stretcher fully supported, I could now cut and install all of the drawer faces. The vertical drawer faces gave me a bit of trouble, mostly because I had no way of clamping them in place. I managed to get them installed and focused on the standard drawers next.
I, again, was going for the continuous grain look across the entire front, so I made sure to lay out my cuts carefully. I very nearly pulled that off for the third time, however I made one small miscalculation on the set of three drawers, leaving the top one 1/16” short. To make up the difference, I simply increased the spacing between the top and middle drawers. In the finished product, it would probably go unnoticed by anyone but me (and you, the reader, of course). Once all of the drawer pulls were attached, the drawers were 100% done.

Here you can see the leveling foot I added, just like the ones installed on the Rockler Workbench. Also, the drawer faces came out great, other than the one small mistake I made. The continuous grain looks awesome.
To Top It All Off...
As I stated previously, the top on the table saw & router cabinet was going to be a bit of an experiment. Because the cabinet is on wheels, there is no way to effectively level the base to the floor and/or the table saw. The only effective way to accomplish any semblance of leveling would be to make the top itself adjustable.
The leveling system in place for my soon-to-be old miter saw station utilizes four carriage bolts as leveling feet and has performed flawlessly for almost three years now. In theory, this same principle should work for the top of the shop stand, only the heads of the bolts will be upside down and I’m leveling the top to the cabinet instead of the cabinet to the floor. An additional carriage bolt will be installed in the middle of the top to provide more support.
I drilled some recessed holes into the bottom side of the top, slightly larger than the carriage bolt head. With a nut on either side of the stretcher, this would effectively work just like the nuts used on the leveling feet on the workbench, only this time the top nut will provide the raising/lowering versus the bottom one.
The 3/4” plywood was cut to its exact size, and the MDF was fitted just like with the Rockler Workbench (slightly oversized and flush-trimmed). With the two pieces screwed together, I set the top in place where it would sit if installed directly on the shop stand. After removing the vertical drawers and the two top drawers, I was able to reach inside and trace the holes in the metal rails onto the bottom of the top. This would give me a general location to drill my recessed holes.
With the holes marked, I made shallow recessed holes (about the thickness of the cutting head of the forstner bit). The carriage bolts and nuts were installed and set at the same height, to make it easier to set them into place. With the MDF now installed, this top was HEAVY. I managed to flip it over and got it onto the bolts. With only a slight nudge the top fell right into place. It only took a few minutes to get the top level to the table saw. I left the top about 3/16” below the surface of the table saw, just so flimsier material won’t get stuck when pushing it through the table saw (ask me how I know this is a thing).


Once the top was finally done, I routed out two grooves in the MDF to allow my table saw sleds to easily extend properly during use. I’m glad I checked before routing, because one of the screws I used to secure the MDF and plywood together was right in the middle of one of the slots.
After a couple of coats of shellac, this project was complete. I got all of my router bit holders loaded up and put them in place. This system works great, and I’ve got plenty of room to expand in the future. The two small drawers were perfect for the extra bit holders and the other small parts I had for some of the routers/bits.


With everything loaded up in all of the drawers, all that was left was to install the hardwood trim. Like with the Rockler Workbench, that is going to wait until after the Rockler Miter Saw Station is finished. Again, updated finished pictures will be added here once the trim is finally attached.
That’s two Rockler shop stands completed. The last one will be the biggest of them all…the Rockler Miter Saw Station.
***UPDATE: June 2023***
Of the three Rockler workshop projects I made two years ago, this one has gone through the most changes, and those changes are not very many.
The first thing to go were actually the original Rockler locking casters I installed. At first I had the casters from the old Rockler Pack Rack I’d long since gotten rid of. Those began to break down and fall apart when I was moving the cabinet one time. I had the option to replace them with an identical set that were installed on my old Sanding Station, but I was hesitant to use those as they also broke down over time (plus they probably weren’t rated for that much weight).
I opted, instead, to install some beefier polyurethane casters I got from one of the big box stores. The only problem with these casters was that they were taller than the old ones by a couple of inches. On top of that, the new casters had a plate on them versus a stem, so I would have to make something to attach them to the base of the legs.
I got some carriage bolts and installed them into some scrap Baltic birch plywood blocks (countersunk, of course). These carriage bolts would act as the stems to attach to the legs of the stand. The caster plates could then be screwed to the plywood securing them in place.
The casters were a much-needed improvement, however they did present another problem. With the added height of the casters and the plywood blocks, they raised the top of the table saw & router cabinet up too far above the table saw. Even with the adjustment screw system I have in place, I could not lower the top far enough to be below the table saw. Given this stand is also the outfeed for the table saw, this would not work.
My only course of action was to remove the 3/4” MDF layer from the top and simply leave the plywood one in place. This lowered the table enough to allow it to act as a proper outfeed table once again. I still haven’t routed a new set of miter grooves to replace the ones from the MDF, but I don’t think I really need them, given the plywood outfeed section still attached to my table saw from the old Table Saw Outfeed Table.
The MDF did not go to waste, however. I wound up repurposing it on the Rockler Band Saw & Scroll Saw Cart.
The other changes made were not physical changes, per se, but more changes to what was stored in the drawers themselves.
In January 2023, I decided to swap the router table position on my table saw which allowed me more storage space under the right side of my saw. I built the Table Saw Storage Cabinet to allow me quicker access to the majority of my table saw accessories. All of my 10” saw blades, dado blades, push sticks and featherboards are now stored in this new cabinet, allowing me a bit more space for organizing my router accessories.
As for the functionality of this stand, I am VERY happy with that. The drawer for storing my router bits is excellent, and the one deep drawer is perfect for housing all of my various routers. The saw blade drawer is now only storing my one extra 12” miter saw blade, and the other vertical drawer still houses my original SawStop throat plates. I very well could possibly combine these drawers together into one, but I don’t think I would have much use for the other vertical drawer. I suppose I could make another router bit drawer in the future if I should run out of space in the original one. Only time will tell.