
Christmas Presents, 2022
I originally had four presents in mind for this Christmas season, but because of a bunch of delays with my last couple of office furniture pieces, along with Hurricane Ian rolling through, I got put behind schedule by a few weeks. On top all of that, I was simply getting very run down after everything that I’d done previously throughout the year.
Come the end of the furniture projects around Halloween, I was extremely burnt out with woodworking. Couple that with all of the solo long distance driving I’d been doing throughout the year, and my energy levels were at a low point. Point of the matter was there was no way I could get all of the presents I wanted to get done in the short amount of time I had.
I had to pick from three of the four I had in mind and stick with those. The fourth would have to be pushed back until next year. Since we were headed up to Maryland for Christmas like usual, and two of the gifts were for Lisa’s cousin Bill’s two boys, those HAD to get done.
The other two were for two of my friends. They were both very similar in nature (being kind of artsy), but only one of the two was already set in stone as to what I was making. The other, for which I had yet to finalize a design, is for my best friend, Jill, would be put off for her birthday in the spring. I told her I was making something for her for Christmas while I was visiting her during my road trip in May, but I don’t think she would mind if she got it for her birthday instead.
Without any further ado, here are this year's Christmas presents:
Taekwondo Belt Display
With Bill’s and Wesley’s boys getting a little older now, I figured a more practical gift than some puzzles would be in order this time around. Their oldest son, Maddox, is really into Taekwondo and is moving up in skill level very quickly. When I asked Wesley what I could make for Maddox, she mentioned that they had a board for displaying his belts but that it wasn’t going to be big enough for the others he would be pursuing. Also, it didn’t have much room for displaying the various medals he’d won.
With that in mind, I set out to design a custom belt display which had a bit more flair than most of the others I’d seen available online. What I thought would really stand out would be if I could make each rung out of a different species of wood that would match the colors of the belts. Here are the colors I’d be working with (from lowest to highest level) and the species I opted for:
white (basswood)
orange (padauk)
yellow (yellowheart)
camo (???)
green (???)
purple (purpleheart)
blue (???)
brown (thermally-modified ash)
red (bloodwood)
red/black (bloodwood/wenge)
black (wenge)
For most of these, the species for each was a bit of a no-brainer. Where I didn’t have much to work with were camo, green, and blue. I had no choice but to go with a tinted stain for green and blue. The most difficult one was the camo. I suppose I could find a piece of wood with some varied amount of colors and/or grain patterns.
As I was looking through my current supply of hardwood scraps (for what I already might have on hand), I stumbled on a piece of the mango wood leftover from last year’s presents. It had just enough color variations in it where it might work for camo. I showed it to Lisa and she agreed…problem solved!!
For the two stained pieces, I opted for some white oak I had milled up for my old defunct Hall Bench project from three years ago. Here is the overall design:


The frame is rather simple. There are three cross members that will connect the two long rails. There will be two 3/4” dowels on the bottom that can be used to display medals. As for attaching each of the slats and the top piece, I decided to go with some strong neodymium magnets. I didn’t want to try screwing them in place from behind (for fear of splitting them), and gluing them just didn’t sit well with me.
The most difficult part, at least for me, was going to be cutting out the letters for Maddox’s name. I decided to go with walnut for the letters to give a bit of contrast with the white oak piece I selected for the top. I obviously can’t use my band saw for the letters with holes in them (‘A’, ‘D’, ‘O’). I didn’t think trying out with a coping saw with such small pieces was a wise decision, so I decided to just bite the bullet and get myself a scroll saw. While that might seem a bit extreme, I do have other things in mind down the road for the scroll saw other than just these letters.
Before putting the frame together, I carefully laid out all of the holes for the neodymium magnets. I went with the ones offered on KM Tools since they were smaller than the ones at Rockler, not to mention cheaper and much stronger. A couple of down sides were they were 10mm and required a specific bit to drill the holes, and they were a bit brittle . I wound up chipping a few of them in the process of installing them. Thankfully I made sure to order extras just in case.
For the 3/4” dowel holes, I drilled both sets of holes in both rails at the same time by taping both pieces together. This would guarantee no chance for misaligned holes. Both those and the holes for the magnets were done at the drill press. It is much more precise and makes this type of operation much easier. To drill the holes in the back of the slats, I set up a fence and stop block so that I could drill one hole, turn the slat 180 degrees, then drill the other. This also guaranteed the holes would line up perfectly with the ones on the rails, no matter the orientation of the slats on the frame.
To secure the magnets in place in the rails and slats I simply used some Gorilla Glue super glue. I put a small drop in each of the holes and simply pressed the magnets into place and held for a few seconds. This seemed to work just fine and was A LOT easier and less messy than dealing with 5-minute epoxy. I made sure to install the magnets in the slats with the opposite polarity facing the rails so the magnets would attract each other rather than repel.
Construction of the frame was rather simple. I used some wood glue and dowels to connect the cross members to the rails. I originally thought about using threaded inserts (like the Adjustable Storage Cabinets), but I was not too keen on installing those in the end grain of hard maple, not to mention it was just so much more work. The dowels were quick and easy with the doweling kit I bought at Rockler.
The frame went together pretty easily. After getting the cross members glued and clamped to the rails, I made sure to put the two 3/4” dowels in place on the bottom of the rails. Even after having to sand them to fit the holes, they went in only with some persuasion from my Thor’s hammer mallet. The holes seemed like they were misaligned, but I think it was mainly the dowels themselves. I’d planned on these dowels being removable, but the fit was so tight that they can’t easily be taken out. Plus with the addition of a spray lacquer finish, they’ll be pretty much cemented in place anyway.
I still needed to put a small 1/8” roundover on the slats, so I set up my router table for the task. I was doing a test run and quickly noticed I would have a problem smoothly running the slats with the magnets face down on the cast iron router table…well, shit.
My only option was to somehow clamp one of my other routers to the workbench and use that as a make-shift router table. I didn’t like the idea of using my cordless Makita as the base was a bit small. I opted for my variable speed DeWalt router instead. My only problem was it wouldn’t fit in between the jaws of my moxon vise.
After thinking for a minute, I clamped one of my bigger quick-grip clamps to the motor of the router, and then used two smaller quick-grip clamps to hold the CLAMP to the workbench. I double-checked that it was secure and it was rock solid. I turned on the router to verify it wouldn’t vibrate and it was good to go.

It was a bit messy, but this setup worked like a charm. It pays to have a few routers on hand sometimes.
With all of the various glues left to dry overnight, the following day I proceeded to sand everything to 180-grit. I also made sure to test the slats on the frame and they each snapped into place perfectly. I simply could not have asked for them to fit any better than they already did.
The last thing to do was to cut out the letters in the walnut. I asked Lisa to cut out some removable vinyl letters with her Cricut so I could use those as a guide. As I had not used a scroll saw in some 30 years or so, I thought it best to try my luck on a piece of scrap 1/4” Baltic birch plywood first. The Pegas 21” Scroll Saw I chose was definitely the right choice. It was super easy to set up, and the included blades are of top quality.
I took my time with the practice run and I got back into the swing of scroll sawing quickly. The end result wasn’t the greatest, but they would work. I next moved onto the walnut. I was even more careful than the practice run, and I got about the same results. I still need much more practice on the scroll saw, but I look forward to having the ability to make very intricate projects down the road. The letters came out just fine, and with a bit of sanding, they were done.

My first attempt at the letters. The ‘O’ was the hardest in trying to keep it remotely round.
With the letters complete and glued in place with just some super glue, the entire project was prepped for finish. Before applying spray lacquer, I needed to stain the white oak slats. For the green and blue, I went with Minwax’s tintable stain in hunter green and marine blue, respectively. Once the stain dried, I applied four coats of Deft rattle-can clear gloss spray lacquer to everything. After letting the lacquer sit overnight, it was buffed with some kraft paper, and the finished product turned out absolutely awesome.

A thing of beauty.
I’m thrilled with how the belt display came out. It really wasn’t too difficult of a project (mostly a lot of repetition). The colors are just fabulous. I was a little worried about the purpleheart not looking very purply after first cutting it, but it turned out great in the end. The only color I was a bit disappointed in was the bloodwood. I was hoping for a more traditional red than what I wound up with. Oh well, wood will be wood.
Charging Station
When it came to Bill’s and Wesley’s younger son, Cayden, Wesley suggested a charging station for the various small electronics he was beginning to accumulate. She sent me links to a couple of items for inspiration and I was off and running.


The box itself is a simple design with the front and back pieces being glued in place with some 1/4” through dowels in the sides. The sides are white oak, the top is walnut, the dividers are hard maple, and the bottom is 1/4” maple plywood.
The top slides on and off via a groove in the sides and one in the front. The sides and front have holes to allow for charging cables to be fed to each device, as well as ventilation for the charger. The bottom will be flush with the bottom of the sides and will sit in a groove. I originally had the bottom installed like a regular drawer bottom, but that would have led to problems during installation and cutting of the various grooves.
Everything will be made from 1/2” stock, except for the bottom panel and the short dividers which are 1/4”. The three tall dividers are 1/2” material.
Construction was rather nondescript. When it came time for the grooves in the sides for the top, I went with the router table and my 1/4” spiral bit. This allowed me to make a much crisper groove and it was easier to set a stop so I wouldn’t blow through the front. I was left with a slight rounding at the top and bottom of the end of the groove, but that wasn’t a big deal. If I’d made the groove only slight longer, I could have made the entire opening for the top completely square.
As for the top, to fit it in the groove, I simply rounded the small 1/4” sections on either side so they fit in the groove…problem solved. I did make one small change to the dividers. Originally I had the smaller ones at an angle. This would have meant cutting an angled dado, and I simply didn’t have the time or patience to give that a go. I just made a standard groove for each piece and made it 1/16” deeper than I planned and the dividers came out great. A little wood glue and super glue holds them in place just fine.
The groove in the bottom was similar to all of the grooves I’ve made in many of my picture frames, only it wasn’t as wide. I had to change out the bearing on my rabbeting bit to make sure I only cut 1/4” instead of 1/2”. I was left with rounded corners, but I simply rounded the corners on the plywood panel. A little glue and some 3/4” pin nails hold it in place just fine. I didn’t bother filling the small pin holes since they are on the bottom and no one is going to see them anyway.
Prior to assembly, I sanded everything to make my life easier. I still had to break a few sharp edges, but nothing more. I did make one small snafu when drilling the holes for the dowels. I don’t know what I was thinking, but I decided I wanted to change the position of the top dowel holes on the front so they would be the same distance as the bottom. Once I drilled the hole, I quickly realized the reason I didn’t have it set up that way in the first place…it ran into the groove for the top!!!
Thankfully I only made the one mistake and I was able to repair it. I cut a 1/4” plug and glued it into place. I was able to match the grain with the small plug with the side panel almost perfectly…crisis averted.
With everything put together and sanding done, I applied the same spray lacquer as with the Taekwondo belt display. With a final buffing after the lacquer dried, the charging station is complete.


Although not shown, I am including a small 6-port charger inside the charging station. I decided to forgo the charging cables as I’m not entirely sure of every device that will be using the charger. That’s up to Cayden and his parents.
There were only a couple of small goofs on this project, but nothing I couldn’t fix or wouldn’t be noticed by the untrained eye. I think this will be a big hit come Christmastime.
Lighthouse
The last gift for this Christmas season was one I already had in mind for almost a year. It’s for an old elementary school classmate I reconnected with last year who helped me through the rough patch I went through when writing Malaika’s story. She’s become a close friend and her guidance played a major role in enabling me to pull out of my depression.
There is a lot more behind the meaning of this gift, but I will leave that between my friend and I. As for the gift itself, the picture says it all.
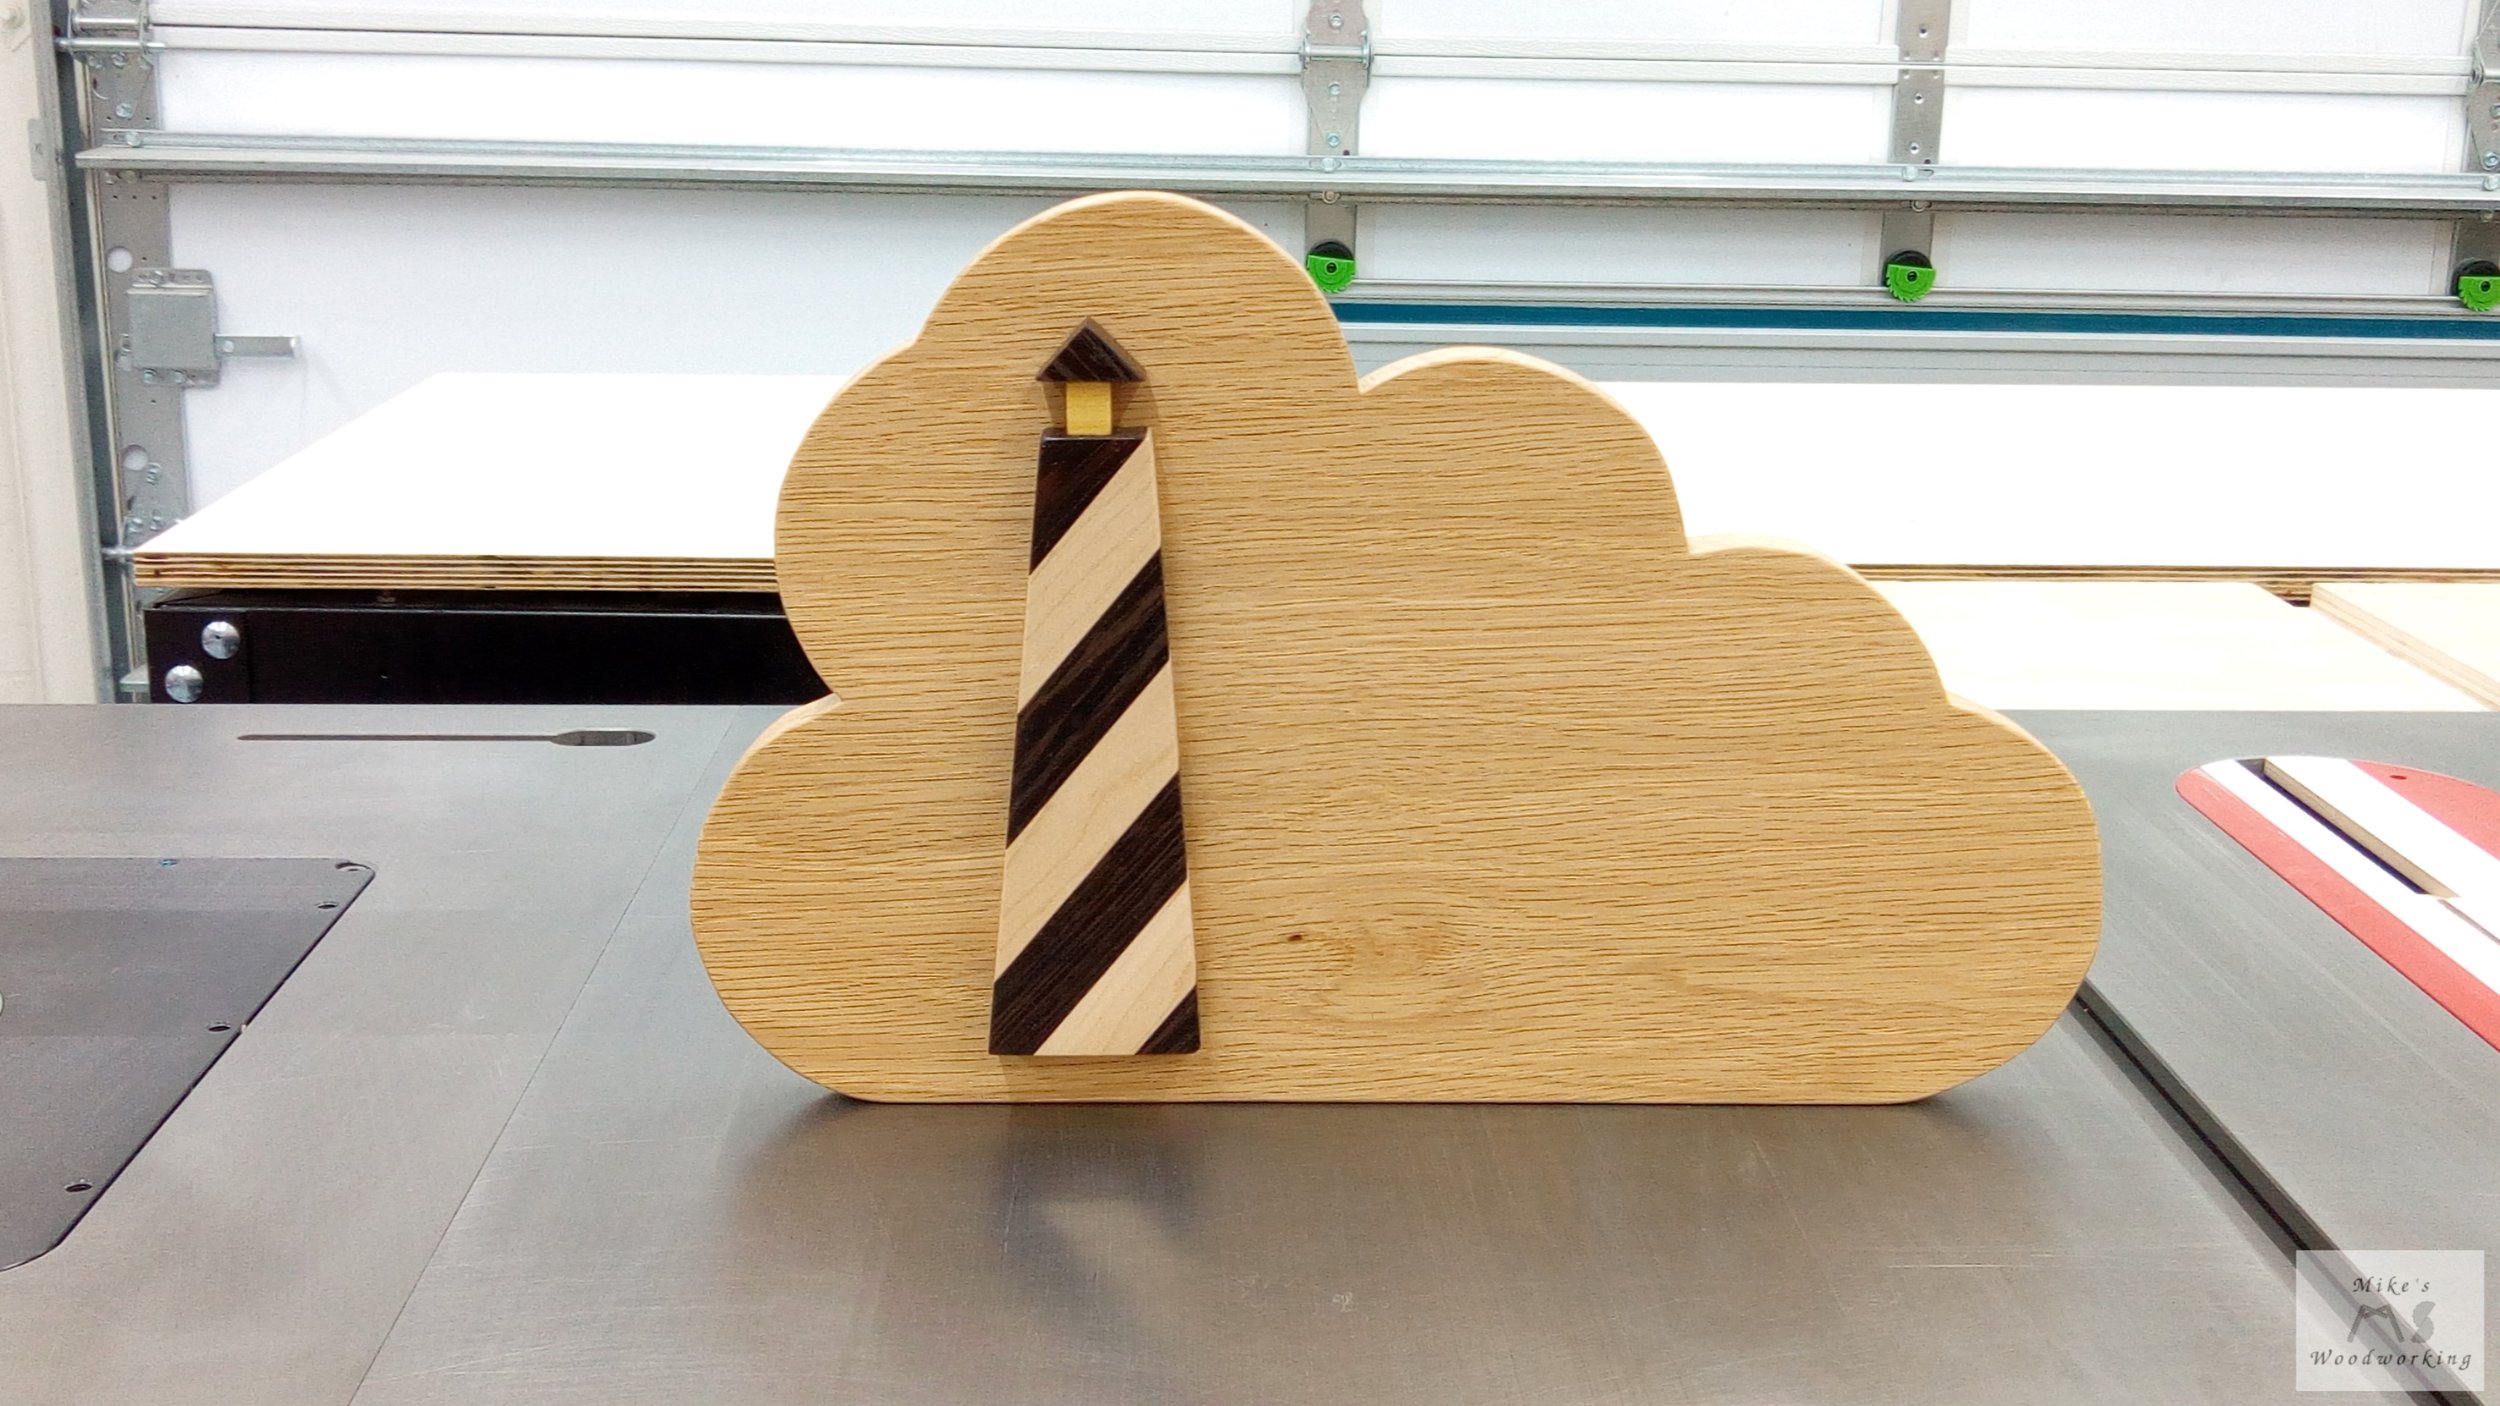
The cloud is made from white oak. It’s actually a panel glue-up from the hall bench I started a few years ago, so it’s finally seen some use. The lighthouse is made from hard maple and wenge, with a small piece of yellowheart for the light. Lisa came up with the idea for the light and the top.
The lighthouse itself wasn’t very difficult to make. I simply glued up a bunch of 3/4” strips of wenge and hard maple, cutting out the lighthouse using a posterboard template. The little top was from the corner of the off-cut of the same blank. The light was cut with my scroll saw from a small scrap of yellowheart.
After I completed everything and had it boxed up, it finally dawned on me that instead of a rectangular piece for the light I could have made a plug with one of my plug cutters. That would have yielded a round light and might have looked a little better. Oh well, maybe next time. I still love the way it turned out.
Now, you may be wondering why there is so much empty space on the right. Well, a quote I shared with my friend once before was applied to that space (thanks, again, Lisa) and takes up the majority of that area. I will not divulge the quote here. To me, this is a bit more of a personal gift and I’d like to keep it that way. My friend and I will both understand the significance of the lighthouse and the quote, and the cloud was just a great background for the entire thing.
Final Overview
With that, Christmas presents for this year are done. These projects allowed me to try out a couple more different techniques. I got to use a scroll saw for the first time in some 30 years, and I very much look forward to using it again on future projects.
While I like all three projects, my favorite is definitely the cloud and lighthouse. Because it’s a bit more of a personal gift for a friend, it has much more meaning. It’s projects like that which make me continue with woodworking. I love making things for my friends and family. I really enjoy seeing the smiles on their faces, knowing it’s because of something I made. And if it may cause a small tear to be shed, that’s just fine. Honestly, the reactions I’ve gotten for past gifts have done the same to me.