
Office Storage Cabinet
The final piece of the office remodel was by far the biggest piece of the five I had in my original plans. To complete the mishmash of crap I had in my office, I had one more wire shelving rack with a bunch of plastic storage drawers to divide up all of the miscellaneous IT parts I still planned on keeping (mostly different types of cables and tools).
Alongside that, I had one of the Craftsman metal storage cabinets I used to house in the garage of our rental house. It, too, had a lot of different types of IT junk in it (spare monitor, UPS, hard drives, etc.)


To say these things stuck out like a sore thumb would be an understatement. I wanted to make a singular cabinet that could better house all of the stuff I planned on keeping (yes, I was going to take this opportunity to purge some of the stuff from my inventory) and, at the same time, blended well with the other pieces I had designed. So, this is what I (initially) came up with.


This was, without a doubt, not a great looking cabinet. I mean, it certainly had the ample amount of storage I wanted, but it’s overall look was not the greatest. I did, however, like the idea of the doors that opened and could slide back into the cabinet. Other than that, though, this was just a monstrosity.
It would have been an absolute pain in the ass to make this cabinet, given its overall size. Moving it would have been an adventure as well. The fact that the carcass is all one piece is what really led me to a redesign (along with the obvious inset doors).
I completely went back to the drawing board with this and settled on something that resembled a hutch we have which displays our decorative glasses and other knickknacks.

This Ethan Allen hutch was a great find at a consignment shop after we moved into our new house.


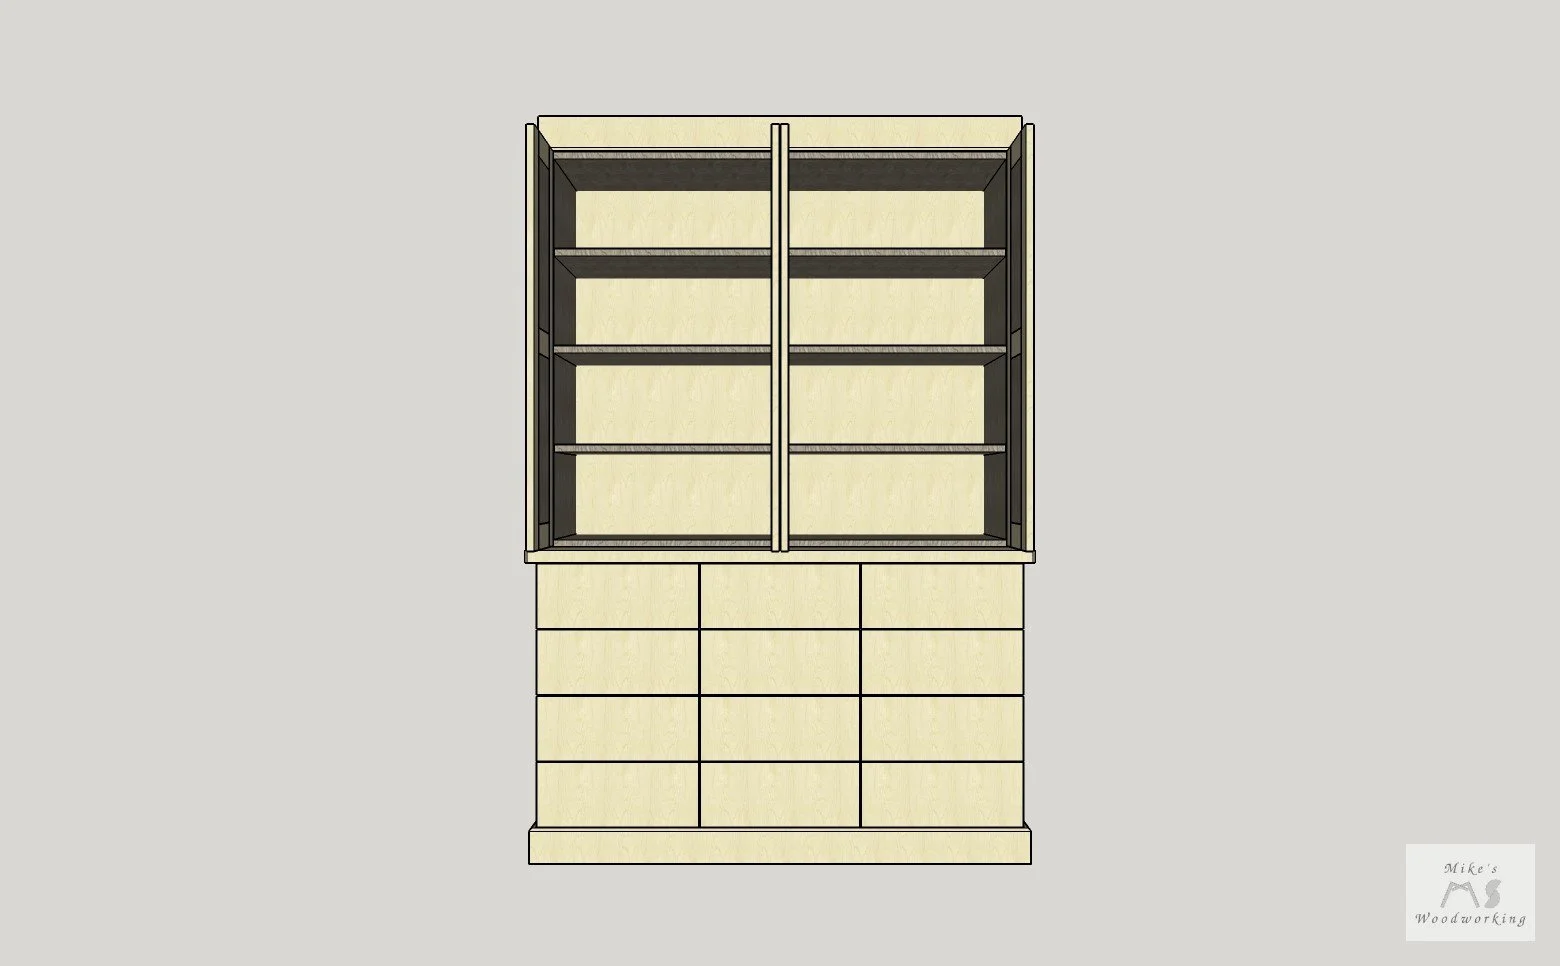
Obviously, the point of our hutch is to display things, which necessitates glass doors. This is just a straight storage cabinet, so the solid panels were the way to go here. The bottom is now a simple bank of 12 equally-sized drawers (the middle four are actually 1/4” wider). What I really like is the inverted trim detail that tops off the upper section.
The biggest change with the new design was the fact that it would be built in two separate sections. This would make it’s construction and transport much easier. I’ve devised a way to securely mount the upper section to the lower when the time comes, but I’ll get to that later.
As with every other piece of the office furniture, more dadoes and stretchers were used. Given the shear amount of weight the bottom cabinet was to carry, I wanted to make sure it had plenty of support.

I initially had only the center brace with the connecting stretchers to support the bottom panel (which was nearly 2’ deep and almost 4’ wide). That might be fine in the long run, but I started to second-guess myself. I opted to beef up the bracing on the bottom.

The addition of these four braces would give the lower cabinet dividers much more support over that larger 24” span.
When it came time to secure the dividers in place, I opted for screws through the top and only two pocket screws near the ends for the bottom. I was very careful when I laid out the pocket holes on both the front and rear stretchers to line up one hole with the dividers on either side of the center brace. With the dividers in a dado, there is no room to move laterally, but I didn’t want the divider to slide forward/backward on me.

Four screws in countersunk holes in each divider is more than sufficient here.

The screw doesn’t bite into the divider a lot, but it’s just enough to keep it in place.
I went with a solid plywood panel for the top of the lower cabinet. I wasn’t sure just having stretchers between the dividers would be enough support for the hard maple top and the upper cabinet on top of that.
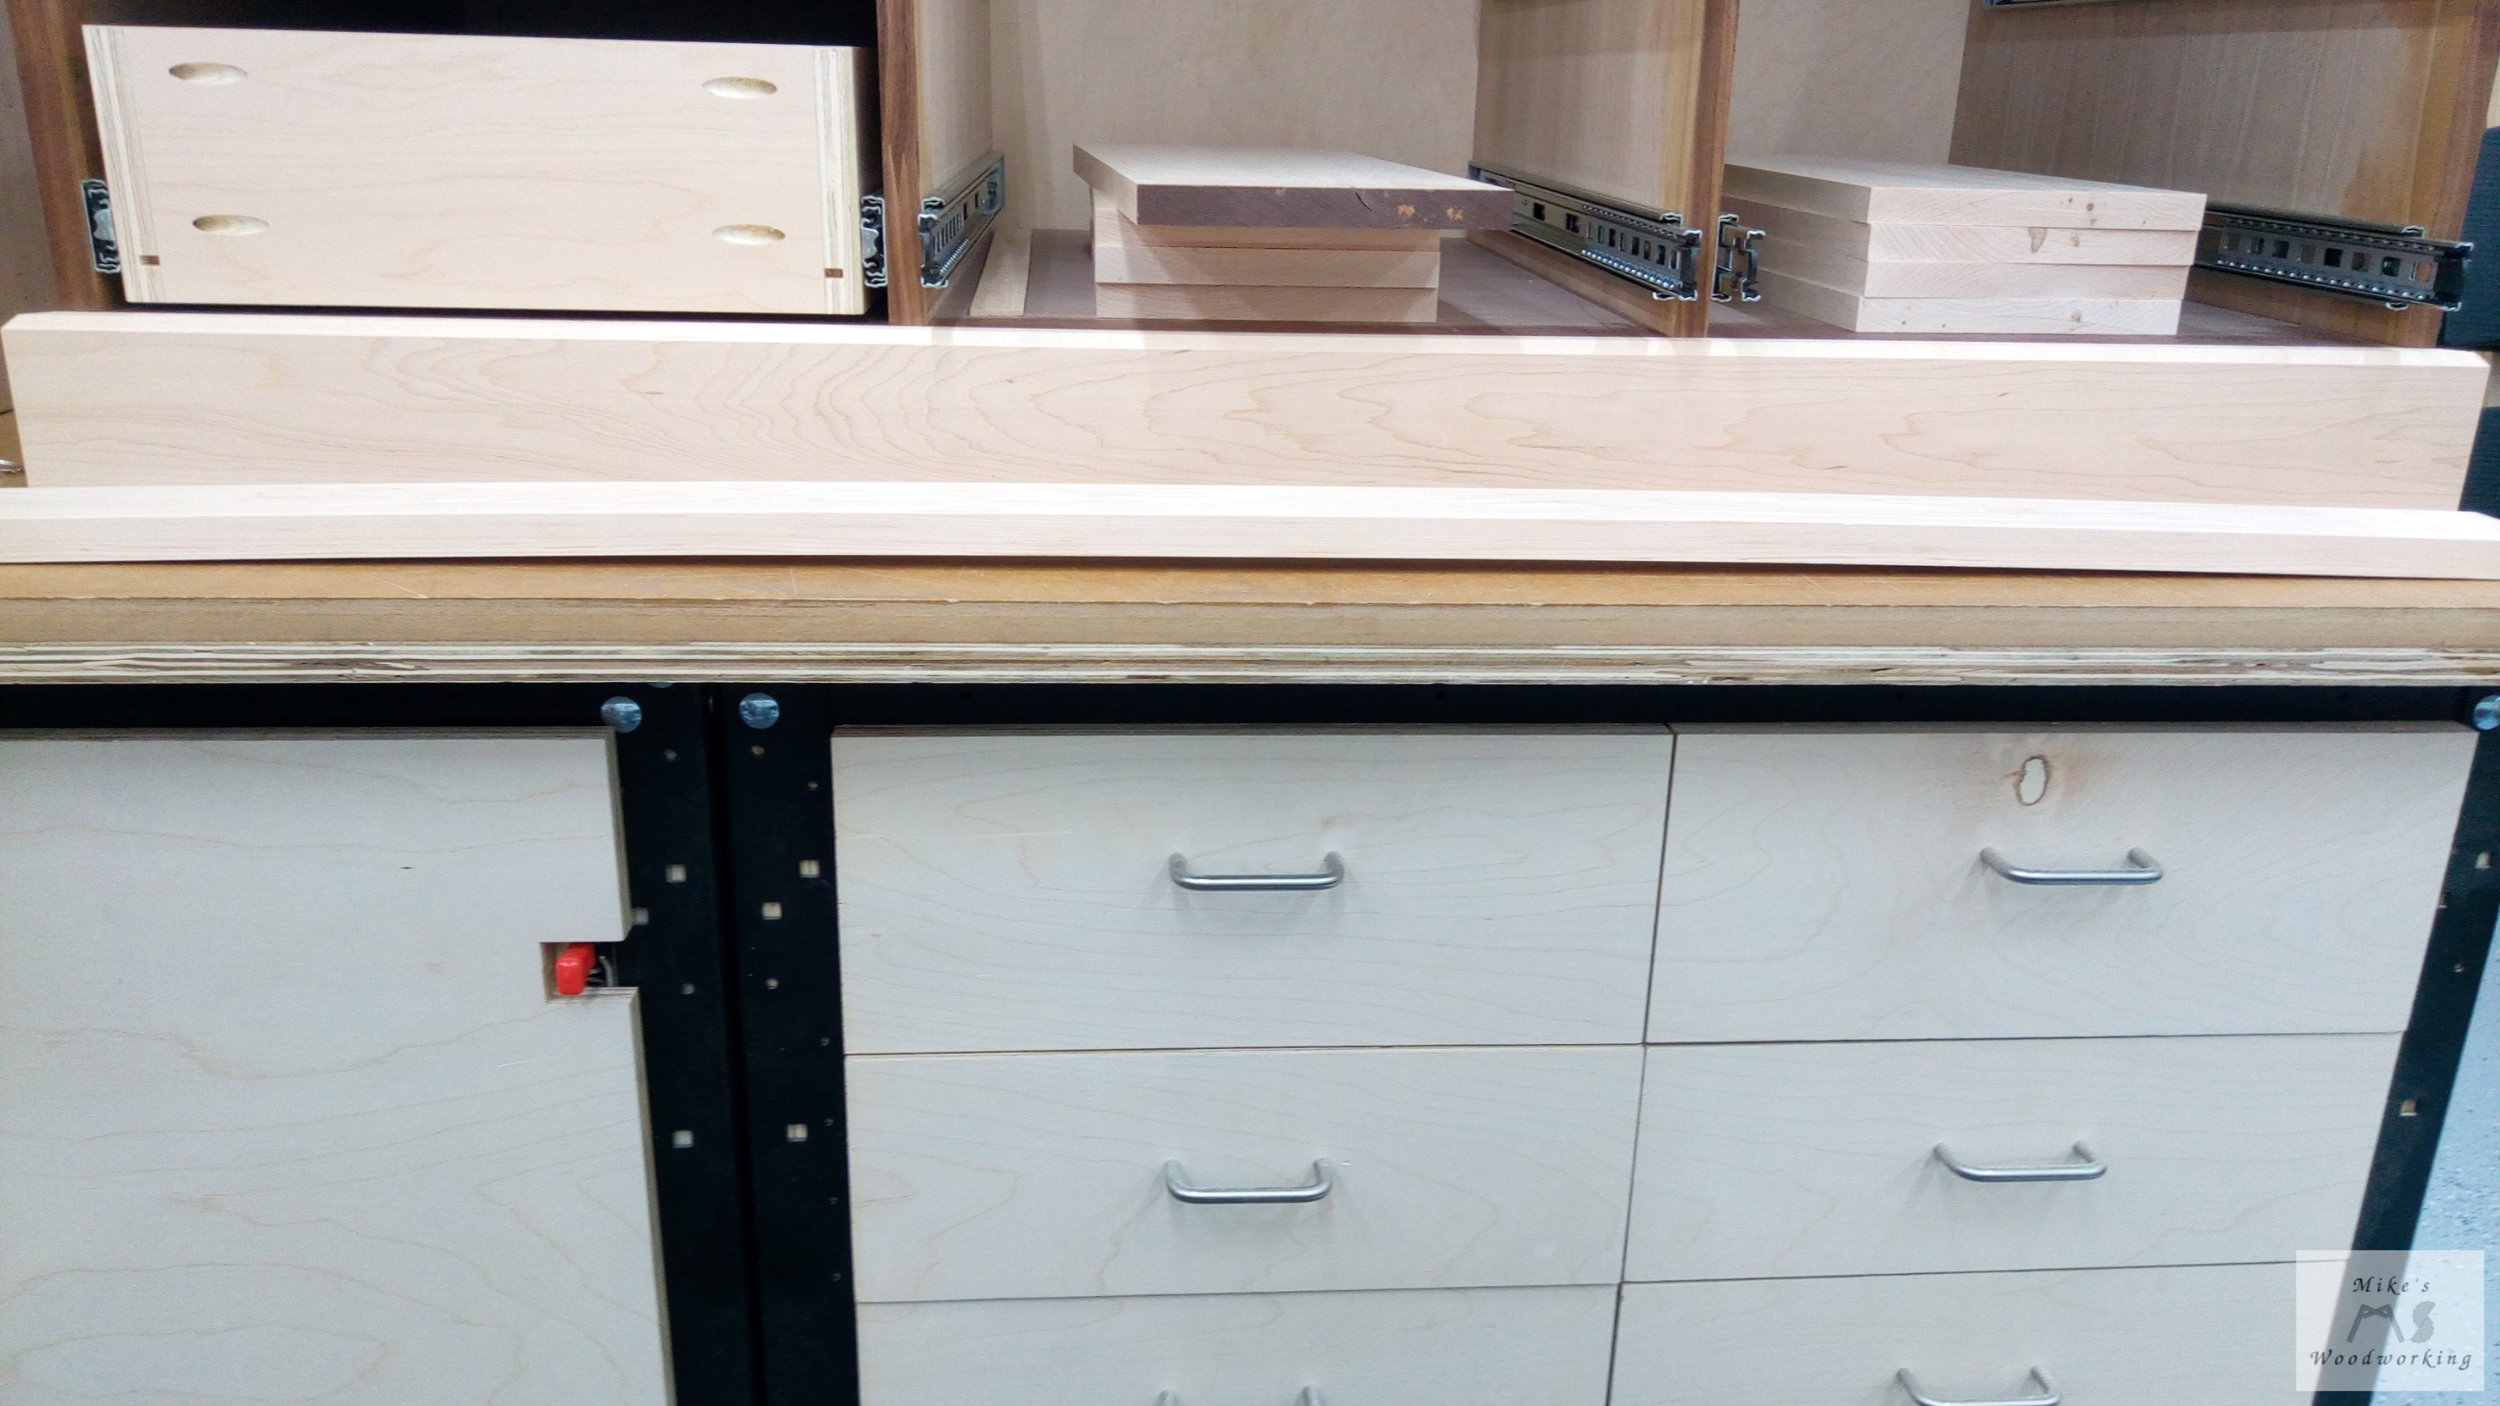
The installation of the 12 sets of soft-close drawer slides and a coat of Walrus Oil Furniture Butter completed the lower cabinet carcass.

When it came time to install all of these drawer slides, I decided to make my life a lot easier and get a Rockler Universal Drawer Slide Jig along with a Kreg Automaxx 6'' Wood Project Clamp. OH. MY. GOD. Why didn’t I get these things years ago? They made installing the drawer slides a breeze. I was able to install all of them in just under an hour. It would have taken me twice as long or more otherwise.
The upper cabinet was similar in construction to the lower section, with the only difference being there were no stretchers connecting the sides. Both the bottom and top were a solid plywood panel with a dado in the center to accept a center divider. The middle panel had a shallow 1/4” dado to allow the acceptance of the dividers on both the top and bottom. All three shelves were glued and brad nailed in place. Screws were not an option in this case.
Securing the dividers was a little tricky. I was able to secure them in place with screws through the top and bottom panels, much like the lower cabinet. However, when it came time to secure them to the middle panel, I was in a bind. I shot a few brad nails into the bottom divider prior to installing the top divider…no problem.
With the top divider in place and screwed from the top, there was really no way of securing it mechanically. In the end, when it came time to secure the back panel in place, a few well-placed brad nails would hold the middle divider in place just fine.

Any adjustable shelves will be made with maple plywood instead of walnut. I simply didn’t have enough walnut leftover, and I didn’t want to spend more on another whole sheet just for these.
I decided to add a few shelf pin holes in the sides of the upper cabinet. I’m not sure if I’ll need to change the space in the future, but I want the flexibility if it’s needed.

The Rockler JIG IT® Shelving Jig worked great for these.
As for securing the upper section to the lower, here is what I came up with as a solution.

I’m not sure if I’ll try to mask the holes by trying to color the exposed plywood once the bolts are in place.
I drilled four recessed holes, with appropriately-sized thru-holes, to accept connector bolts that will screw into corresponding threaded inserts that will be installed into the hard maple top once that is in place on the lower cabinet. This should be more than sufficient to keep the upper cabinet in place and not tip over and kill me.
The drawers were pretty much just standard construction with one caveat.

I made sure to not drill pocket holes where the drawer bottoms were, like I did on the Printer Stand. I’m finally learning.
I wanted to be able to divide the drawers into smaller sections, if necessary, if I didn’t need all of the room for a specific item. After applying the edge banding, but before screwing the drawers together, I ran a pair of grooves in the sides to accept a 1/4” divider.
I cut all of the dividers from a spare section of 1/4” maple plywood from the previous office projects. I had enough to make 23 of the 24 dividers I could possibly ever need. I don’t envision needing all of them at once, so being short one isn’t a big deal.
After a short break from the shop because of Hurricane Ian, I made the final push to get all of the hardwood pieces milled, cut, finished, and installed.


I ran the chamfer for both the bottom and top trim pieces at the same time as the Office Bookcase, that way I could take care of everything all at once and only make one setup at the router table. I would cut the pieces to proper length later on down the line.
The glue-up for the top of the lower storage cabinet was a pretty simple affair. Having those Woodpeckers Clampzilla clamps makes everything super easy. After cutting a bunch of slots for biscuits, the top was clamped up and left to sit overnight.
The doors wound up proving to be the biggest pain in the ass to make of all. After I milled all of my stock to final thickness (over two days to give the material time to do any more movement), I went to cut the stiles at the table saw and noticed a BIG problem.
This is SUPPOSED to be a door stile, not for an archery set.
While I was ripping one of the maple boards, it was starting to bind a bit. Thankfully the riving knife prevented any major problems. Once I finished pushing the board through, I saw what was causing the binding. A couple of the stiles, which are around 40” long, developed a rather large bow in them.
A tiny bit of bow isn’t a big deal, but this was causing the center of the stile to lift up almost 3/8” in the center. I tried a number of different things to take out the bow (ironing the board, wetting it and laying heavy weights on it), but nothing was working. There was just so much stress in this particular board that it was simply a goner.
I had no extra hard maple around, and I didn’t have time to go back to the lumber yard for more, so I just worked with the stiles as they were.
When it came time to run the grooves in the stiles for the 1/4” plywood panels, this is where that extreme bow gave me fits. With a couple of the other stiles, any bow was slight and featherboards were plenty to keep the stock against my table saw fence.
However, with these two boards, they were so stiff that the featherboards simply couldn’t hold them against the fence enough. I somehow manhandled the boards through the blade and made the grooves. They wound up a bit wider in the middle where the worst bowing was, but they would ultimately work out alright.
When gluing up the doors, I made a last minute decision to use more hide glue on these, much like the ones on the bookcase. When doing a dry-fitting of everything, I was having a hard time with a couple of pieces and felt the extra working time would be in my best interest…boy was I correct there.
After plenty of finagling, I got all four doors glued up. The two pieces with the most bow were both used in one door that would be placed in a position where it wouldn’t be quite so noticeable. All in all, the doors came out fine. Thankfully the hinges offer a bit of adjustability when it came time for spacing the doors on the cabinet.
With the addition of the upper trim and some finish, it was finally time to move both sections into my office and secure them together with the connector bolts.


Sorry for the blurry pic. The adjustable shelves are more of the maple plywood since I ran out of walnut. I think they look nice anyway.
Once I got the upper section in place, I was able to secure the connector bolts in place.

Marking the corresponding holes on the top of the lower cabinet was easy enough. While still on my workbench, I placed the upper section onto the top and positioned it in its final location. With a 1/4” drill bit, I made a mark through the through-holes and used my Rockler Portable Drill Guide to make the holes in the top for the threaded inserts. I had a small mishap with one of the threaded inserts, but I was able to fix it and it will never be seen anyway.


Here you can see how bad the bow is on the worst stile. It’s on the side where it won’t be seen all too often, so I’m not really worried about it. It’s still a fully functional door nonetheless.
With the office storage cabinet now done, the office furniture remodel is now complete. I’ve got a wrap-up of the entire process here.
After a short break, the next thing on the docket will be Christmas presents. I’ve only got a little over a month for four gifts, so I’m not sure if I’ll get them all done in time.