
Office Remodel
As I complete each piece of this remodel, I will put links to the projects here:
The current look of my home office is a total mess. It is a hodgepodge of various pieces that run the gamete of wire shelving you can buy at the home center to things from Ikea. It’s an accumulation of stuff from the past 12-15 years.

This is the current layout of my office. As you can see, it’s quite the mishmash. The green things floating in the air are the power outlets.
There are, of course, a couple of things not shown in this Sketchup drawing that I simply forgot to include. One is the inkjet printer I have currently sitting on top of the IKEA workbench. Another is a smaller UPS which provides protection for the networking equipment, Synology boxes, and printers (the printers are obviously plugged into surge protection only…I’m not a novice). Also not shown are the extra printer supplies like paper, toner, and ink.
Now that I’ve shown the current layout, here is a peek at what I WANT to do with the space.

Just as the green floating things are the power outlets, the red ones are the landline (next to shredder) and the cable (next to printer cabinet).
My choice of woods will consist of walnut for the larger panels that make up the carcass of each piece and door panels, and hard maple for the trim, door frames, drawers, and tops. The trim surrounding all of the furniture will have a simple chamfer. As you may have noticed, a few items have moved or appear to be missing. That’s all part of the overall plan.
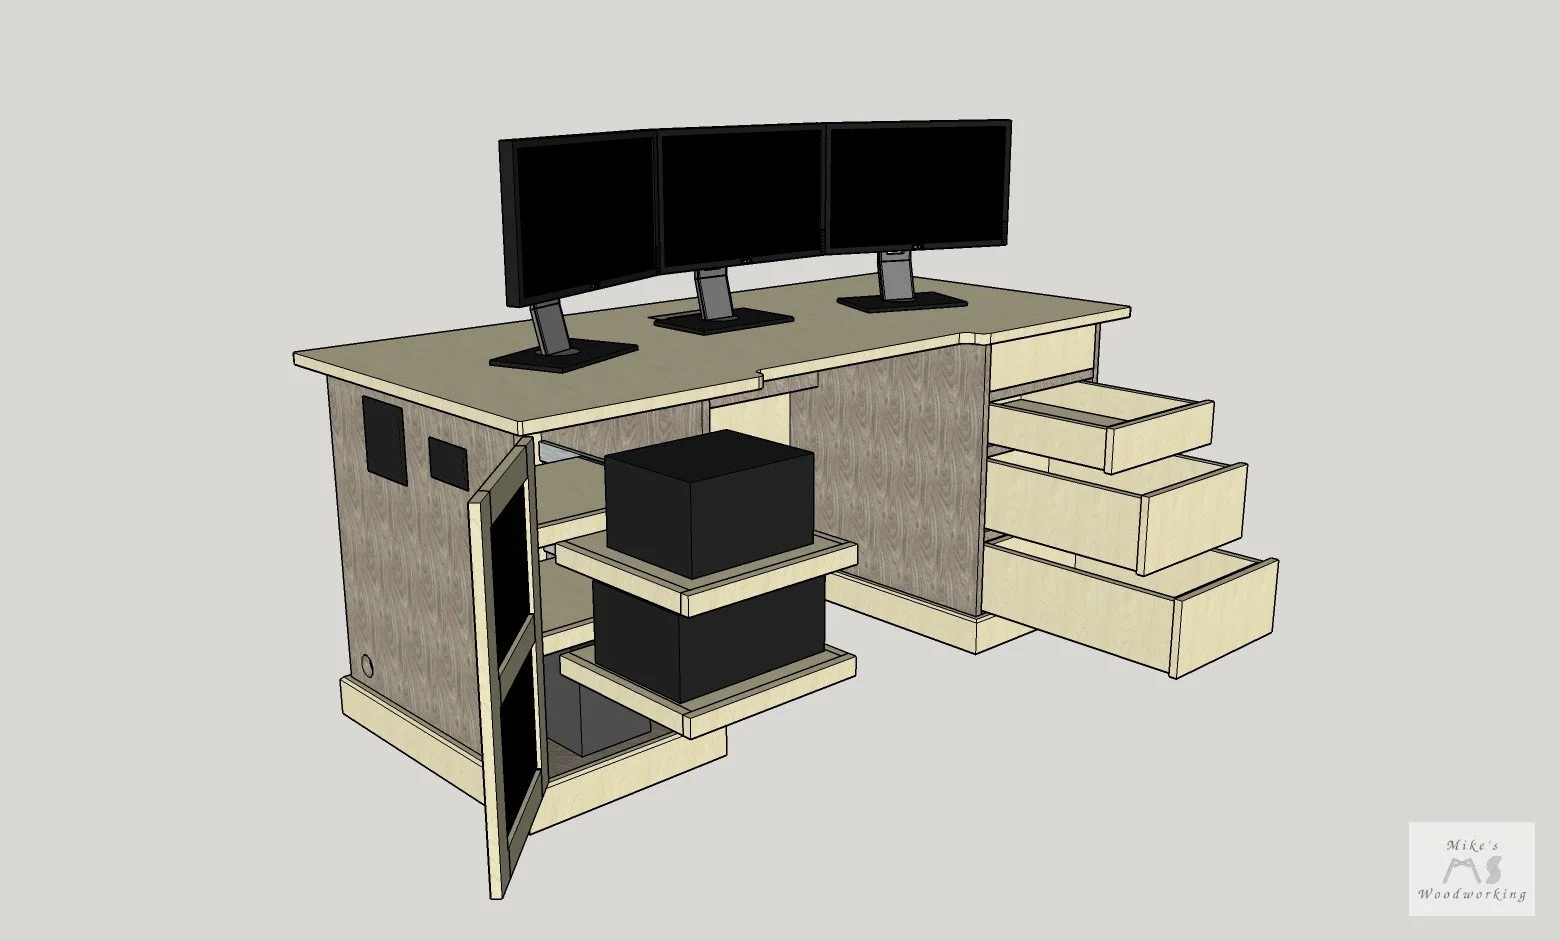
First up is my version of the Executive Desk. The inspiration for this piece came from the Executive Desk that Marc Spagnuolo at The Wood Whisper made a few years ago. I bought the plans and instructional videos and modified the desk to suit my needs, wants, and overall look (not to mention my current skill level as a woodworker).


Next up is the small two-drawer file cabinet in the corner of the room behind the Executive Desk. The current file cabinet has A LOT of junk in it that simply doesn’t need to be kept anymore, plus it just will not fit into my new home office motif. It has served me well in the time I’ve had it (moving multiple times, with the dents and scratches to prove it), but it’s time to move on. There really isn’t anything special in the design or function of the file cabinet. Moving on to the next piece.


The current setup for the printer and networking equipment is certainly not anything to write home about. A set of wire shelving which, while entirely functional, simply looks like crap in my opinion.


The laser printers are most frequently used, especially the all-in-one with its document scanner, so they would need to be out in the open permanently. The inkjet, however, is only used sparingly (mostly for making my business cards/Christmas gift tags). Having that printer behind closed doors would make the most sense. With that being said, because of its design, it would be beneficial to allow the inkjet the ability to be pulled out via a drawer.
The other three compartments would be used as additional storage space for printer supplies, or anything else related to the rest of the items stored on or in this piece. To allow flexibility for future use, I think I will make the storage compartments with one adjustable shelf for each section.
Sitting just to the left of the printer stand will be a small bookcase. I have a collection of old books (IT, woodworking, gardening, etc.) as well as a set of home repair binders that are taking up space on a bookcase in Lisa’s office. I want to move them out of her space and into their rightful home in my office.


I’ve opted to put doors on the bookcase to keep dust off anything stored inside. The door panels will utilize acrylic instead of glass. I’m not comfortable working with glass, not to mention acrylic will make the doors that much lighter, plus the acrylic won’t shatter should something hit it like glass might.
As for the shelves inside, I’m not sure if I will go with adjustable shelves or simply fix them in place. That decision will be made once the project actually appears on the horizon.
Finally, I’ll address the elephant in the room, aka the giant storage cabinet on the opposite wall as the desk.


As you can see, both the upper and lower sections have doors that will open and slide back into the frame. I thought this was a nicer look for such a large cabinet and would prevent the large doors from being a nuisance if they were left open for any extended period of time.
The lower section has 12 drawers which are around 5” deep each. The upper section has a total of 20 drawers measuring 3” deep. The purpose for all of these various drawers is to house all of the littany of IT parts and cables I still have. Most of these things are currently in plastic drawer bins on the large wire shelving unit or in the metal Craftsman cabinet.
In addition to the drawers, there is a section at the top, which may or may not have an adjustable shelf, to house any large items that are left over.
For the top of the cabinet itself, I’m not sure if I will go with a hard maple top like the other pieces in the office, or simply forgo the top altogether.
I started designing this furniture some three years ago now. Due to a lot of different circumstances, I have not been able to get any of these projects going until now.
The first I will likely tackle will be the Executive Desk as it is the most used piece in the room, and is a bit complicated. Overall, making all five pieces of furniture for my home office is a daunting task to say the least. The hardest part, with everything I want to make, is actually getting started in the first place. Once I finally make up my mind to get the materials, I’ll be well on my way.
Office Remodel Wrap-Up
With that, my office remodel is finally complete. All five pieces took me a total of almost eight months to finish. This includes my road trip in May, as well as the time lost to Hurricane Ian, and other countless days where I just didn’t have the energy.
While certainly not perfect, I am absolutely ecstatic with the overall results of my office furniture, particularly the Executive Desk. It was, by far, the most complicated piece of the entire project. I think, if I were to start this project over from the beginning, knowing what I know now in regards to some portions of its construction, this would see the greatest amount of improvement in the final product. Nevertheless, I thoroughly enjoy sitting down at my desk every morning knowing that I built it myself.
The File Cabinet was one of the simplest builds, partly because it was by far the smallest. There weren’t many hiccups with its construction, save for maybe one of the drawer faces. It’s functionality meets every criterion that I required during its initial design.
The Printer Stand offered its own set of challenges. I had to make a couple of changes on the fly when it came to the pull-out printer drawer and the doors for this compartment. It wasn’t anything that a short pause and some thinking couldn’t solve, and the results were what I expected in the end.
The Office Bookcase was another fairly simple project. The biggest hiccup were the doors and their acrylic panels. As I mentioned in the corresponding article, I am not pleased with the doors and will likely remake them in the future (one benefit of using hide glue).
The final piece was definitely the biggest of them all. The Office Storage Cabinet was ultimately made into a two-piece item simply because of the sheer size. Making it as a singular unit just wasn’t feasible. Like the bookcase, the doors were the biggest sticking point. When cutting the door stiles to size, some of the hard maple had so much tension in it that they bowed horribly, to the point where no amount of added moisture and attempts at flattening worked (additional milling wasn’t an option). Again, I’ll likely try to remake one (possible all) of the doors in the future (hide glue to the rescue again).
Given all of the hiccups and little flaws that only I am likely to see in each of these pieces, I am exceedingly proud of what I’ve accomplished. These were my first completed pieces of furniture (the adjustable storage cabinets don’t count) since starting this woodworking journey some five years ago now. Yes, I had a small shop in Maryland and in our rental house, but I never got even close to making furniture in those spaces.
I absolutely love the contrasting look of the darker walnut panels with the lighter hard maple door frames and drawer faces. One of my favorite things turned out to be the choice of hardware for the drawer pulls and door knobs. The aged bronze with a hint of copper is just perfect. It blends well with the walnut, and offers the ideal amount of contrast with the maple. Sometimes it really is the little things that make the biggest difference.
It was a long journey for me to get to this point. As I’ve said previously, the hardest part for me is actually getting my ass into the shop to begin working on a project. I’ve always got fear and trepidation in regards to failure with each and every project, whether it’s for the house or the workshop. It’s something I think I’ll always have with me. Once I get going, though, I’m able to press on and get the job done, even if I make a few mistakes along the way. But, hey, they are only mistakes if you can’t fix them 🙂