
Workbench, Version 3
I was growing tired of Workbench #1. First, the large clamp drawer was a total bust with all of its binding problems. Also, the drawer storage wasn’t very deep and the open back half of the bench was not very accessible (it was backed up to my table saw). I was usually keeping things there that I used very rarely so I wouldn’t have to go on an archaeological expedition just to get something out (my name is Mike, NOT Indiana Jones). Lastly, my vision to include a vise on this workbench never materialized, for one reason or another.
I needed some options for clamping. I didn’t want to build a full-blown workbench. I’m not much for doing hand tool work, and I wanted something with a decent-sized work surface that can be multi-functional. Workbench #1 was an assembly table, but most importantly it was the outfeed portion for my table saw. Somehow I need to combine all of these requirements into one.
After doing more searching for inspiration for an assembly table, I came across a winner. It was the T-Track Assembly & Outfeed Table designed by Johnny Brooke at Crafted Workshop (pictured below). This has everything on my checklist. The t-track would enable any number of clamping options, there is plenty of storage space and it was a great option for an outfeed table. Let’s get to designing.

A Tweak, Here and There
There were quite a few changes I wound up making to Johnny’s table design. First, I changed the overall dimensions just a bit as I wanted a little bigger table. Next, the side cabinets on his were designed for Festool systainers. I’m not a Festool person, so these were of no real use to me. Instead, I went with regular enclosed drawers on both side cabinets, with the drawers being a little deeper.


For the middle cabinet, the plans called for a few smaller drawers and some fixed shelves for two hardware storage boxes as well as a hose reel for an air compressor. I simply made the middle cabinet a set of two wide drawers, but the overall cabinet was a little narrower than the plans.

For the drawers on my cabinet, on one side I wanted a place to store the small air compressor and hose reel I had so that they would be off of the floor and out of the way, but still easily accessible when needed. This was easy enough to draw up with the dimensions of the reel and compressor already known. The rest of the drawers were spaced out to give me ones that were the right depth for what I thought I would need at the time of the build and in the future.
One final change I decided to make was in regards to the top. The double-laminated plywood would be great for strength to secure the t-track. While MDF is generally a much flatter and truer surface, it isn’t as strong when it comes to screwing things into it. I’d be afraid while cranking a clamp down in the t-track that it would break out of the MDF. I opted to go the extra step and add a sheet of Formica to the top. This would help preserve the surface by allowing easier cleanup of glue and other things that might otherwise damage the plywood.
The cabinet builds were par for the course with simple pocket screw construction. Once the cabinets were made, I added some heavy-duty leveling feet so that I could level all of the cabinets to each other and lock them together.
Once if Not Enough
Next came the top. I had some problems with the top. I cut one piece of 3/4” plywood to final size, while the other was just slightly over-sized in all directions. This would give me enough wiggle room to get the top in place and not have to worry about flushing everything up while worrying about the glue setting up before I was finished. Like Johnny had recommended, I found the flattest spot I could on my garage floor to set the top down so that I could add a ton of glue on one sheet and then place the other sheet on top of it, making sure I had about as close of an even overhang as I could on all sides. I then used some 1” brad nails and proceeded to nail the two sheets of plywood together, all the while ensuring I left the sections that would have the t-track in them free of nails as to prevent damaging my router bit. On top of all of the nails, I made sure to put some heavy objects on top of the plywood to add some extra pressure. Once I got as much of the glue squeeze-out off of the floor as I could, I left the top to cure overnight.
After moving this monstrosity on top of the cabinets, I noticed I had a problem. It looked like I might not have gotten a good enough glue bond between the sheets of plywood and that the top was bowed in the center. Needless to say, I was a little bit upset at this predicament. I chalked it up to having it sitting on the floor and the nails not having enough holding power to combat any bowing of the plywood. So, with that in mind, I set out to make ANOTHER top for the workbench. This time, I set both pieces on top of the cabinets, which were already level, and put them together on there. Instead of brad nails, I decided to use some 1” screws to secure the pieces together. I, again, laid out a pattern to leave the space for the t-tracks free of any fasteners.
Once the second top was done curing, I went to fasten it to the cabinets. I, again, noticed that the top didn’t seem completely flat. I tried to secure it to the cabinets in such a way as to pull down the high spots, but that didn’t appear to help much. I decided against trying another top and just left it as it was. The next time I go to make a top for a similar type of workbench, I’m not going to go with plywood. Time to move on.
Yeah, That’s Not Going to Cut It
I had to order the Formica from my local Lowe’s and have it delivered to the house since they didn’t have it in the store. I also made sure to get the contact cement and other things required for securing the laminate to the plywood. I went with the low-VOC contact cement as I didn’t want the smell of the other kind lingering in the garage for days. Applying the contact cement and installing the laminate was a fairly simple task and went smoothly. I trimmed the sheet to be slightly oversized and then I flush-trimmed it with a router. I applied some hardwood trim to the table top and it was, more or less, a functional work surface.
Of course, I failed to realize at the time that applying the laminate to the top was going to cover up all of the markings that I made for the t-track slots that still needed routing. Not a huge deal as I had all of the measurements written down beforehand. I made sure to take into account, when laying out the initial measurements, the thickness of the trim. Now is not the time to ruin my router bit.
Once the guide lines were laid out again, I used my DeWalt track saw guides, with the track attachment installed on my router, to precisely router the grooves for the t-track. I tested the depth on some scrap material and found the perfect depth prior to working on the top. Everything worked out great for the grooves. I just took my time with a couple of passes for each slot, so as not to overwork the router and bit. The mess was mostly avoided thanks to the Oneida router dust collection attachment I had previously gotten for my router. It’s not perfect, but it creates a more acceptable mess (if there is such a thing) instead of a gigantic one.
After figuring out how much t-track I was going to need, there was one dilemma I had to address. How was I going to handle the intersections of the t-track? I had 12 intersections for which I had to account. Rockler, where I got all of the t-track, sells intersection kits for just such a situation. However, the total for buying 12 intersection kits was going to be more than double the cost for all of the t-track. I figured, if I was careful, I could make the 45 degree cuts myself on the miter saw, and save a bunch on the intersection kits.
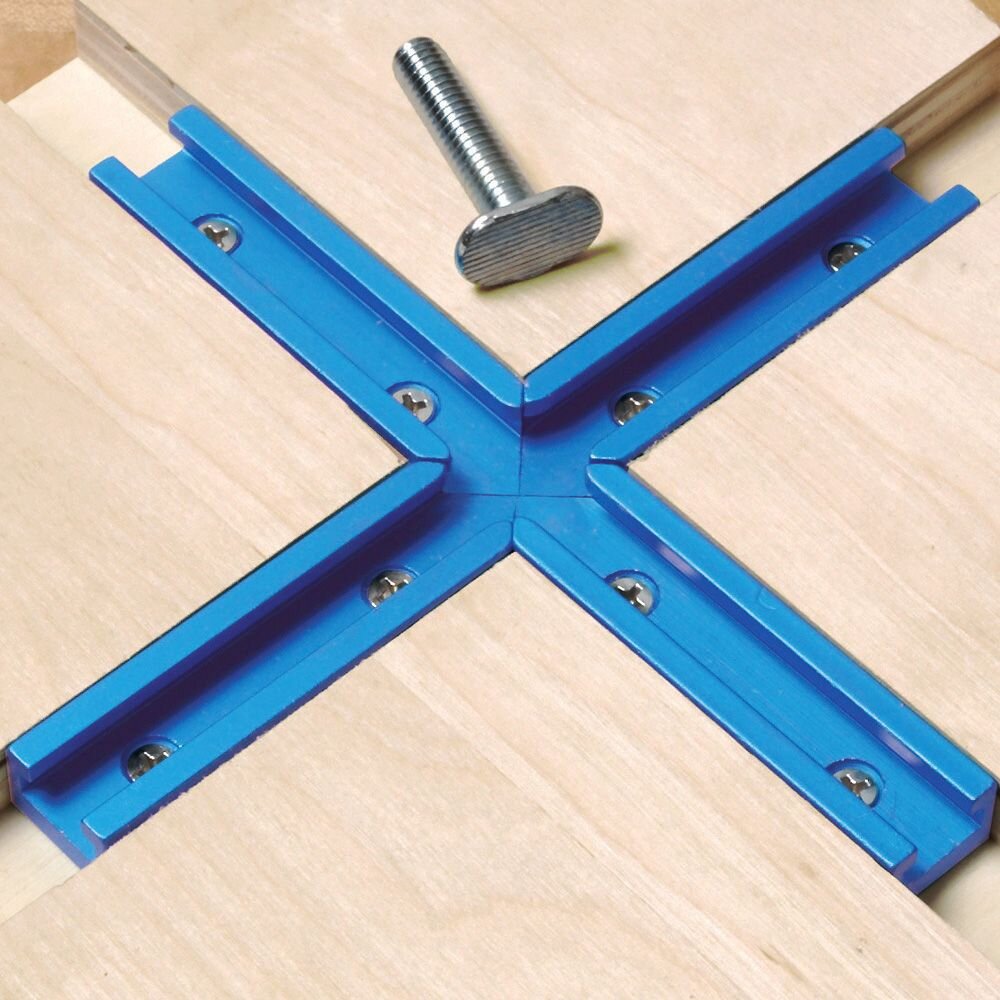
This is a set of the Rockler t-track intersection kits.
I changed out my good miter saw blade for the stock one that came with the saw and began cutting all of the pieces that I needed, carefully measuring for each and every piece, to ensure a perfect fit. It was a lot of time, and a ton of aluminum shavings all over the floor and my miter saw station, but in the end it all worked out. A couple of the intersections aren’t super precise (there are slight gaps in the miters), but everything fits together fine, and I don’t have any problem sliding the bolts through the t-slots. If I were to do this again, I would simply leave all of the t-track squared off and have the intersections open. This would allow greater ease with inserting items in the track in the middle of the table, instead of having to start all the way from the end.

Here is one of the intersections I cut on the miter saw. You can see a slight gap in some places.
You’ve Gotta Roll With It
Next came all of the various drawers. Same old same old there...pocket screws. The only thing of note on the drawer slides was that I made sure to double-up the slides on the two wider drawers to ensure they could handle anything I threw at them.
My “favorite” part came next...drawer faces. I despise installing drawer faces. I have such a hard time with them, for various reasons. All of the drawer faces, with the exception of the two large wide ones, look absolutely terrible. Nothing looks straight, and the gaps are all uneven. Every time I look at them I cringe. For the time being, they are functional, and that’s all that I care about at this point. I’ve got a long ways to go when it comes to drawer faces. I think my biggest problem is that the cabinets themselves just aren’t perfectly square, which is my own fault. I really need to keep checking for squareness as I go.
The last thing to do was to install some kind of casters so that I could move this thing around should the need ever arise (and believe me, it has a few times). I liked the idea of the Rockler workbench casters, but because of the weight of the workbench when it was empty (I calculated nearly 500 lbs.), one set of casters wouldn’t be enough. I would have to double-up the casters to ensure they wouldn’t fail because of the weight. I also made sure to install the caster plates on the workbench, as well. This would allow me to remove the casters when they aren’t needed and won’t be in the way all of the time. In addition, should I build anything else in the shop that can use the casters, I can just install more of the plates and use the same sets of casters.
Once I got all eight casters installed, I was running into a small problem. Again, because of the sheer weight of the workbench, I was having a hard time engaging a single caster in one corner. I tried again, this time engaging both casters in the same corner at the same time, and I was able to lift it without too much trouble. I quickly ran to Lowe’s and grabbed a piece of aluminum tubing, cut it to the proper lengths, drilled holes in the caster arms and bolted the aluminum tubing into place. I made sure to number each set of casters with their proper places on the workbench as they were all slightly different in alignment to each other. Now the task of engaging the casters is a breeze, and disengaging them is just as easy with the aluminum tubing making a great handle.
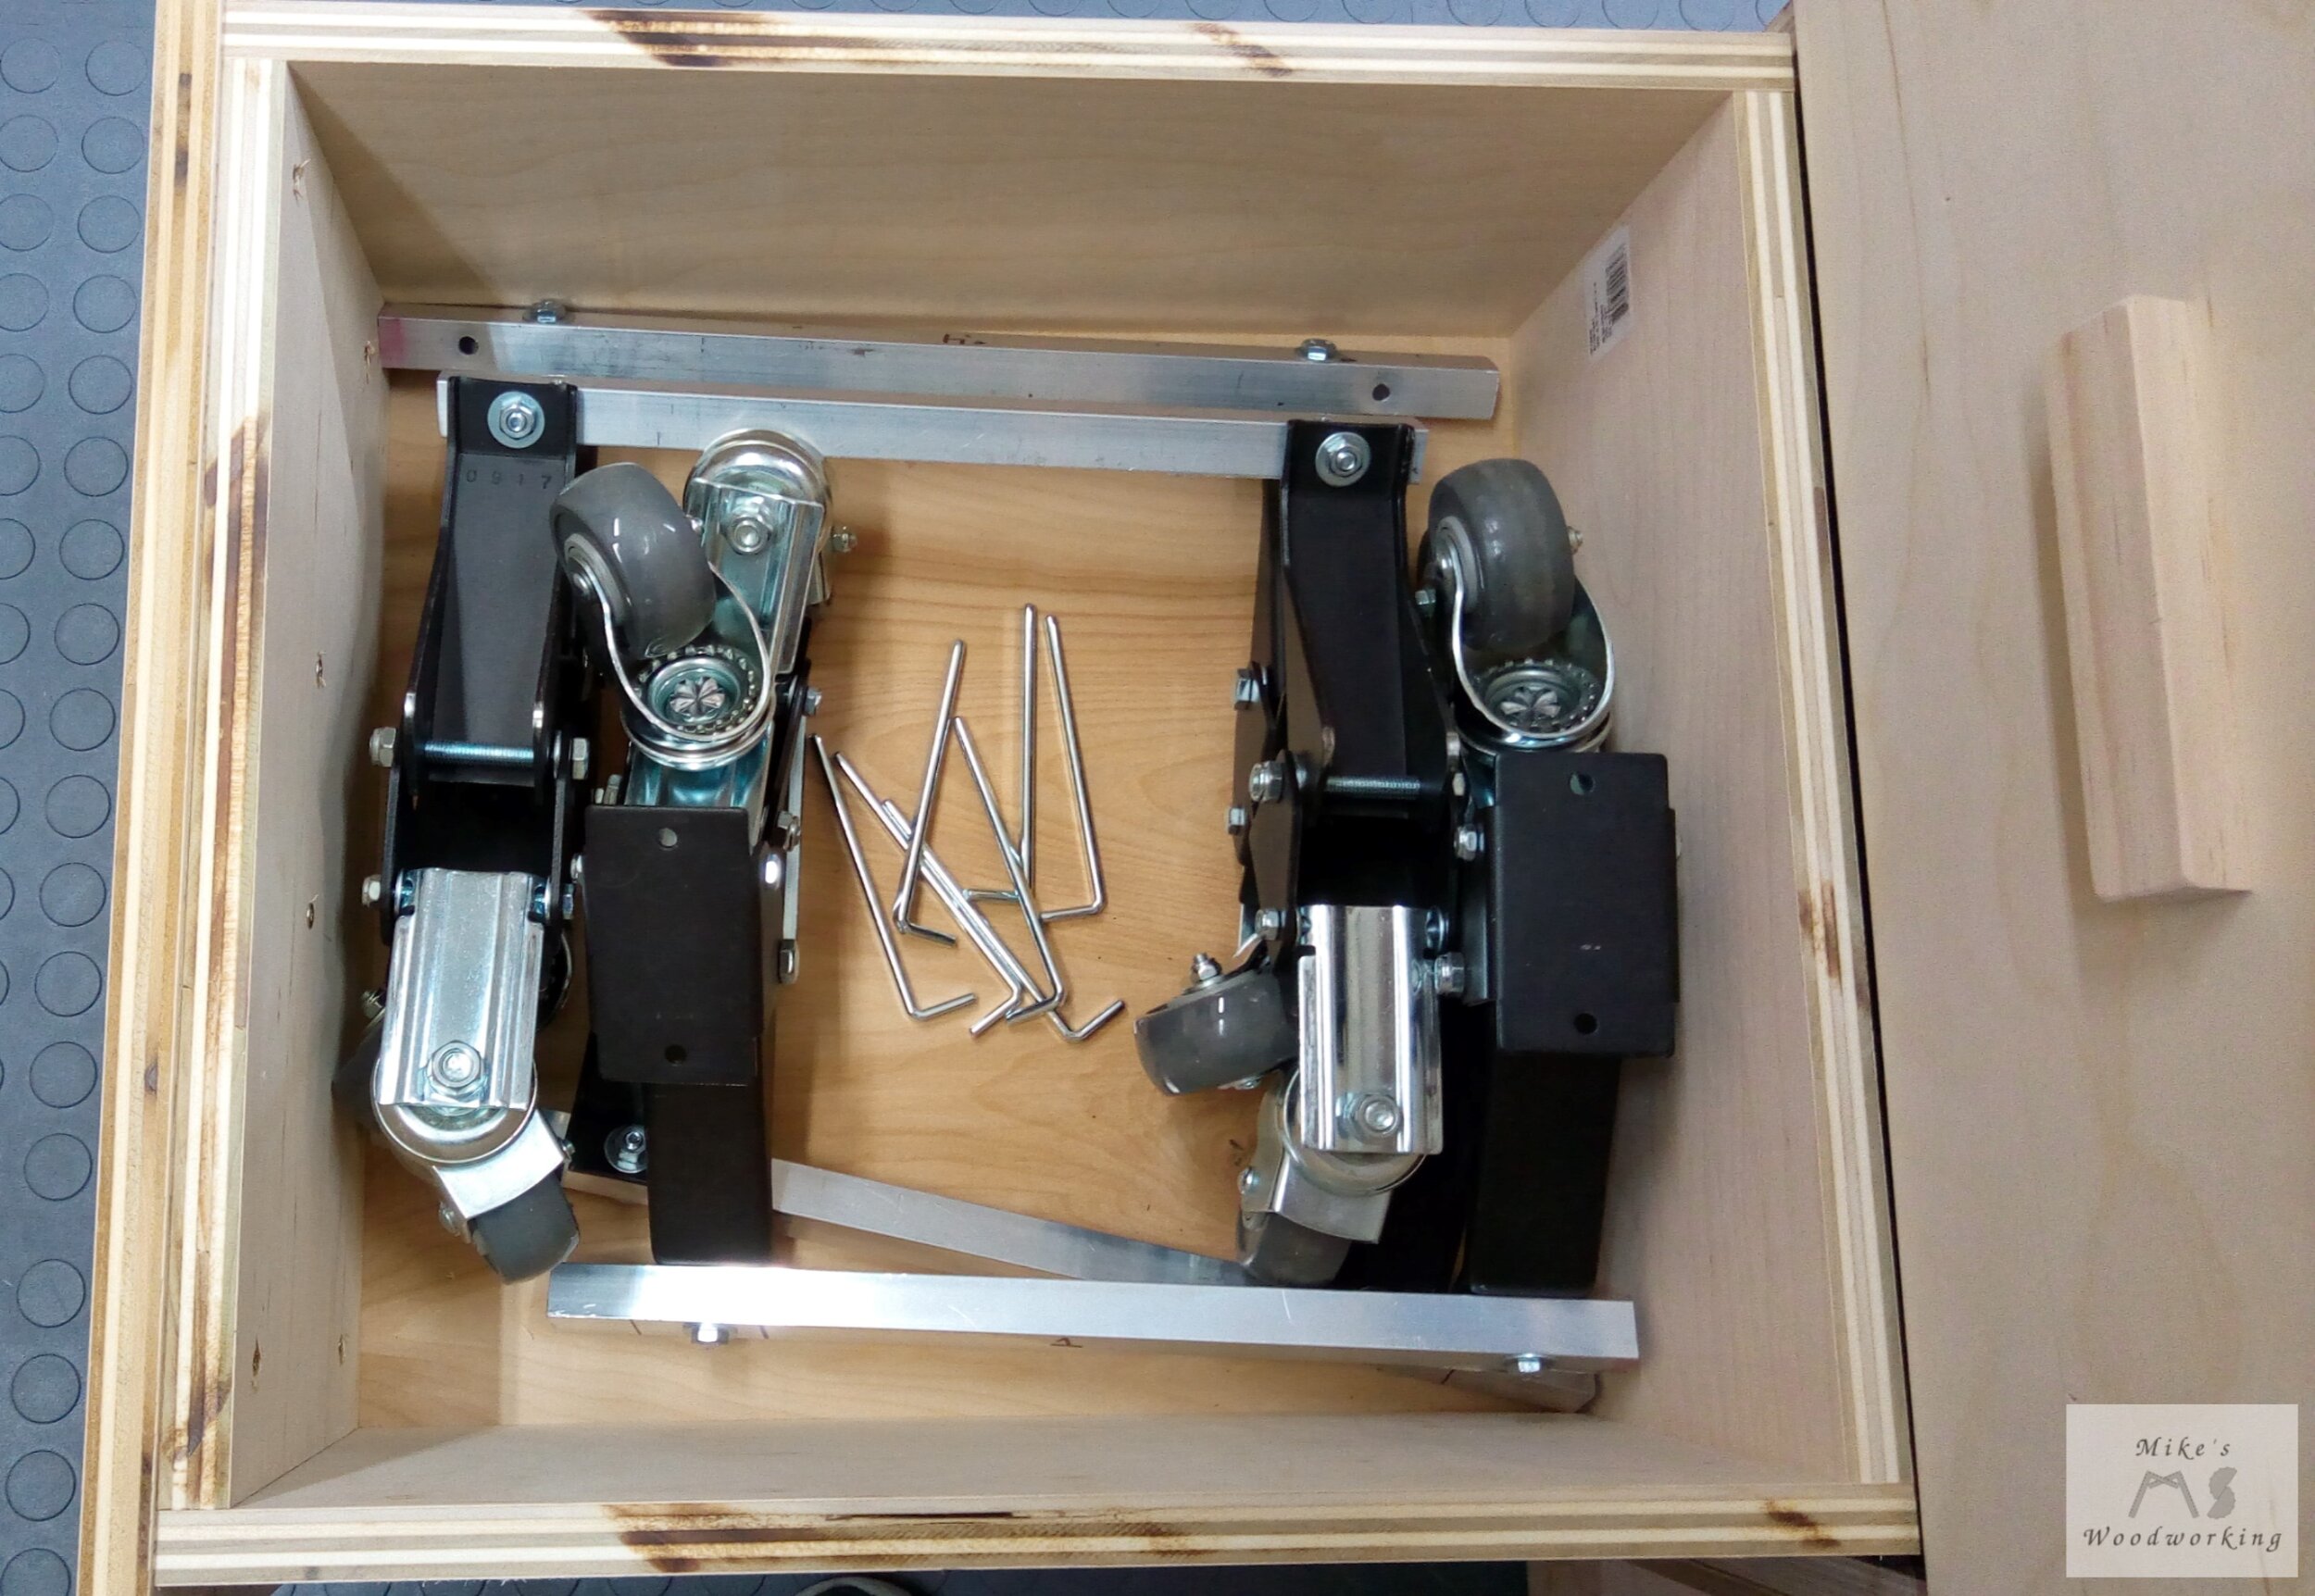
Here you can see I store all four sets of casters in one of the bottom drawers in the assembly table.
The same pine drawer pulls that I installed on my miter saw station were used on the workbench drawers. These would eventually be replaced with metal handles later on down the road.
The workbench has served me quite well in the time I’ve had it in service. As of November 2020, it’s been over a year and a half or so since I finished it, and it’s still holding up just fine. I’ve put a couple of brad nail holes in the top, and a router bit cut a small section off of one piece of trim (the piece I was routing was moving on me). I’m not pleased that the top isn’t dead flat, but I think that is my own doing. I’m just not as skilled yet with some things. I haven’t used the t-track top as much as I’d envisioned I would. I do figure on replacing this workbench with something else in the future. Recently, Jason Bent at Bent’s Woodworking showed his assembly table for his new workshop and I kind of like that idea, just minus the Festool stuff. We’ll see what happens. For now, I’m sticking with this workbench, for better or worse.
***RETIRED: June 2021***
This workbench has been retired, torn apart, and repurposed (in part) into the Rockler workbench. I also used other parts of it for the other Rockler projects I made in 2021 (miter saw station, table saw and router cabinet).
Workbench 3.0 served me well in the time I had it, but a lot of the features that caught my eye in the beginning, especially the t-track, just never found their way into my workflow like I thought they might. The t-tracks were really just a big dust collector and a pain to have to constantly keep clean.
My new Rockler workbench does not have the t-track, by design, but there are times when I wish I still had it. Overall, though, they would have the same problems.