
Scrapwood Storage Cabinet
I’ve had some kind of plywood storage cart in every workshop since moving to Florida. I always seemed to have a lot of scrap plywood pieces on hand for upcoming projects or from the breakdown of other failed/retired projects. The size and shapes of my storage carts has varied from the Sheet Goods and Wood Storage Cart, to the Panel-Cutting Lumber Cart to Lumber Cart 2.0.
As my new workshop evolved, and I added more tools, the amount of floor space was starting to get scarce. My most recent lumber storage cart, Lumber Cart 2.0, was taking up more floor space than anything else in the shop not called an assembly table or miter saw station. It was a full 5’ long and 2-1/2’ wide. Despite having six heavy duty casters installed on it, it was still a beast to move around the shop, which wasn’t very often. I was already in the process of getting away from keeping large pieces of plywood on hand, and I wanted another way of storing my usable plywood scraps.
I remembered seeing the large storage cabinet that John Heisz always had in the back of his workshop. John largely keeps his scrap pieces of hardwood in the cabinet with a section next to the cabinet for storing sheet goods. Now that the old garage shelving was taken down and the stuff stored in them moved to the Adjustable Storage Cabinets in the spare room, there was plenty of room for a standalone cabinet to store wood scraps. In addition to the cabinet, on the wall above the cabinet I would hang a 4-tier Bora lumber rack. I already had the 6-tier Bora lumber rack in use on another shop wall and it’s worked out great. I was going to force myself from keeping large pieces of sheet goods on hand for anything other than a current project.
This Seems Vaguely Familiar
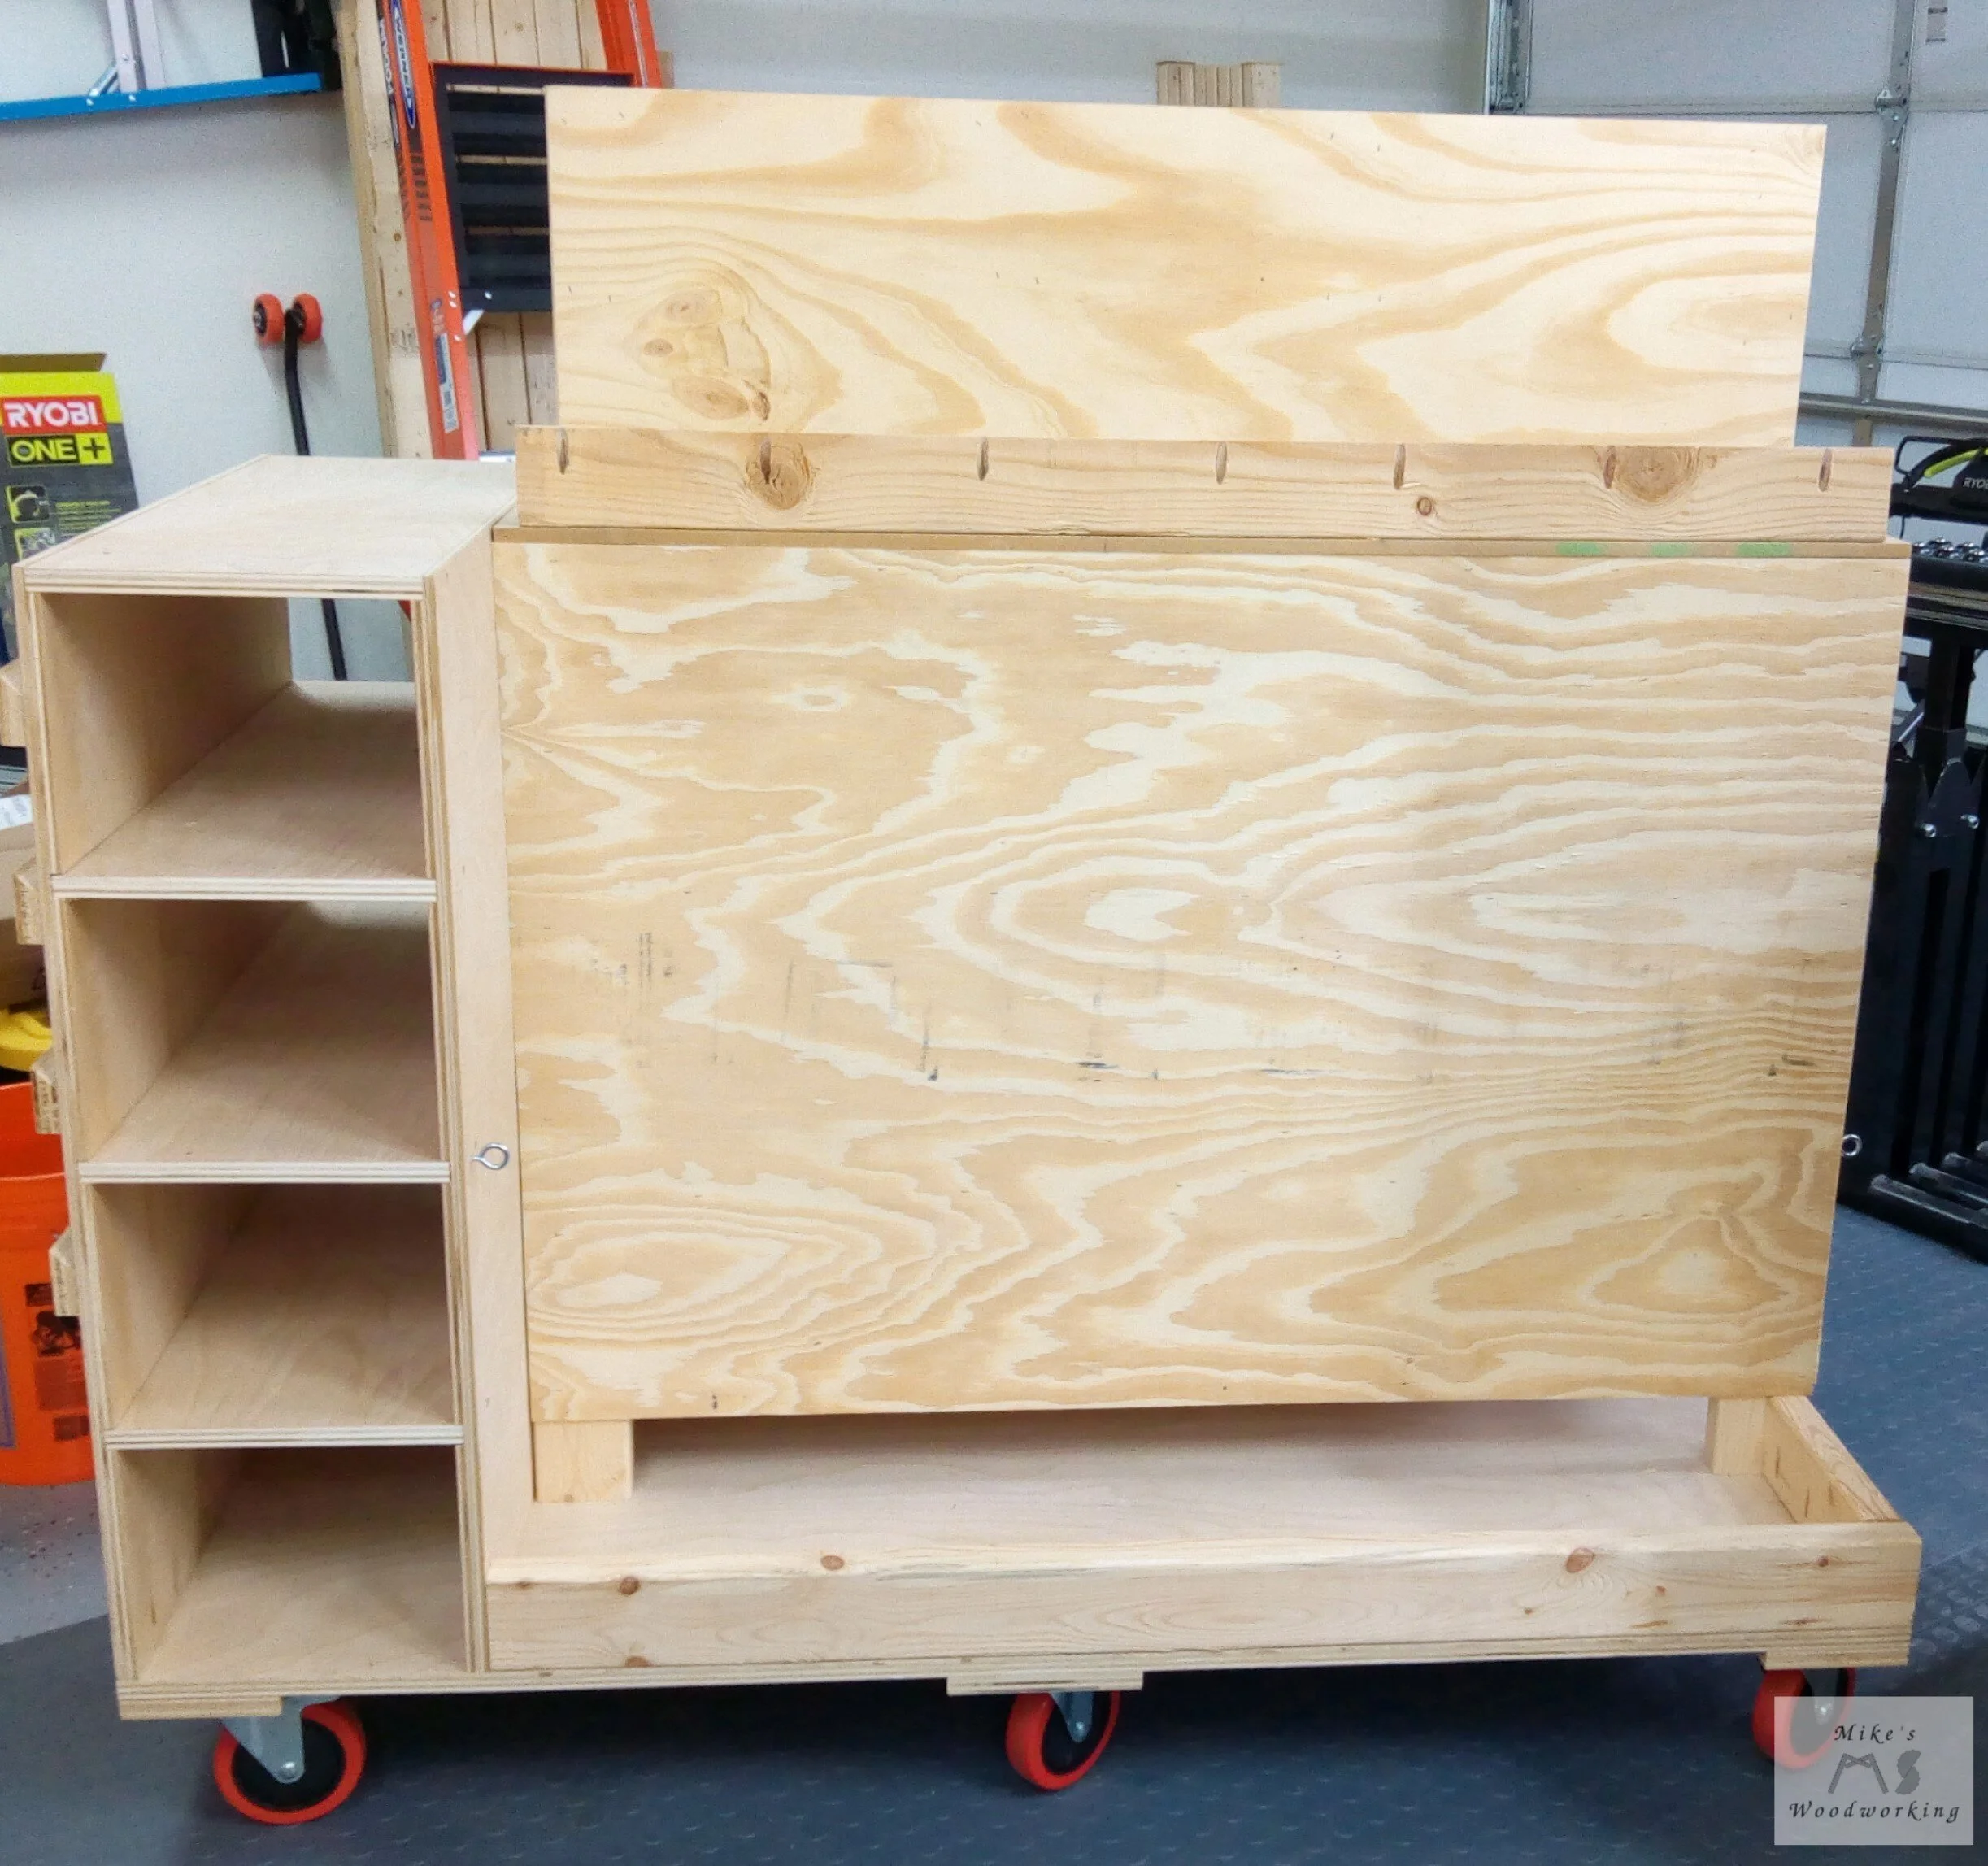
The overall design of my scrapwood cabinet was very similar to John’s. The only differences were the overall dimensions and mine would have adjustable shelves instead of fixed ones. John’s cabinet was over 8’ tall, over 3-1/2’ wide and 2-1/2’ deep. Mine was to be 6’ tall, 2-1/2’ wide and just under 2’ deep. The ceiling in the garage is over 9-1/2’ tall, but given that I wanted room above the cabinet for the Bora lumber rack, I needed to make my cabinet a little shorter. I wouldn’t be including the section next to the cabinet for sheet good storage. Also, I planned on getting a smaller metal cabinet to put next to the scrapwood cabinet in order to hold the chemicals and things used around the house.
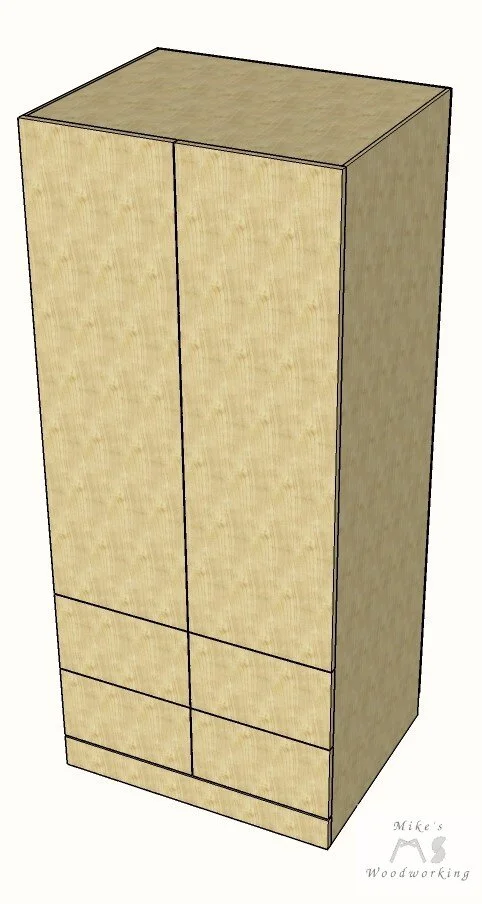
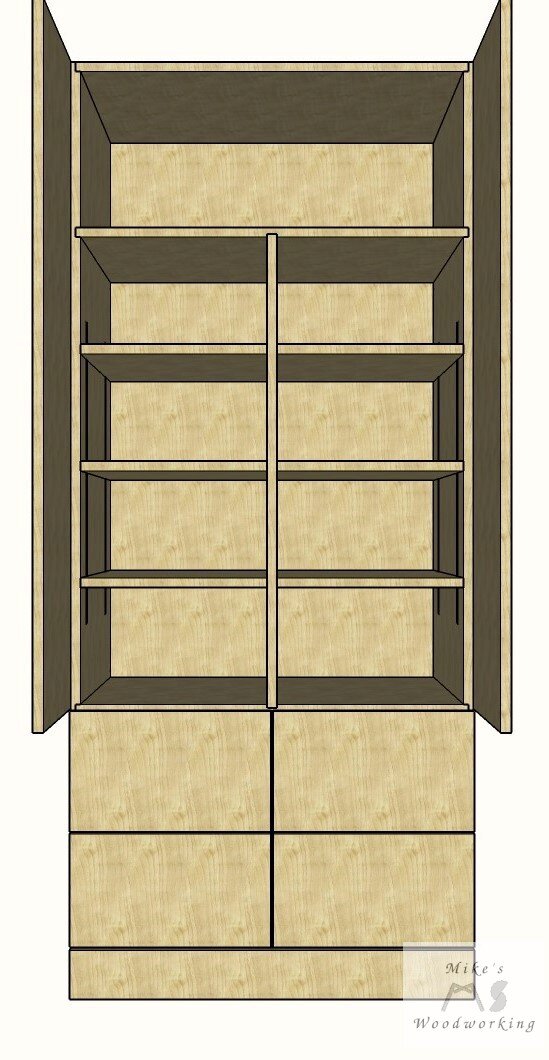
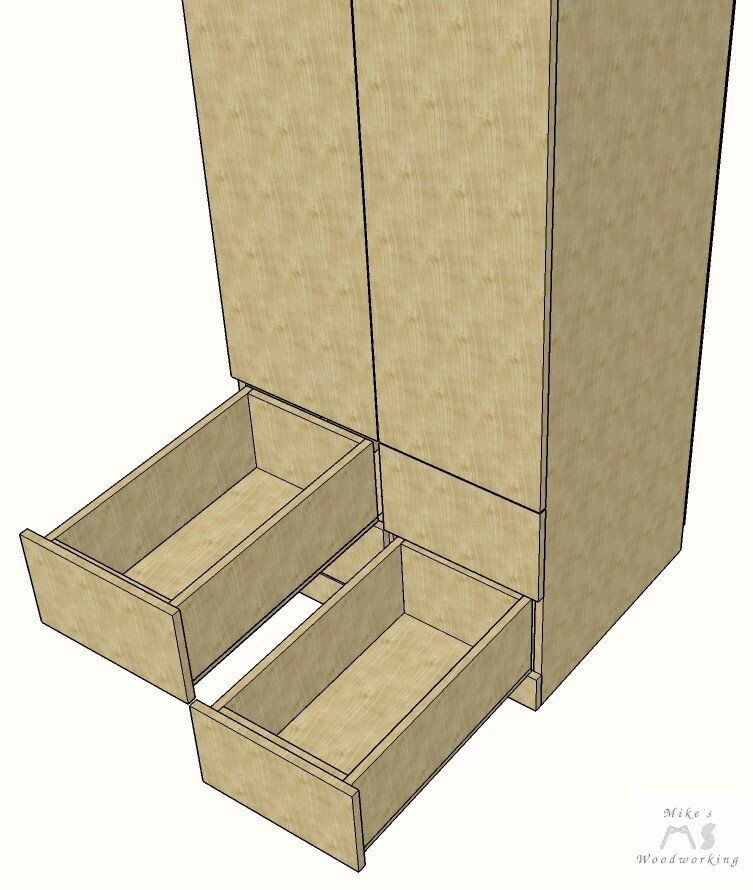
I had already picked up the materials for the scrapwood cabinet while getting the adjustable cabinet materials at Hardwood Lumber & Millwork a couple of months prior. In fact, I had already ripped the couple of sheets of plywood for this project on the table saw while doing the same operation for the adjustable cabinet project. The construction of the scrapwood cabinet was very similar to the adjustable cabinets. Dados would be employed on the fixed bottom, top and middle shelves. The overall depth was the same and there would be adjustable shelving on the inside. The major difference was that the scrapwood cabinet was not quite as tall, would be split in the middle and would have a set of drawers on the bottom.
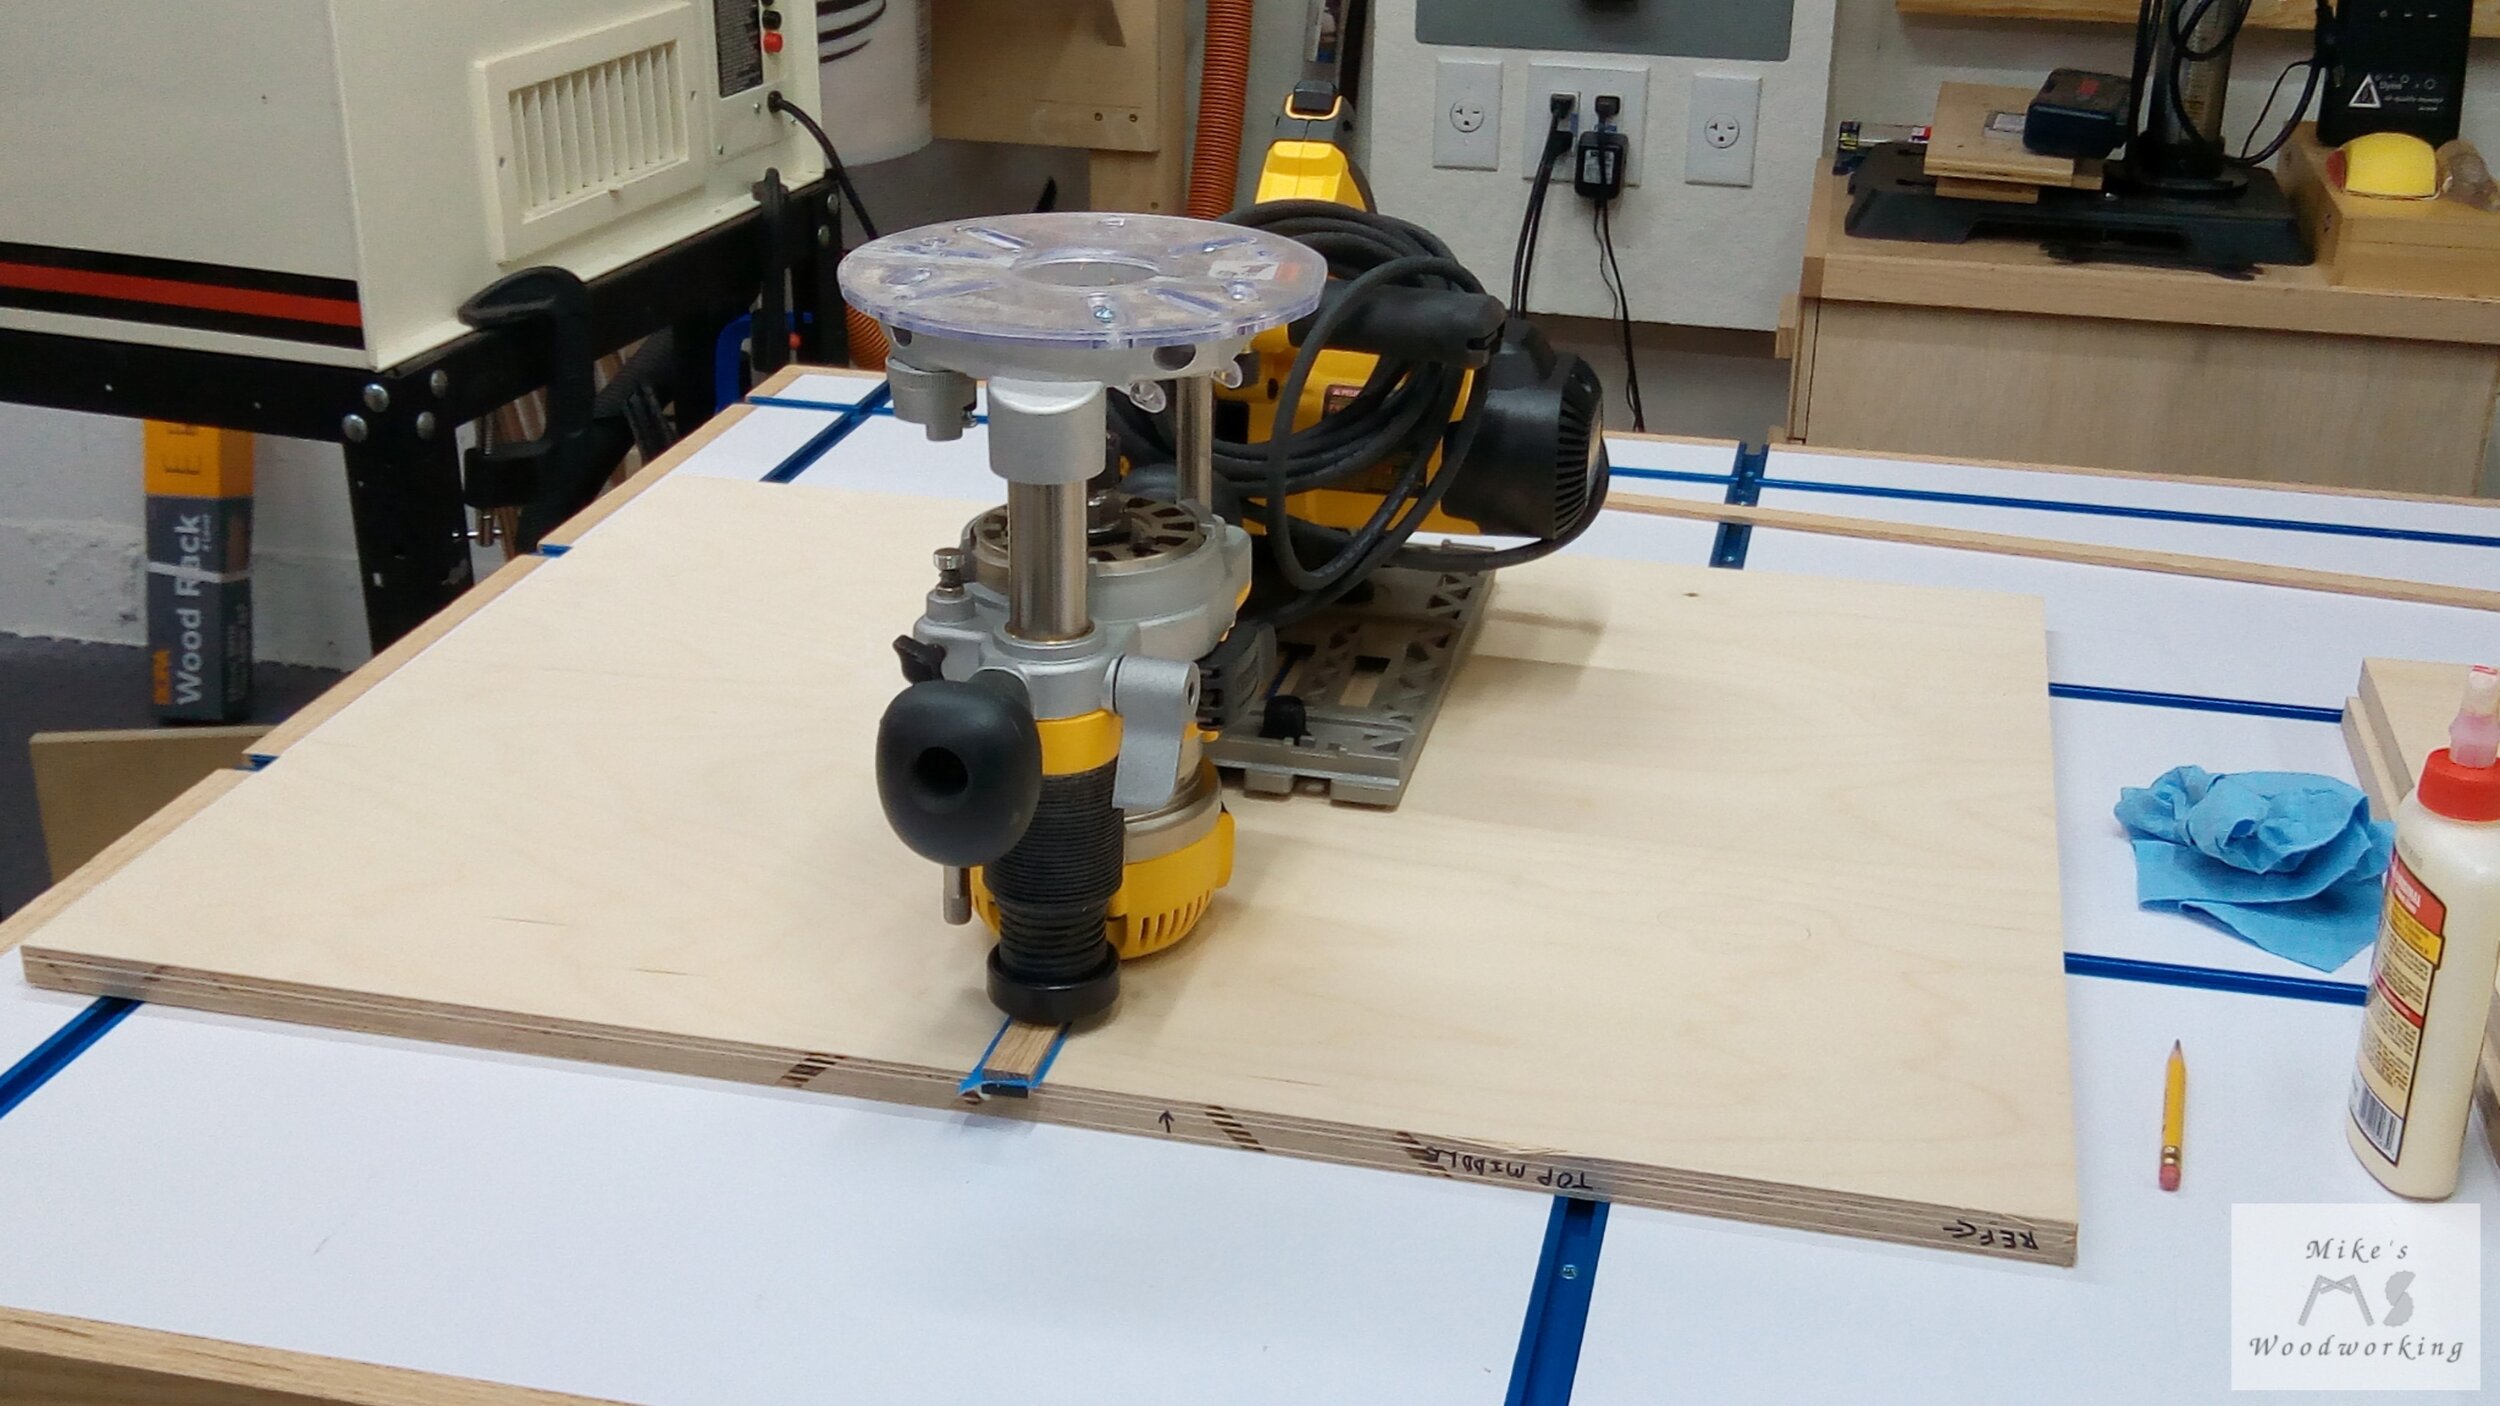
I started with getting the dados cut on the sides. I had a couple of hiccups when I was running two of the dados. First, while I was halfway through a cut, my router bit started slipping in the collet and it caused the bit to plunge deeper than the 3/8” depth I wanted. Luckily, I caught it in time before it blew through the outside of the side panel and into my assembly table top. Apparently, the collet for the router actually broke, causing the bit to slip. I had a spare collet, thankfully, and finished the cut. Second, while I was starting to run the router on the track saw track for the dado at the top of a side panel, I had not clamped the track in place very well and it began to wander down the side panel. Again, I caught the slippage in enough time to not have a huge gauge going across the panel. It did still leave a mark, but it was on the inside and at the top, so it wouldn’t really be seen and it didn’t affect the overall function of the correctly cut dado. More things to file away for future reference.
Measure Twice...Cut Twice...DOH!!!
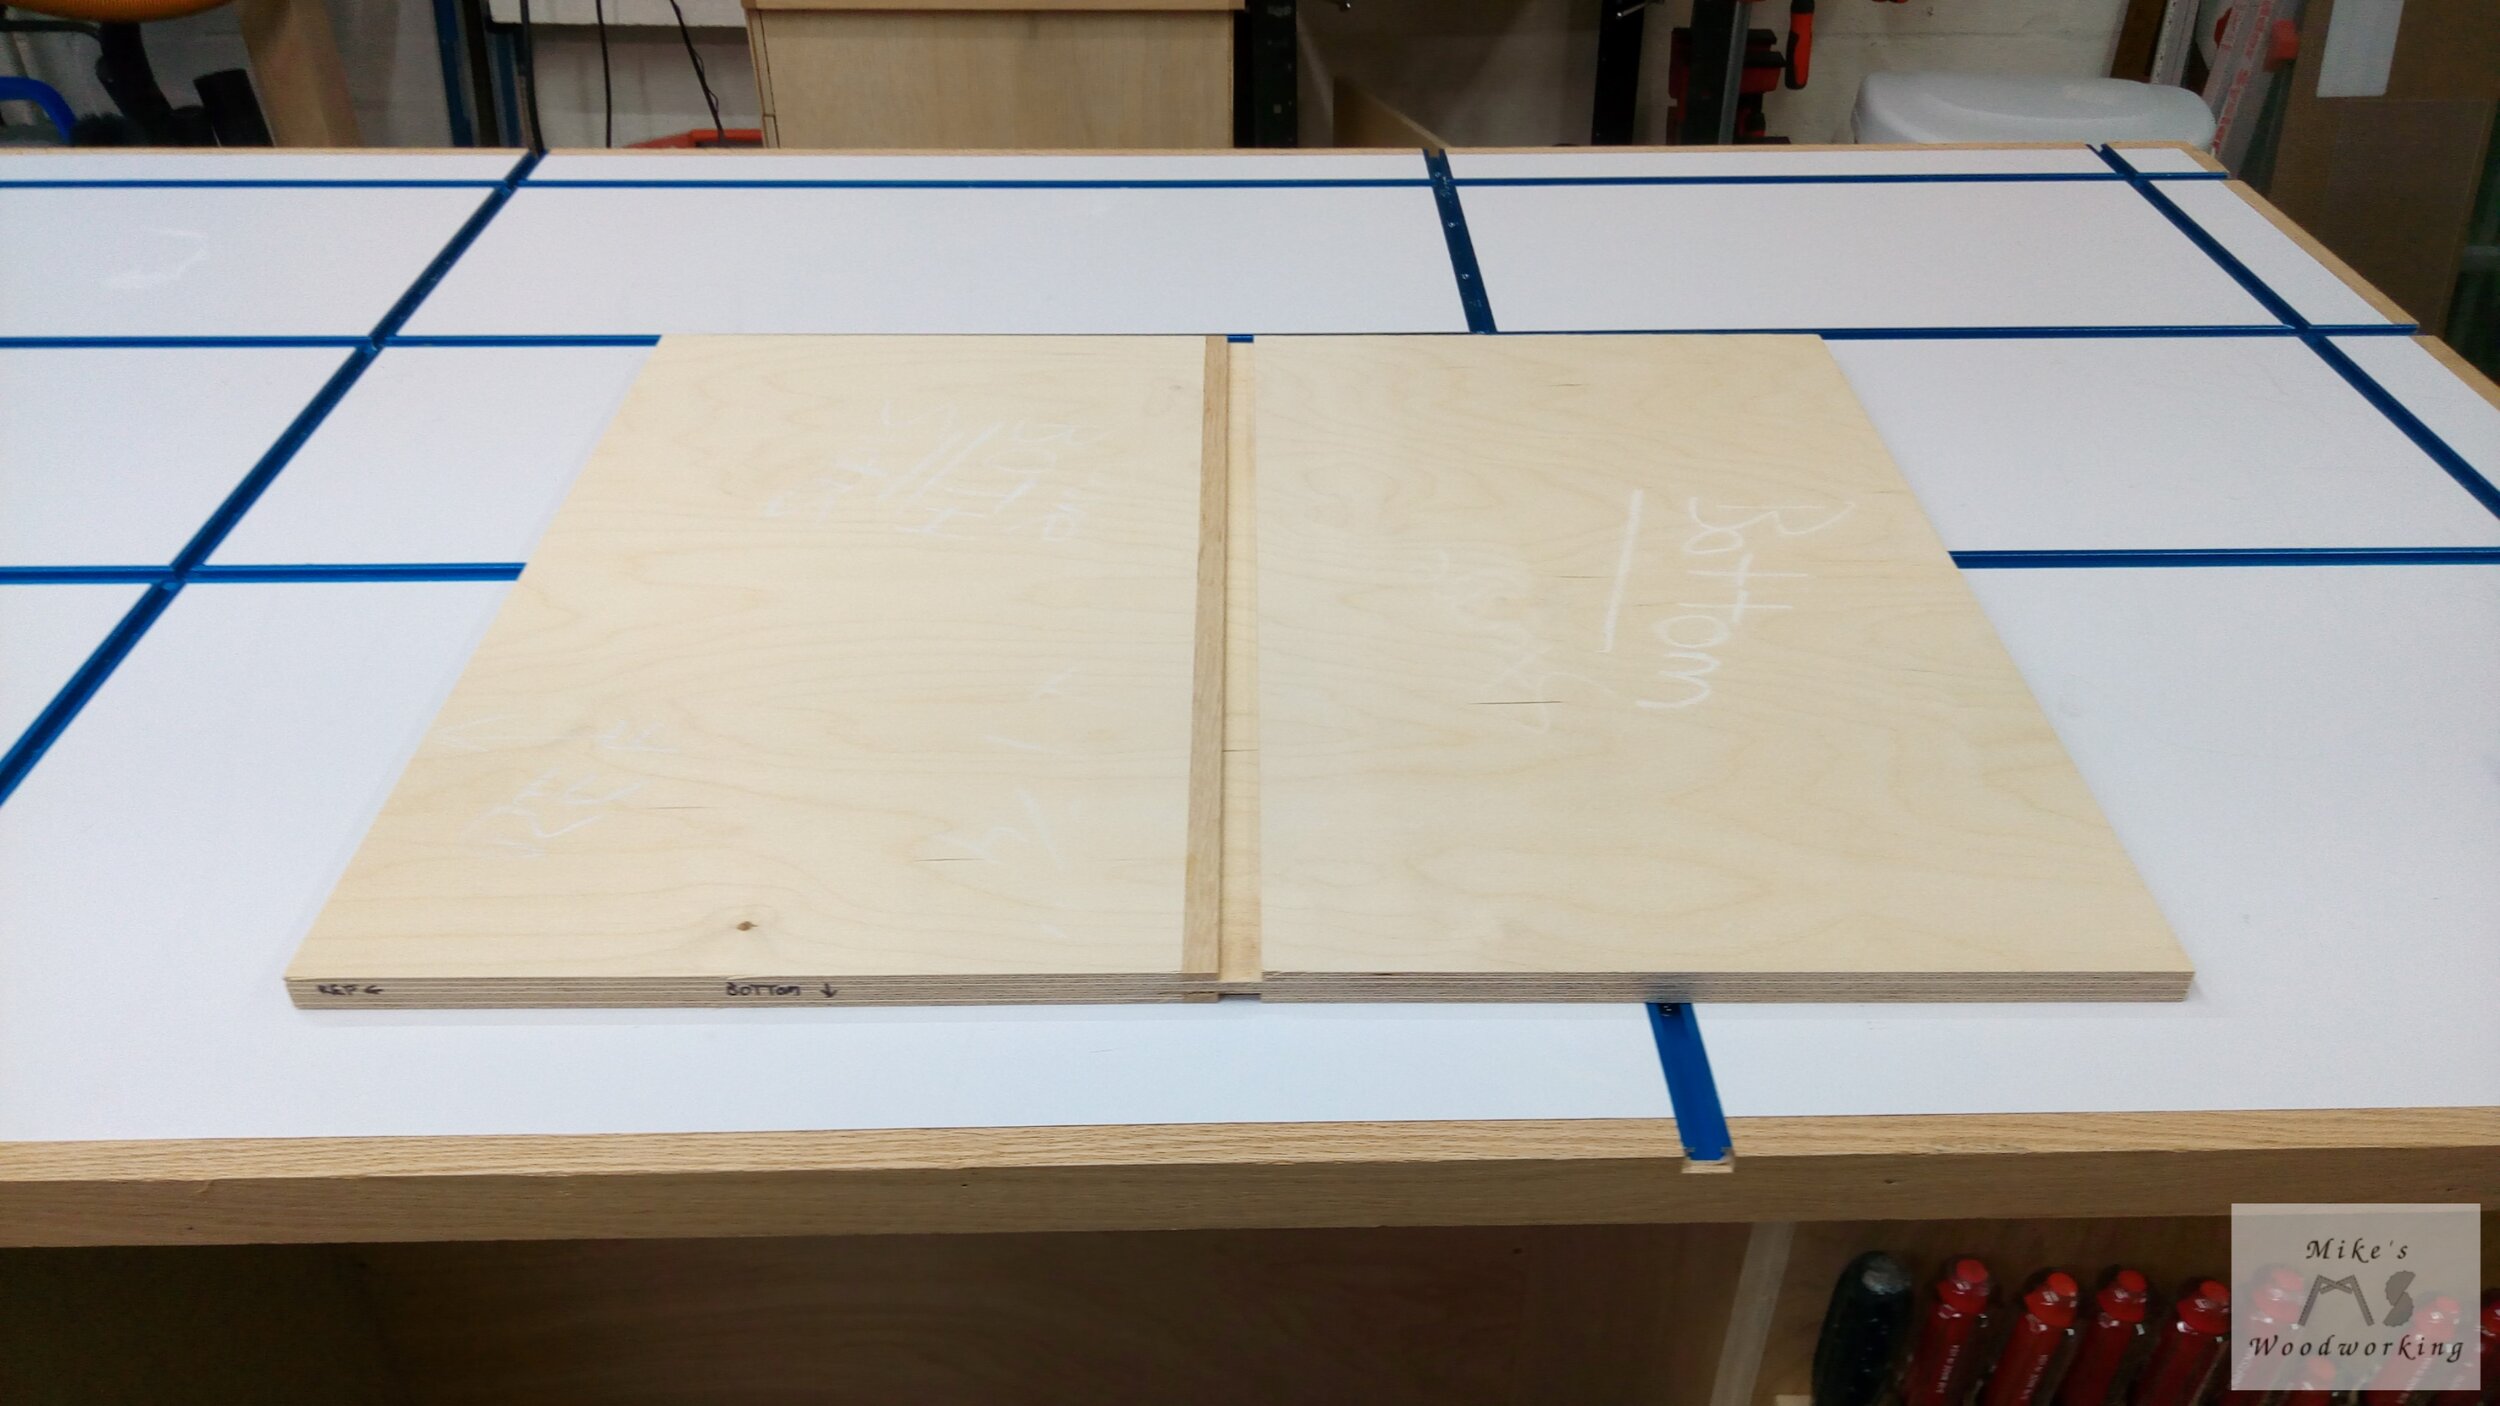
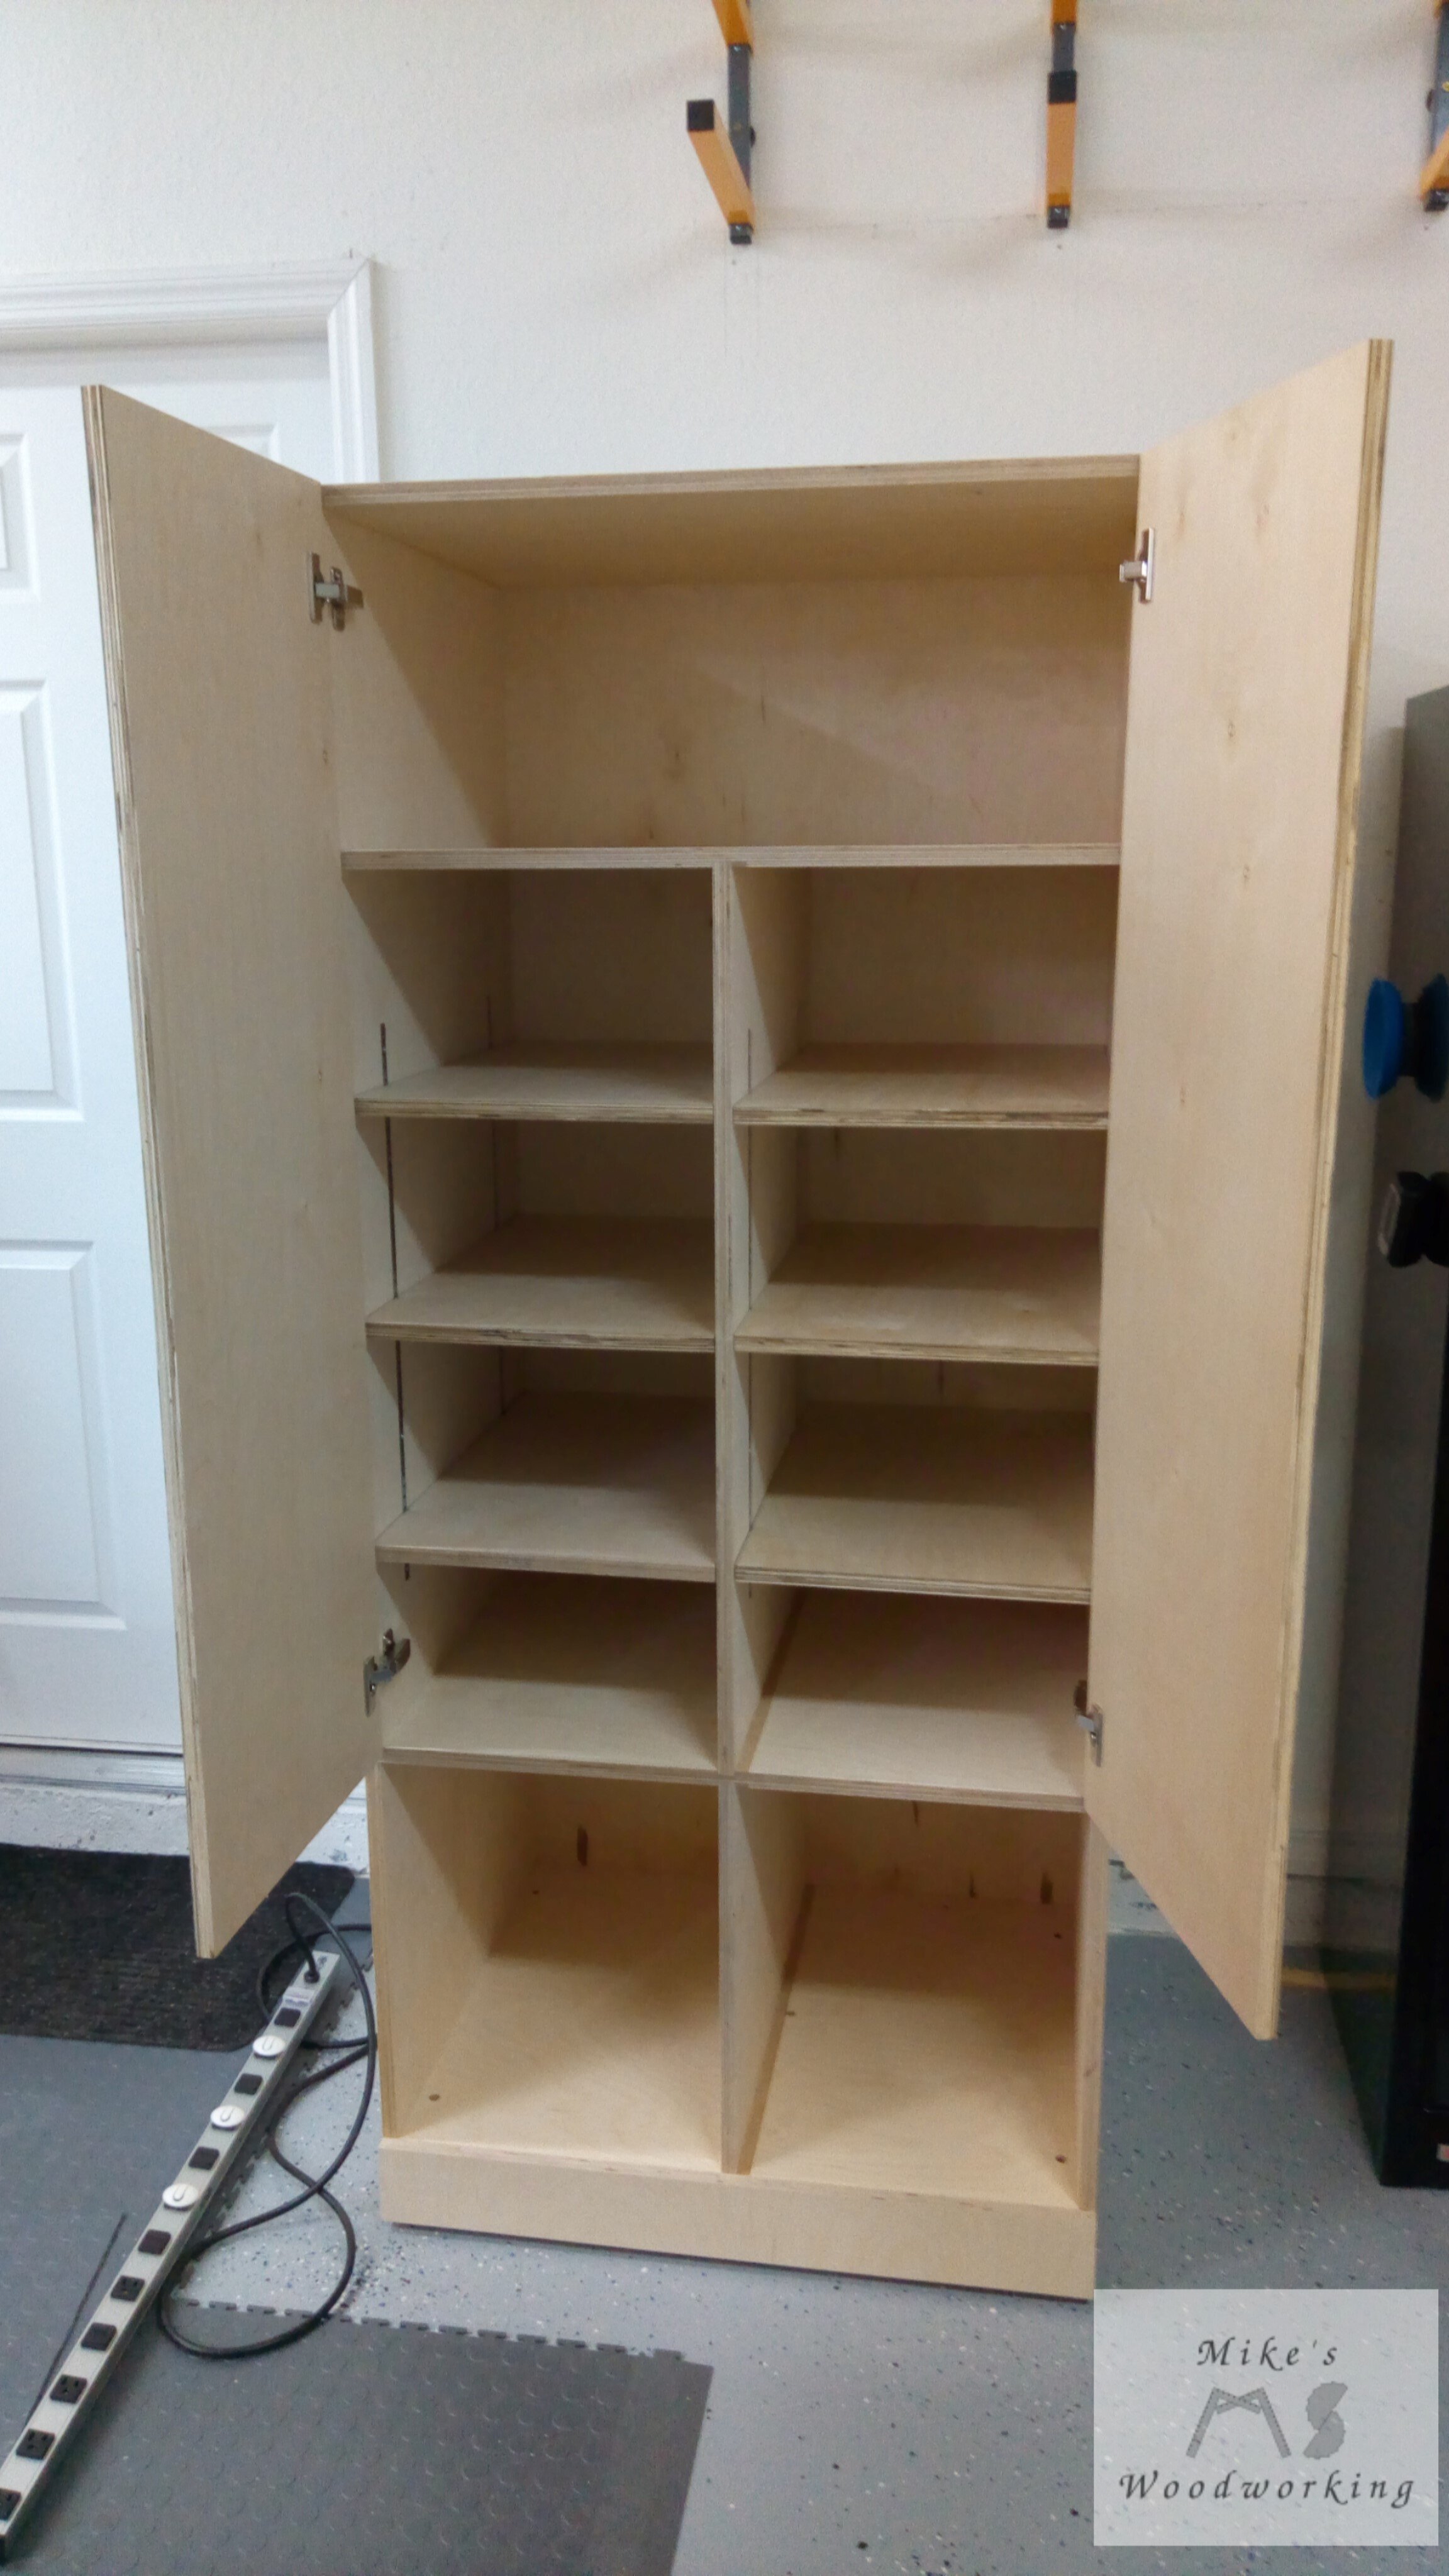
For the dados needed on the shelves, I decided to cut those with the dado stack on my table saw. Since I needed to make five total dados, this would make setup and execution much more efficient. The bottom shelf would have a 1/4” deep dado on both sides, one for a brace and one for a short vertical divider. The next shelf would have the same 1/4” dados, one for the short vertical divider and one for a tall vertical divider. The next shelf above that would have only one 1/4” dado (so I wouldn’t have to change the depth just for one cut) to accept the tall vertical divider.
The setup was pretty simple. I marked the dado to straddle the middle of the shelves, set the fence on my table saw to that number and made the cuts. After I made all five cuts, I had the shelves laid out on my assembly table and something looked off. I got my tape measure out and noticed that all of the dados were off-center.

It took a minute, but it finally dawned on me that I made a mistake with the setup on my table saw. I was using the ruler on the table saw to line up the cuts, but I didn’t factor in that I was using a dado stack and not a single blade. This caused all of my dados to be off-center. Yet another mistake to file away for the future.
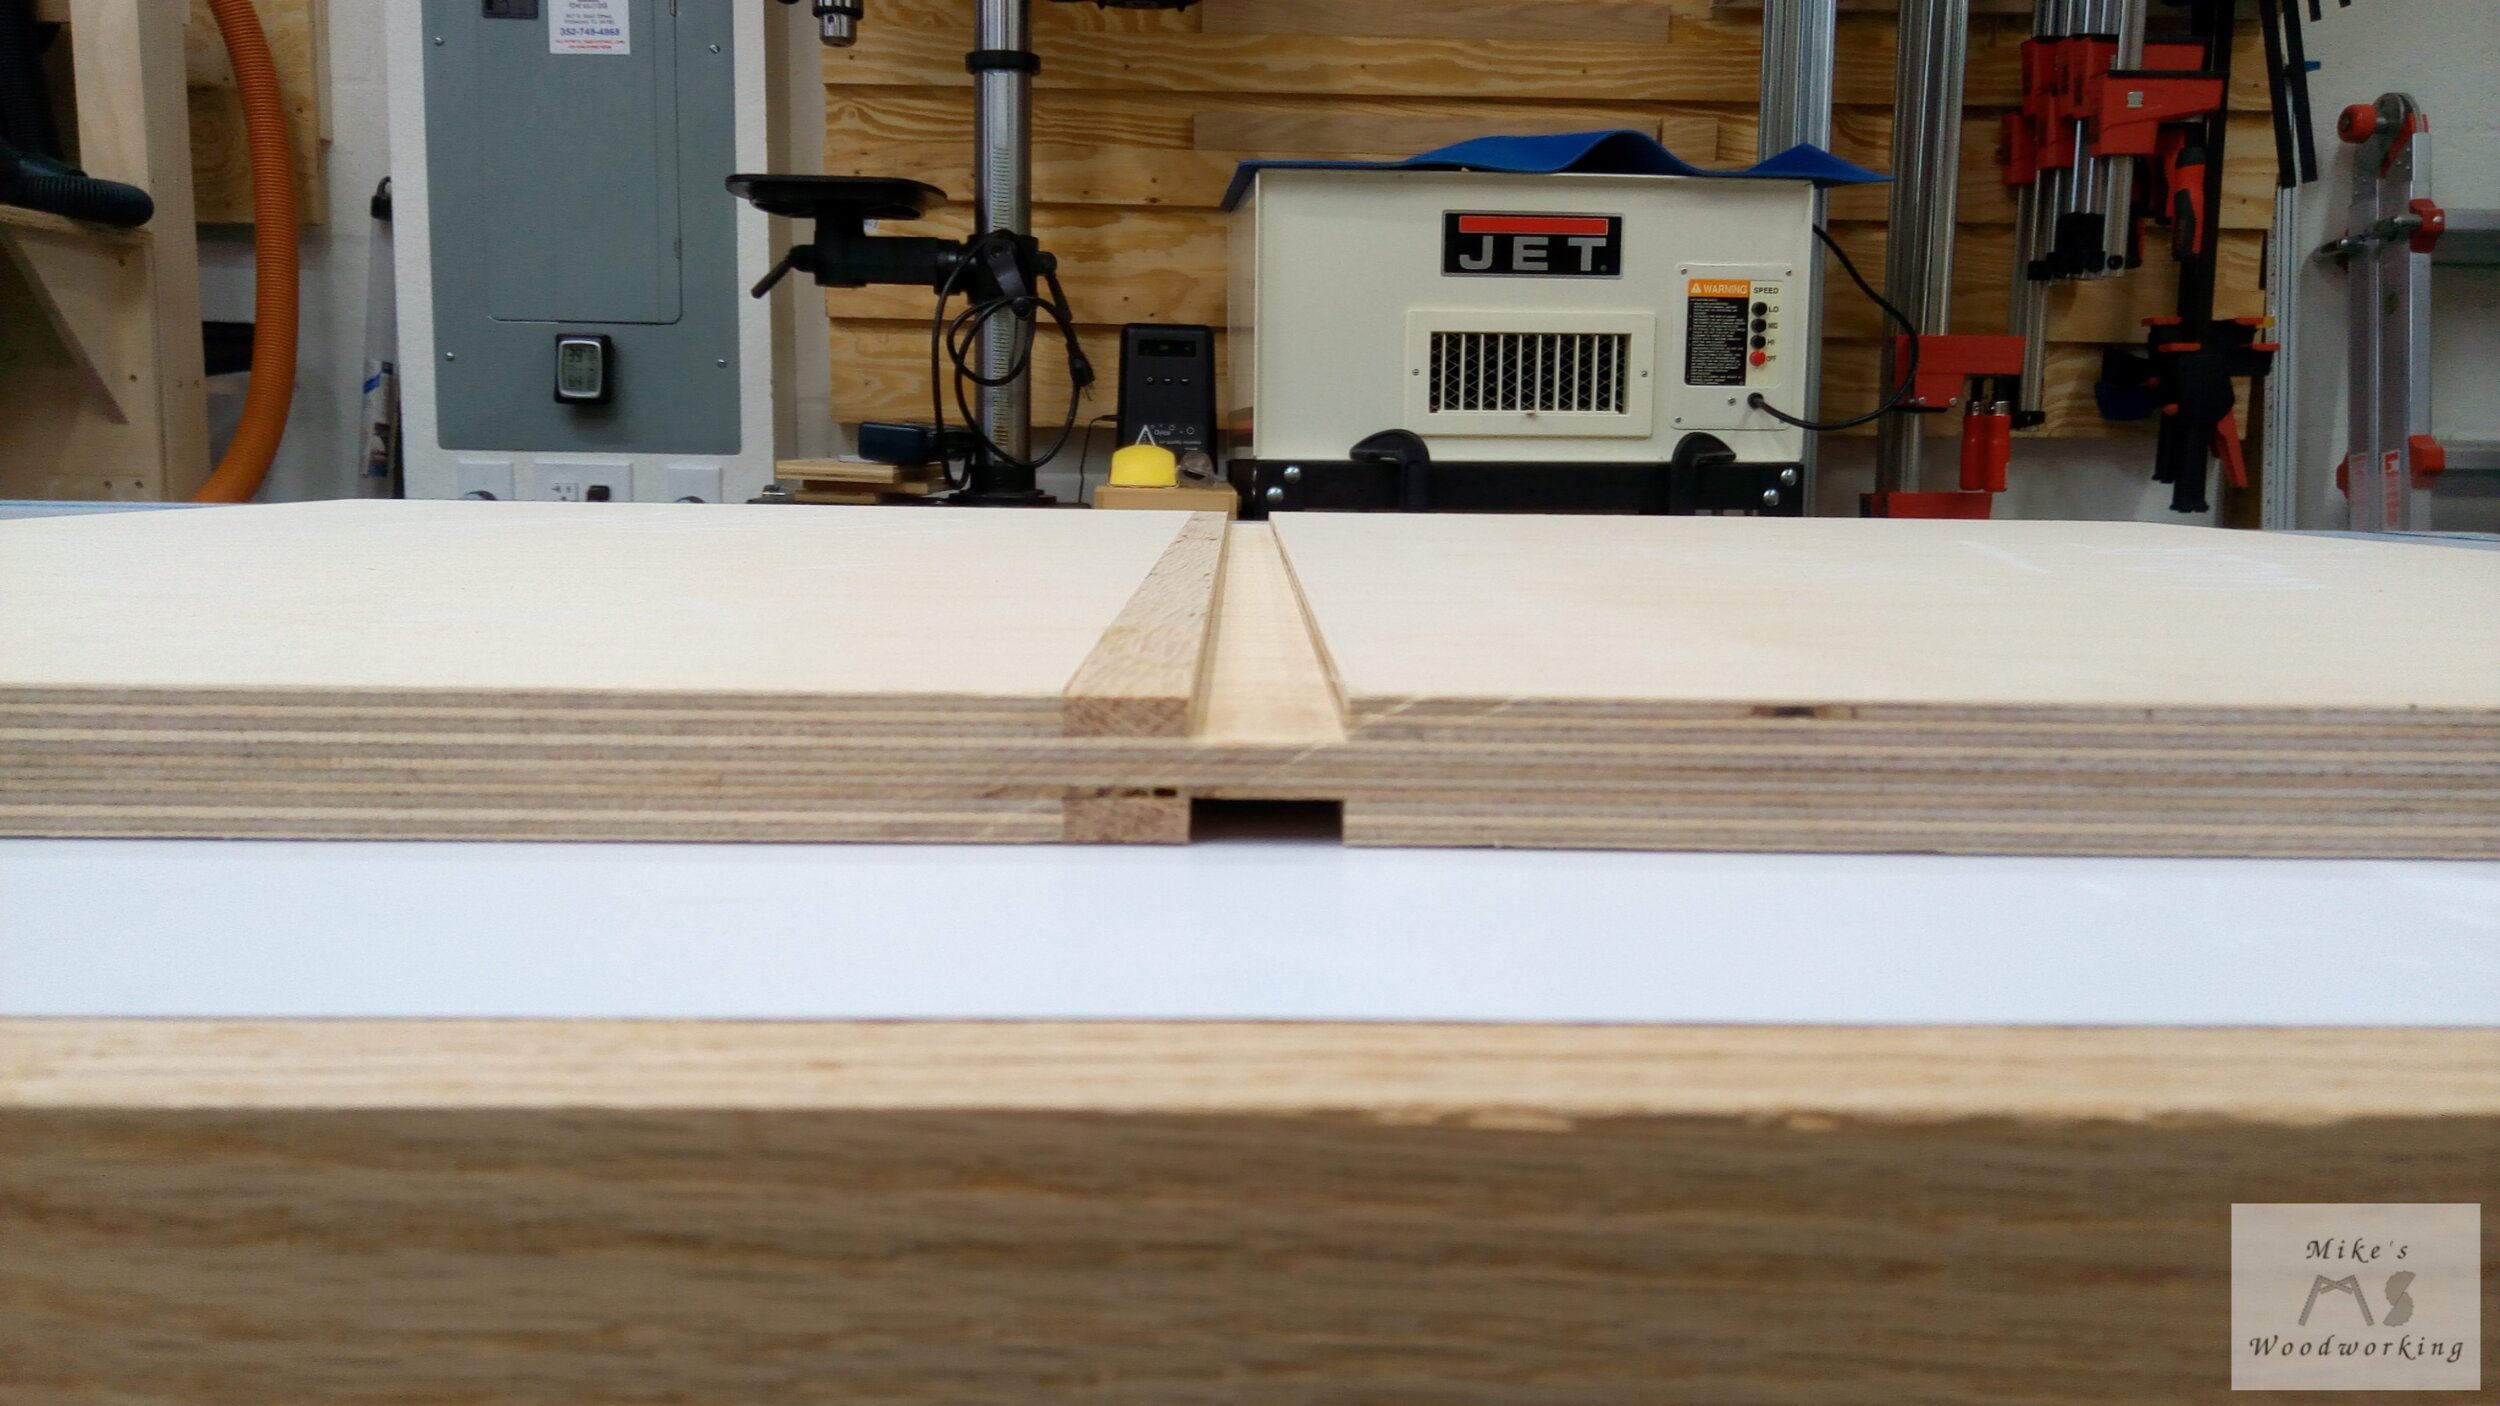
Well, I certainly didn’t have enough material to make three more shelves, and I really didn’t want to waste this nice Baltic birch plywood. I had plenty of scrap hardwood on hand, so I figured the best course of action would be to patch the dados and then cut them again. I cut the hardwood pieces to the correct size and glued them in place. I had to use the same alternate clamping methods employed on the adjustable cabinets since I couldn’t use any metal fasteners.
I didn’t want to run the risk of hitting them with the dado stack, damaging the blades or setting off my SawStop. After waiting for the glue to fully dry, I flushed up the patches with the plywood and ran the dados through the saw again. This time, I made sure to measure from the edge of the dado stack. After finishing all of the cuts, I was good to go.
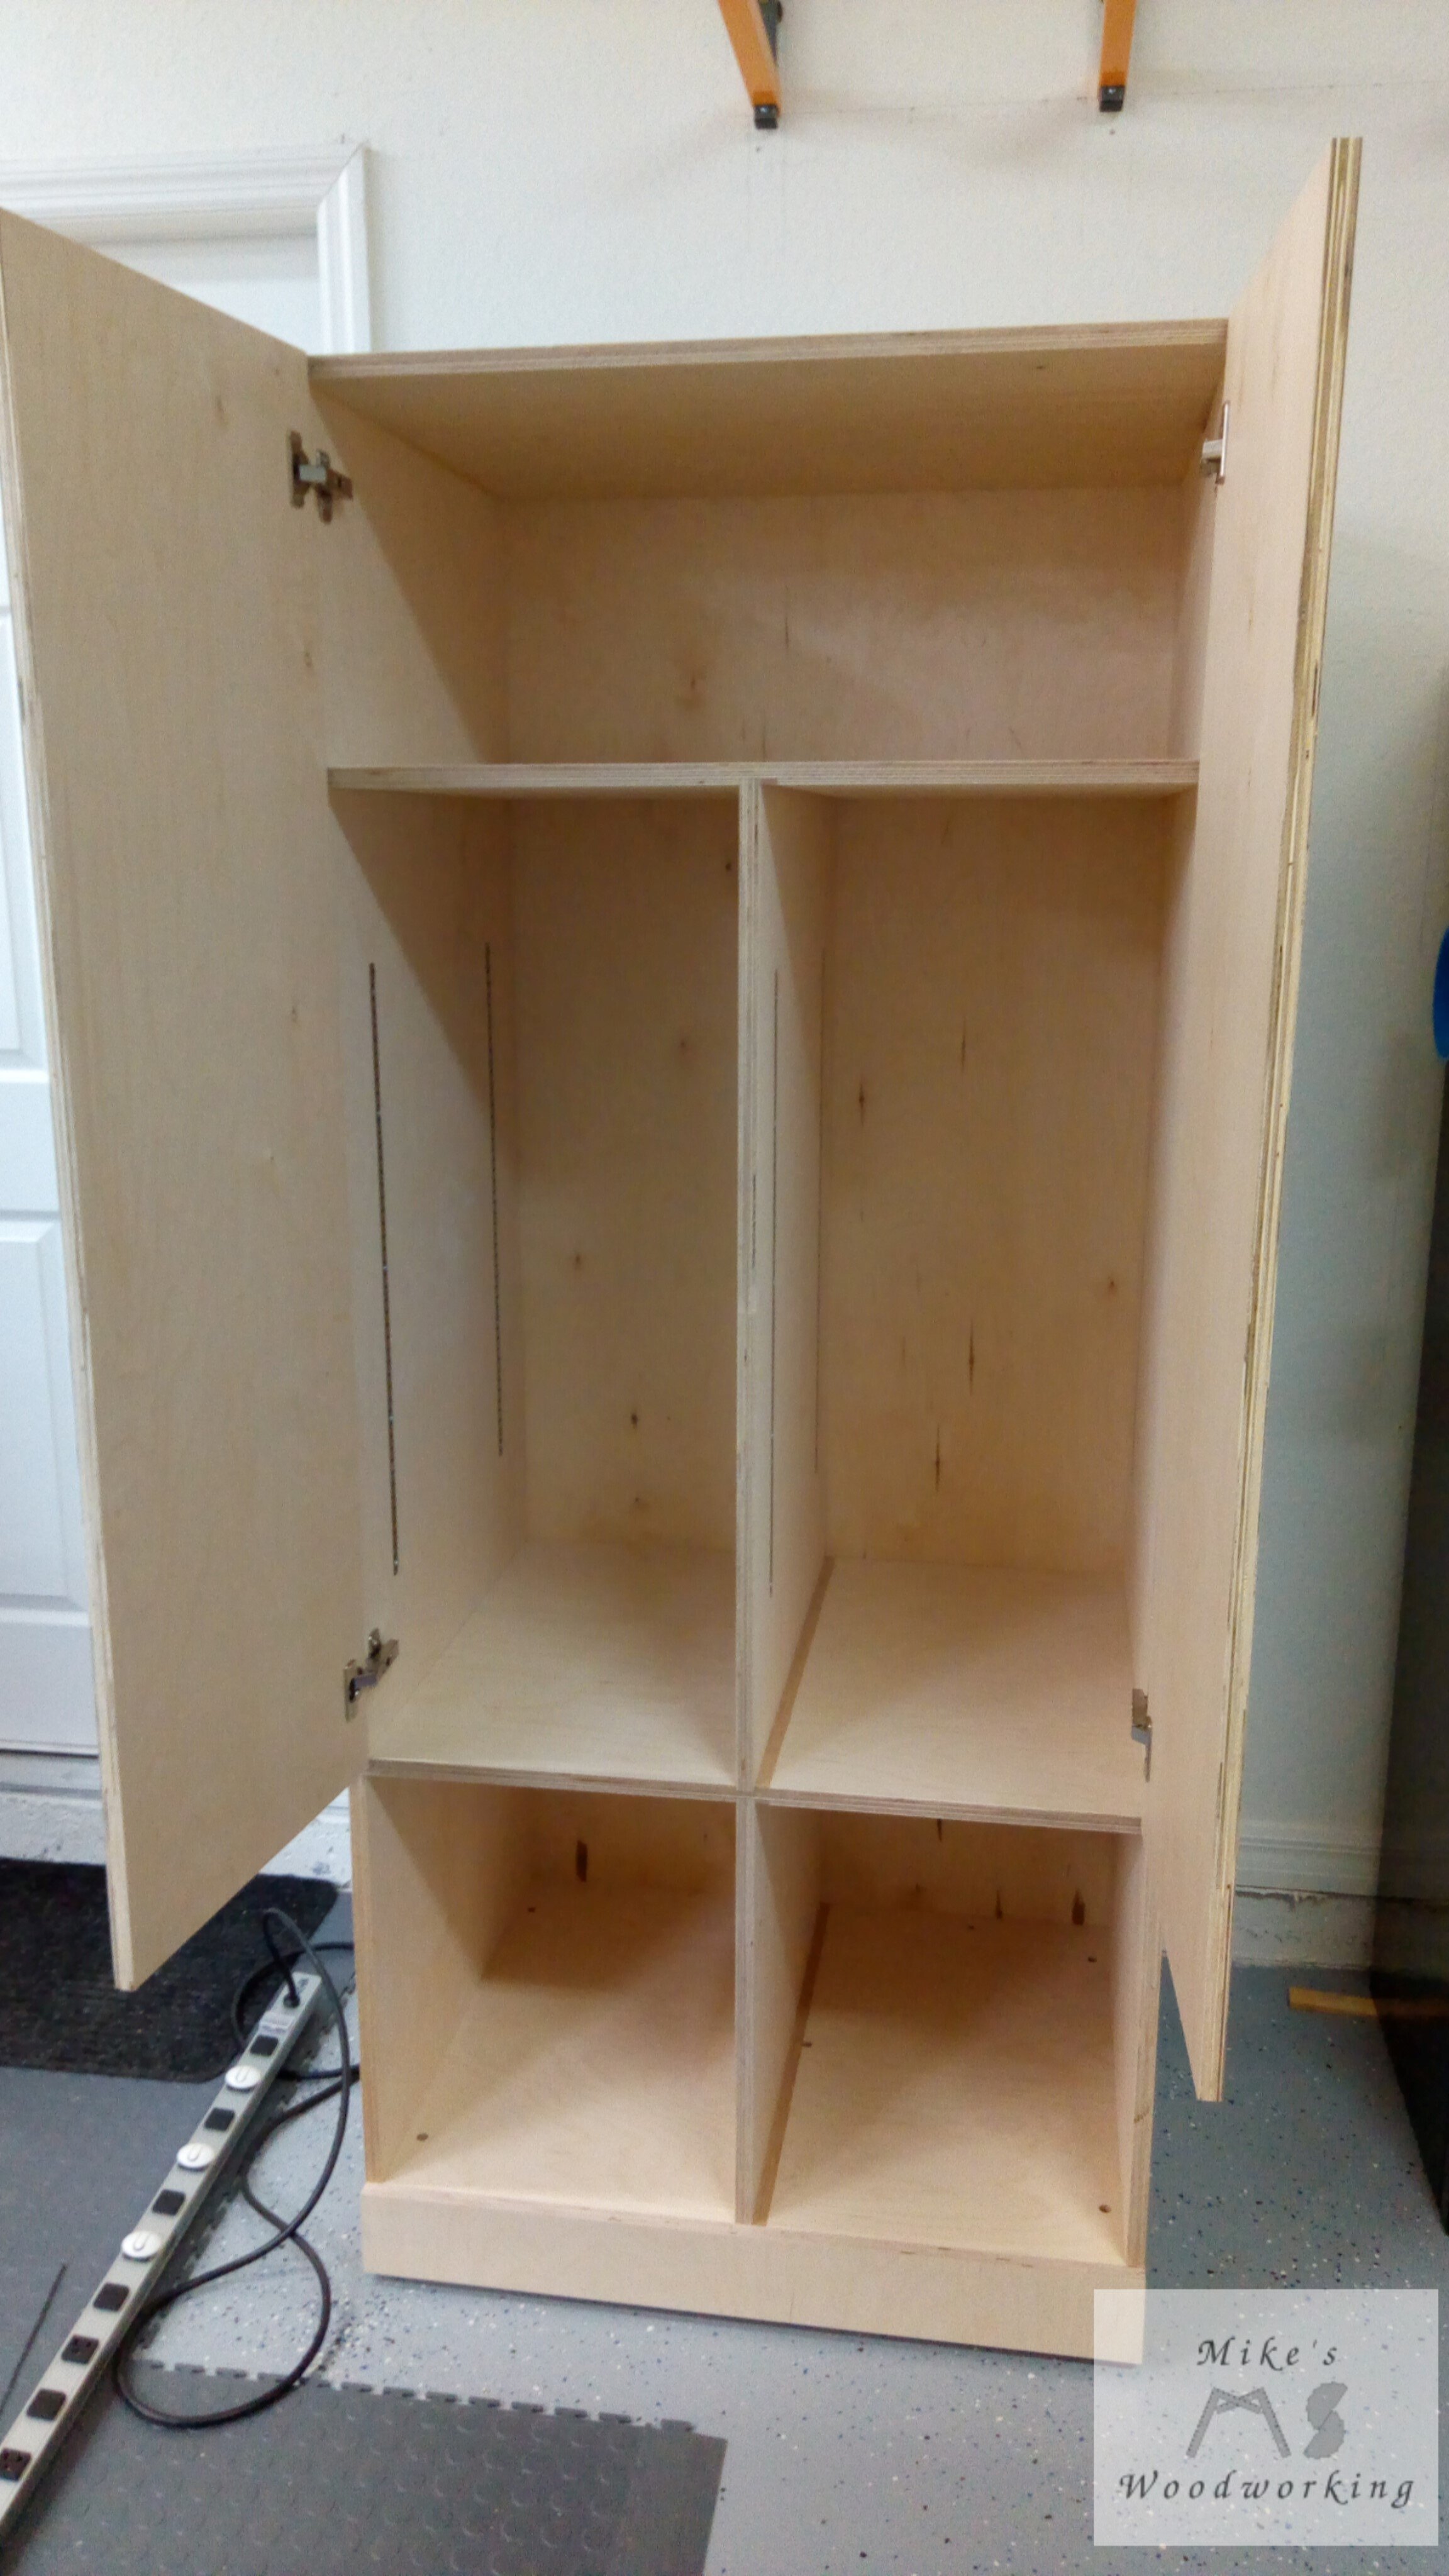
Before I could cut the dados for the shelf standards, I needed to dry fit the cabinet so that I could measure for the two vertical dividers. This meant I had to, first, attach the brace to the bottom shelf and then attach all of the heavy duty leveling feet to the brace and the sides. I got the cabinet held together with some clamps and leveled it on my floor. I measured for the vertical dividers and made my cuts. They slid right in with no excess force needed and I was ready to mark for all of the shelf standards.

The standards on the sides of the cabinet were placed in the same locations as the adjustable cabinets. However, because of the vertical divider, the standards on one side of the divider needed to be offset slightly to avoid the screws hitting each other. I made all of my marks and triple-checked everything. Before I removed all of the clamps and broke down the cabinet, I made note of the measurements for the doors as well as the back panel. I got the dados for all of the shelf standards cut without any issues. Unlike the adjustable cabinet, I did not over shoot my marks for the dados. Next it was on to assembly.
The More Time Taken Now, the Less Taken Later
I set out to glue the sides and shelves together all at once. This was a mistake on my part. I was using Titebond I for the glue-up so my working time was a bit short. With a piece this size, I would have been better off using Titebond III or something else with more open time. Better yet, I probably should have glued this up in stages, that way I wouldn’t have to rush to get everything together. I managed to get everything glued and clamped up using just about every clamp I had. I left the cabinet to dry overnight.
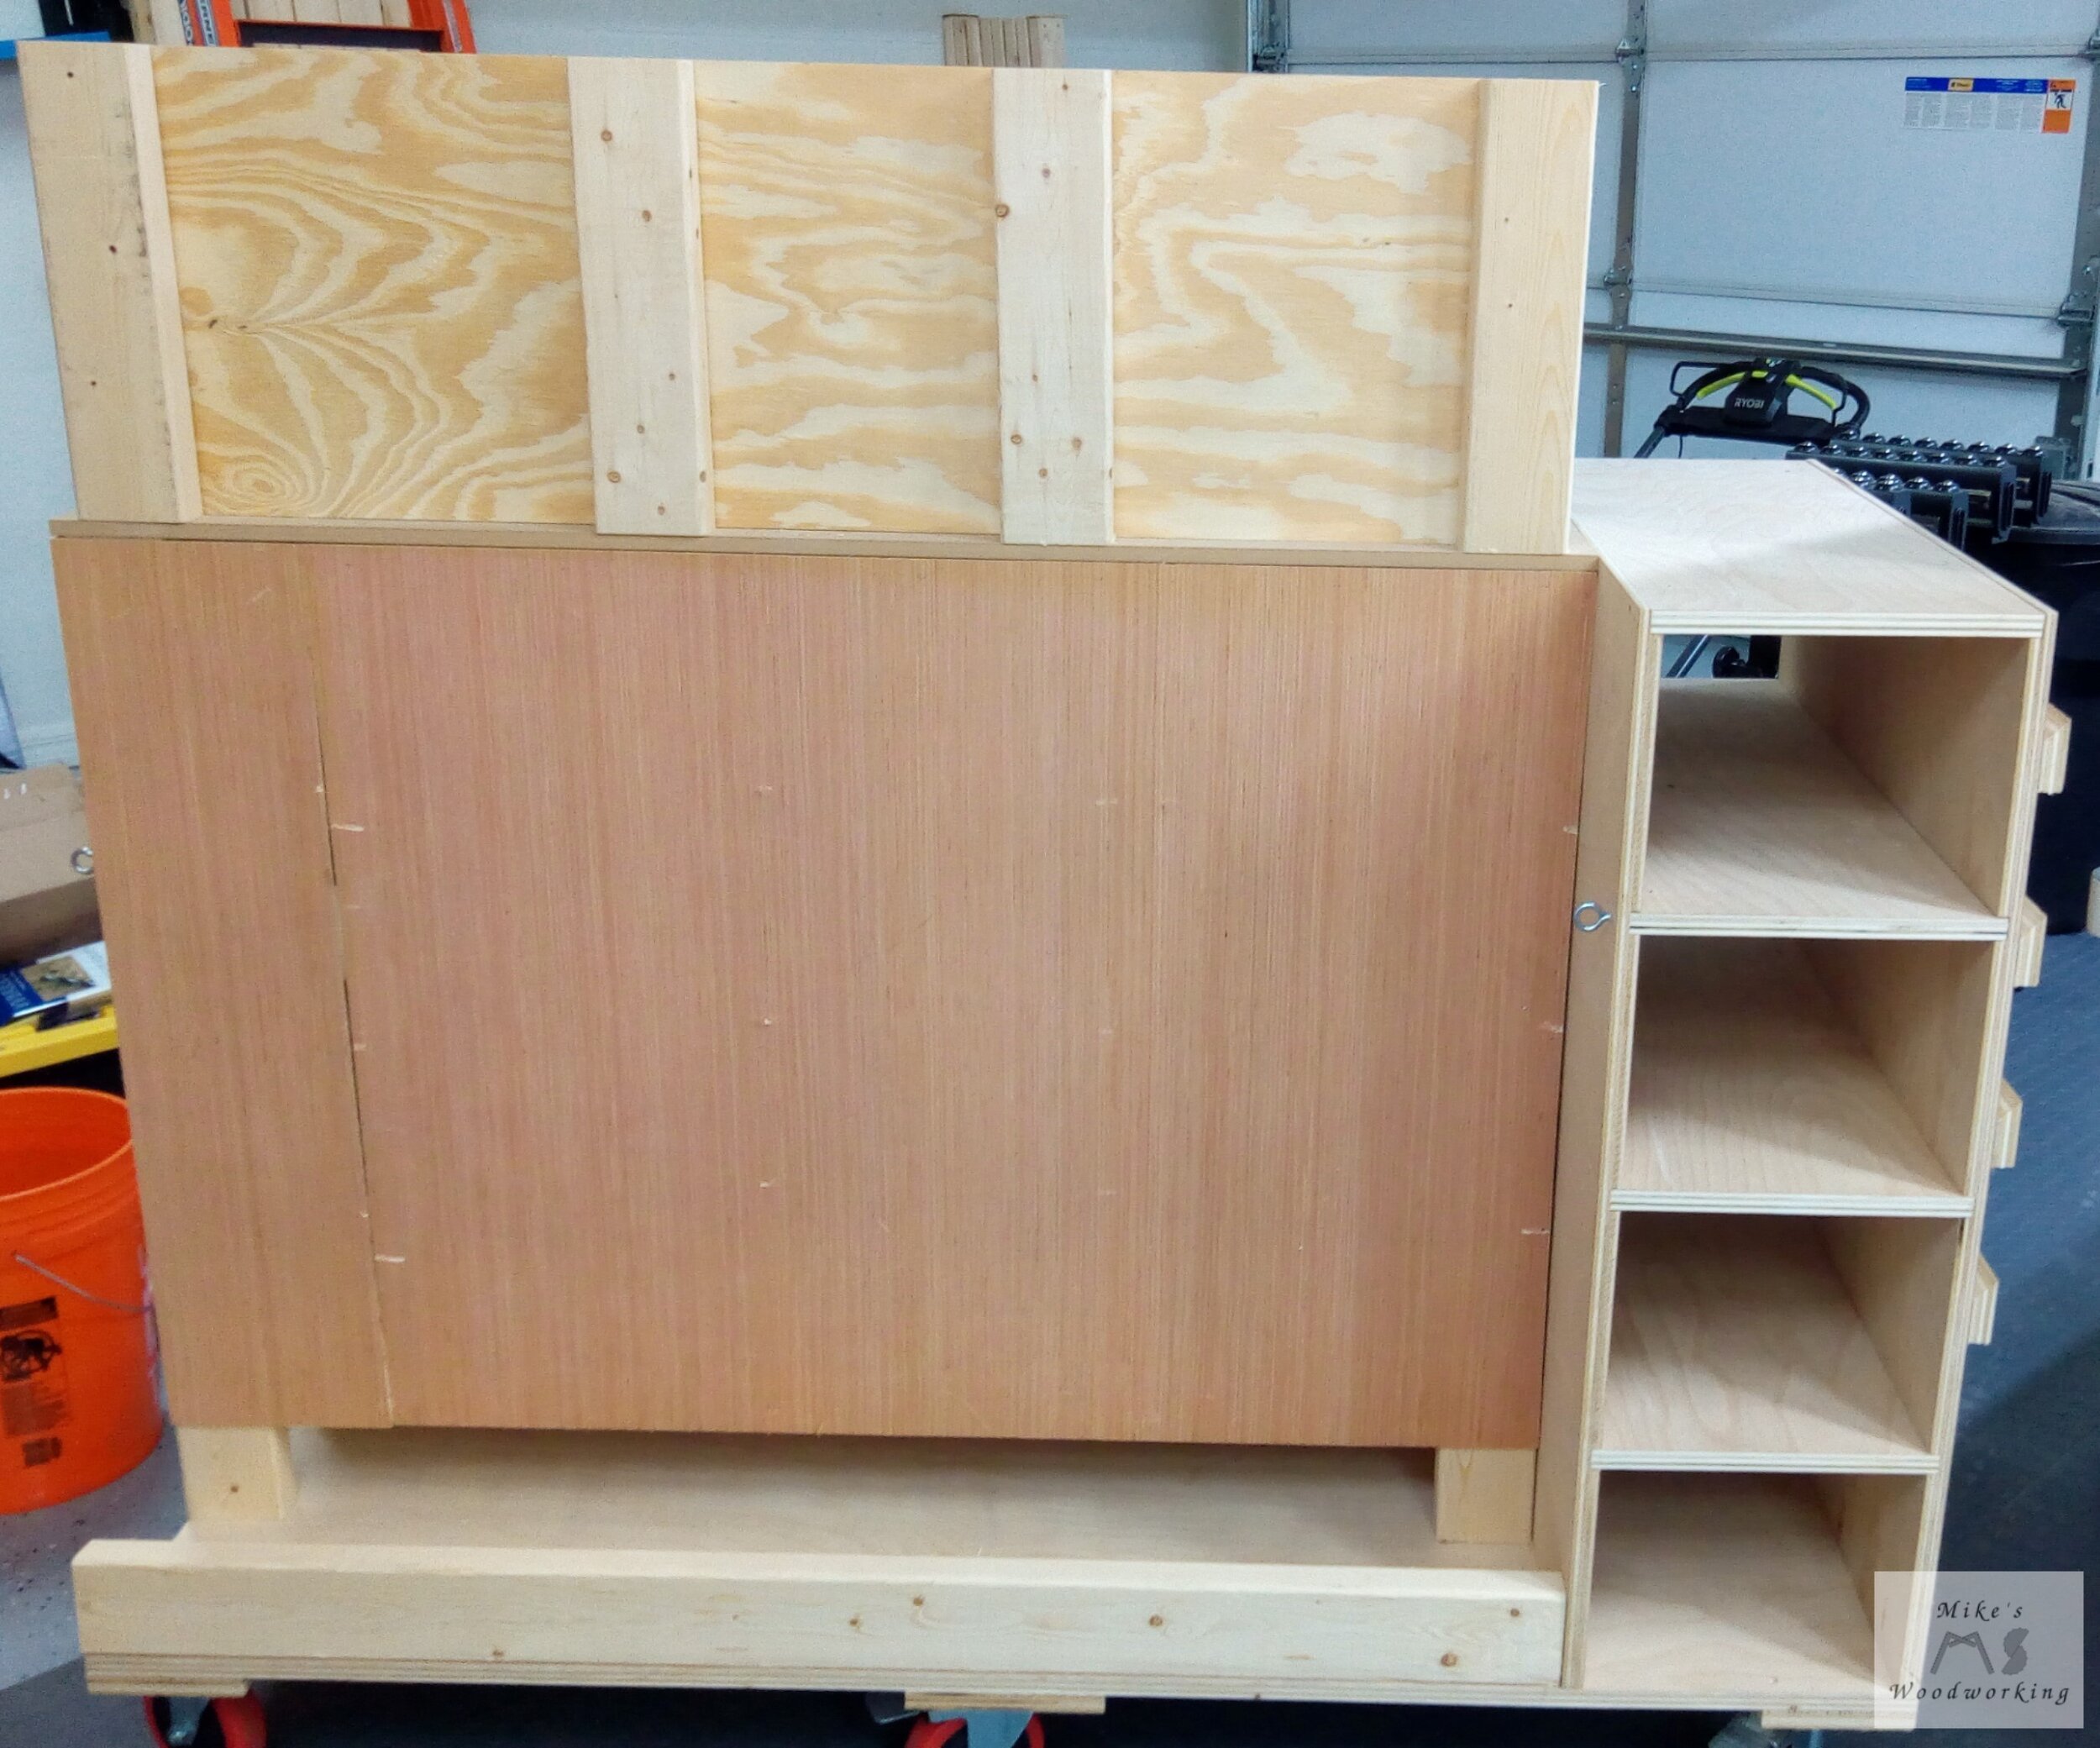
When the next day came, I took off all of the clamps and the cabinet was solid. Next up were the two vertical dividers. I wasn’t sure how exactly I was going to attach them at first. I finally decided that I would glue the small divider in first and secure it in place with some screws, through the other side of the dado. Then, I glued in the tall divider and screwed that in through the other side of the shelf. Between the glue and the screws, those dividers weren’t going anywhere. There were no issues when installing the vertical dividers. Since I referenced the same side of each shelf on the table saw fence, this ensured they would all be in line with each other.
Now that the main carcass was finished, it was time to put the back on the cabinet. This went just like the adjustable cabinets. I took the measurements I made during the dry-fit and made my cuts, leaving the sides of the back over-sized by 1/4” so I could flush them up with a router later. This worked out just fine and the cabinet was now rock solid with no more racking.
I moved the scrapwood cabinet to its final place in the workshop. While I was moving it, I heard something pop when I nudged it one final time. When I looked around the cabinet I noticed that the glue joint on the top fixed shelf had busted loose in one spot and there was a 1/8” gap there now. I drove in a couple of long screws and that brought everything back together again. I guess I didn’t have quite enough glue in the joint and the plywood sucked it up a bit of it. All of the other shelves appeared to be fine so I moved forward.
I See Drawer People
Now that the scrapwood cabinet was in its final place, it was time to work on the four drawers. Because of the way the drawers were designed, all of them were supposed to be exactly the same size. I double-checked the measurements on the cabinet and the drawers on the right side would be slightly smaller than the left. When I ran the dados for the vertical dividers, they must have been slightly off-center. No big deal. This is why you don’t cut all of your materials at the beginning of a project, especially for drawers. The term for this, which I hear all of the time from Brad Rodriguez at Fix This Build That, is referential measurements.
I was going with pocket hole construction for these drawers as it’s fast, easy and reasonably strong. The depth of the drawers was 23-5/8”, 1/4” shorter than the depth of the cabinet. I had four sets of 24” drawer slides leftover from another project, so I figured I’d use these instead of buying more. One might be wondering how I would be able to fit a 24” set of drawer slides in the cabinet. Well, I know from my own experience with these slides that they don’t actually measure the length for which they are meant. They are actually just shorter than the total depth of my cabinet.
I cut all of the drawer sides and fronts/backs to the correct width/height on the table saw. Next came cutting them to the proper length/width. I did this over at my miter saw. The sides were the easier ones to cut, so I set my stop block and finished those off quickly. Now comes the fronts/backs of the drawers. One thing to bear in mind when it comes to drawers is that allowances need to be made for the thickness of the drawer slides as well as the varying thickness of any plywood used in their construction.
For the type of drawer construction I am employing, the fronts/backs would be measured using the following formula:
width of opening – 1” (drawer slide thickness x 2) – 1-1/2” (thickness of plywood x 2)
However, because the 3/4” plywood is rarely, if ever, actually 3/4”, the above formula will not work. The best way to get the exact measurement is by not measuring at all. This was another great tip I learned from Brad Rodriguez. To get the exact measurement needed, set the miter saw stop block at the size of the opening minus the 1” for the drawer slides. Put two scrap pieces of plywood from the same material used for making the drawers next to the stop block. This will yield the exact measurement for the fronts/backs every time without fail. Now that I have all of my drawer parts cut to the correct sizes, it was time to drill all of the pocket holes.
Before I began building my miter saw station, I bought a Kreg K5 pocket hole jig to make drilling all of the holes faster (and with much less mess). This was definitely worth the investment. LET’S GET DRILLING!!! Once all of the holes were drilled, assembly was next. My routine for putting together pocket screw drawers starts with clamping the sides to one of the front/back pieces. I make sure everything is flat and even and clamp it tight to ensure no unwanted movement. I screw in the pocket screws and go through the same operation with the other front/back piece. Once all of the drawers are screwed together, now is when I usually cut the drawer bottoms. The measurement of the bottoms should always equal the width of the opening minus the 1” for the drawer slides, but I always double-check anyway.
The bottoms were made from pieces of 1/4” Baltic birch plywood. There was just enough material left over from cutting the back for the scrapwood cabinet to yield the four pieces needs for the drawer bottoms. I glued and screwed all of the bottoms in place. I probably could have gone with just some brad nails, given that I glued the bottoms in place. I always tend to go a bit overboard with the screws.

To mount the drawer slides, I cut one spacer block that I could use for each drawer slide. All I would need to do is put the spacer block on the bottom of the cabinet and set the slide on top of it. I pulled the slide out a little bit to expose the screw holes and attached a couple to hold it in place. I did the same thing for each slide. For the second set of drawers, I just placed the spacer directly on the already installed slides and screwed them in the same way.
You Used the Wrong Force, Didn’t You, Luke?
When it came to getting the drawers installed, I ran into a small problem. I did a dry run with the drawers to make sure they would fit in the openings. They were all a tiny bit snug, but I didn’t have any issues with getting them in and out, so I just proceeded. The two bottom drawers and the upper left one went in fine. Again, they were a little tight, but not so tight that I couldn’t easily open and close the drawers. The upper right one, well, that’s where the fun begins.
I had a scrap piece of 1/4” plywood set in place on top of the bottom drawer as a spacer. I pushed the upper drawer in place and it was REALLY tight. At this point, I probably should have just scrapped the drawer and built it again, but I was short on 1/4” plywood, so I kept going. I got the first couple of screws installed onto the drawer, so now it was time to take the drawer out and add the other couple of screws to finish attaching the slides to the drawer. When I went to put the drawer back in place, it got about halfway in and then just jammed up. I pushed and pulled multiple times, but that drawer was not having it. I finally yanked the drawer out with all of my might and went to line up the slides again but saw a big problem.
When I went to install the drawer after installing the slides, I must have lined it up a little bit off. When I was pushing, more like forcing, the drawer into place, I completely mangled the part of the slide that housed the ball bearings. There was absolutely no saving this thing. I was now in a bit of a bind. I had no more 24” slides to replace the damaged one. All I had were some 18” ones instead. Oh well, I have no choice at this point. I replaced the mangled slide and its mate with the 18” slides and reattached them to the drawer. I wound up flipping the drawer end for end to make sure I had fresh plywood into which to put the screws. This drawer went in fine, still a little snug, but had free movement.

Check Yo Shelf
I think the cause of my whole problem with the drawers was a slightly off square cabinet. I think the back was ever so slightly narrower than the front, which was causing the binding with the drawers. This is entirely my own fault for not double-checking that when I glued everything up. Also, if I had made all of the drawers 1/16” narrower, it would have given me the little bit of wiggle room that I needed. File that one away for later.
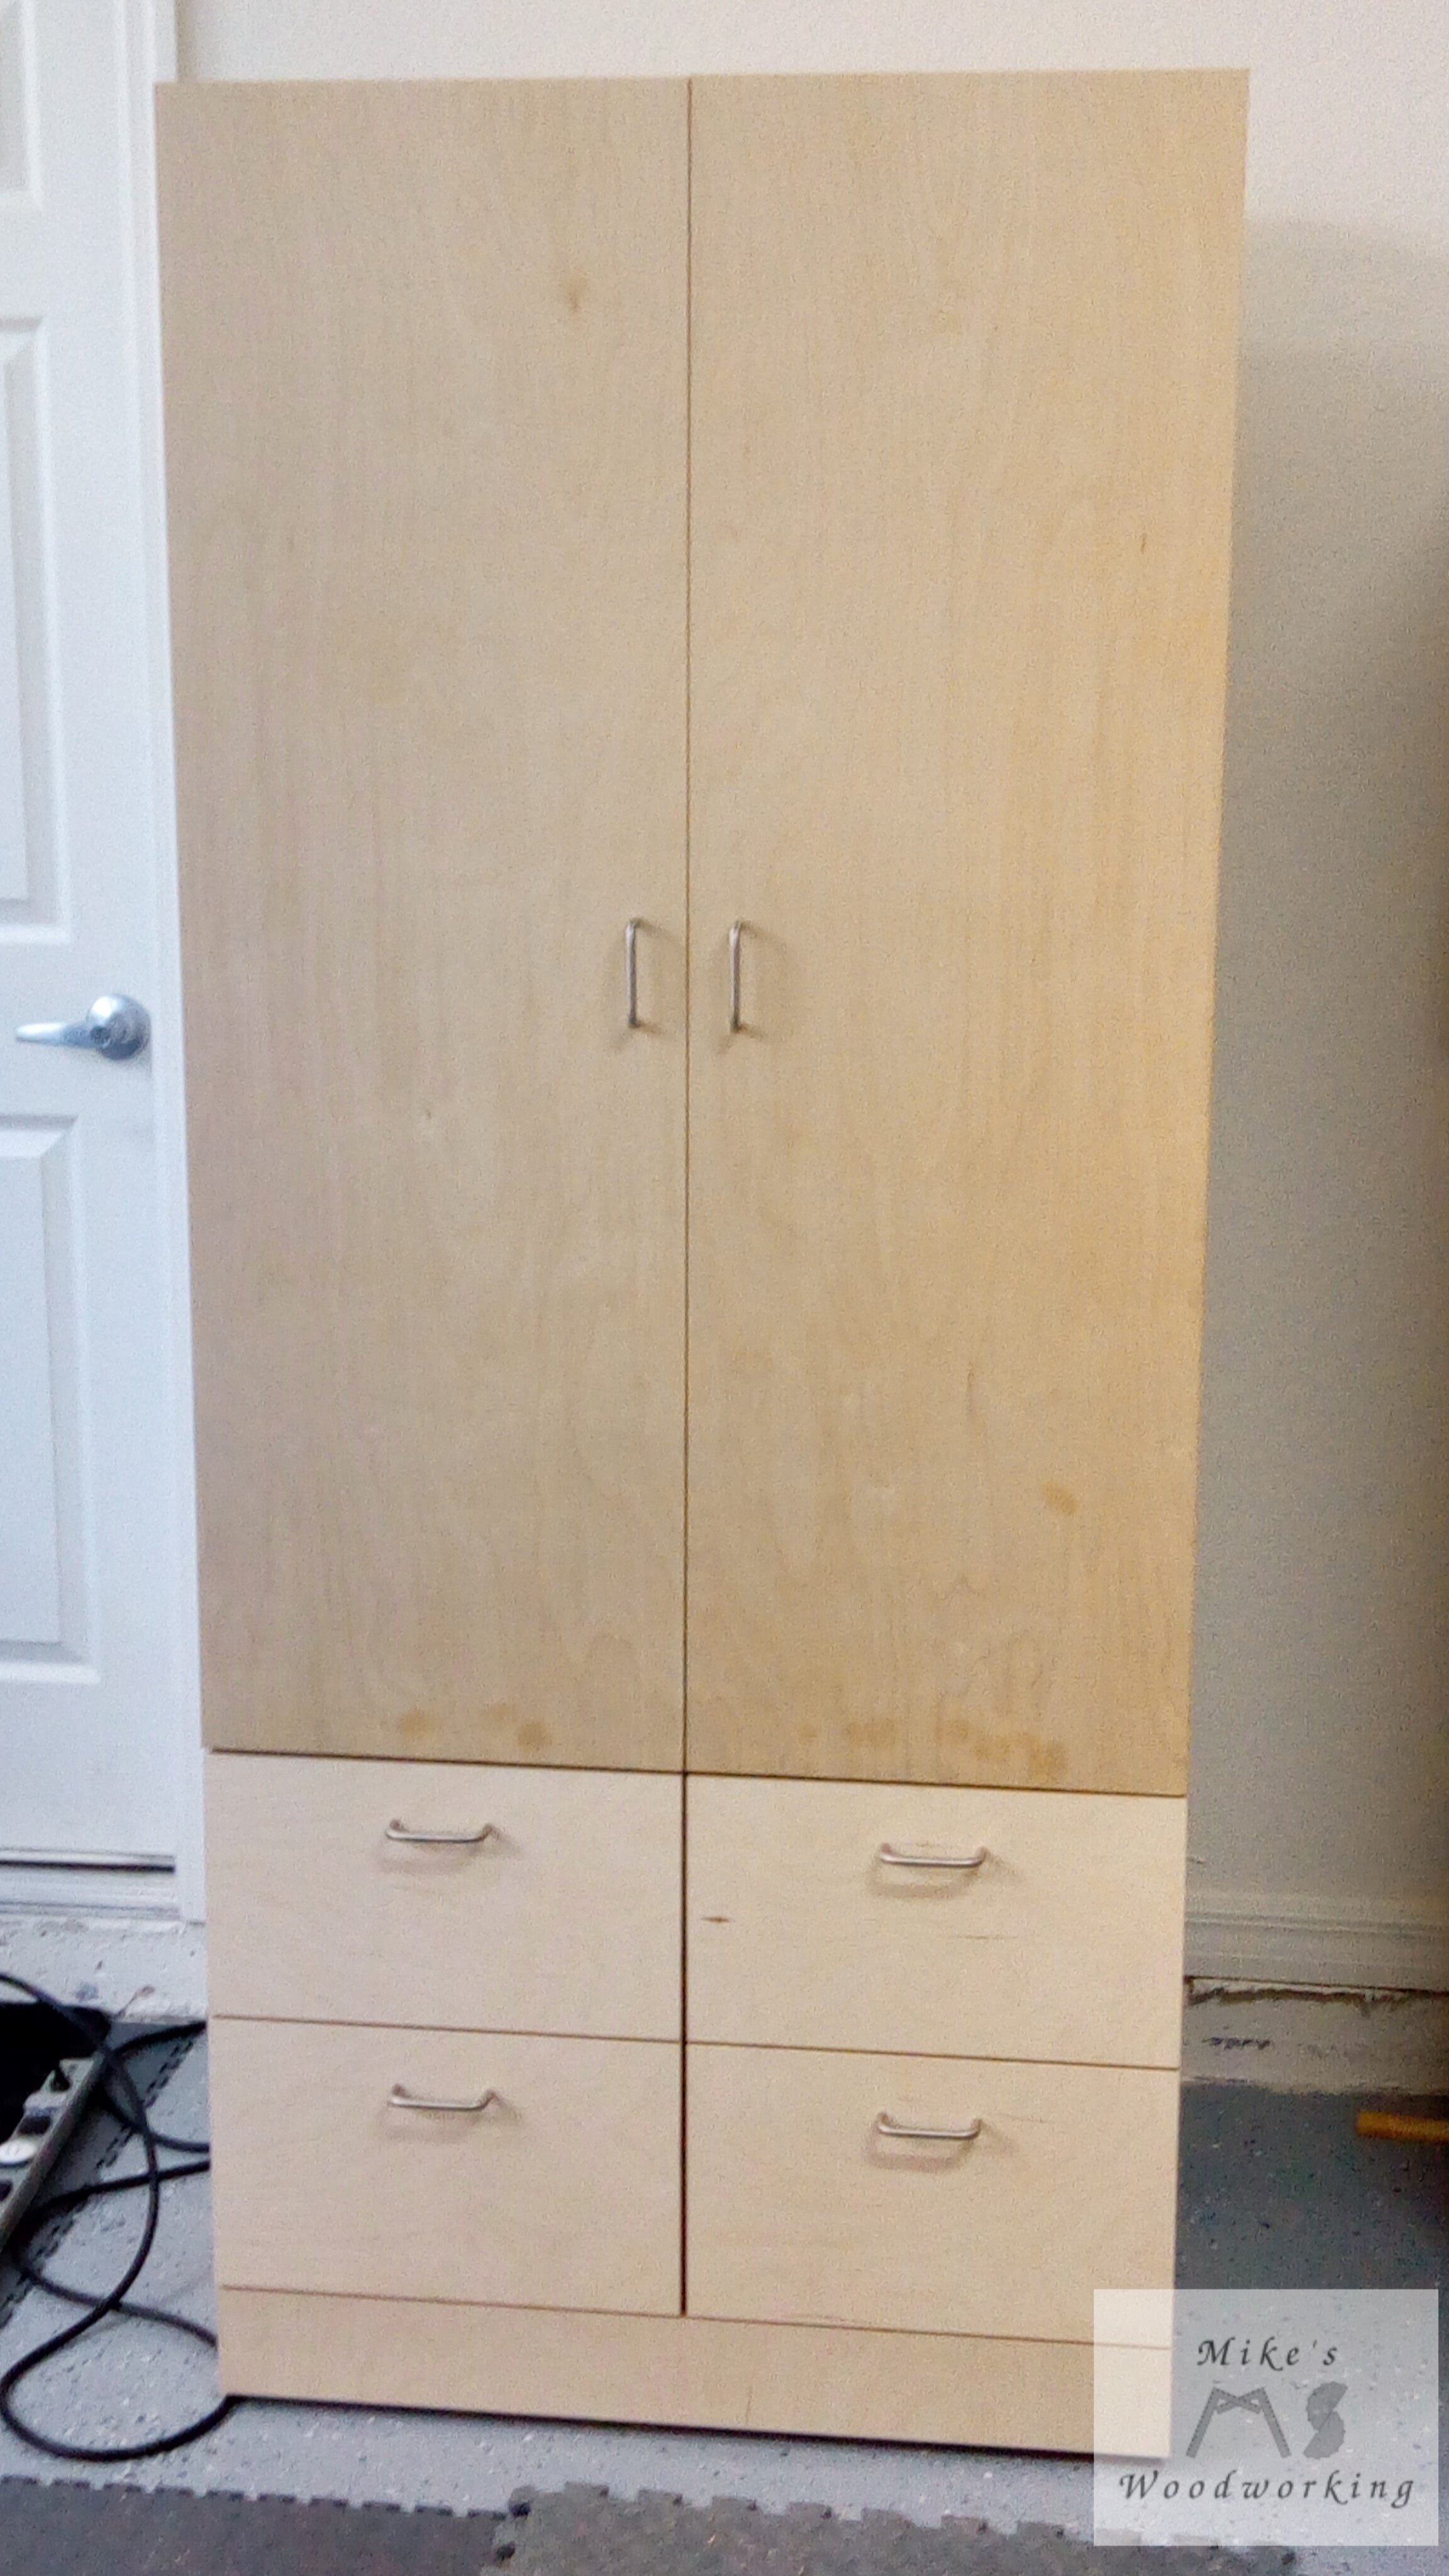
All that was left now were to install the doors and the drawer faces. The doors went off without a hitch. I used the exact same hinges as with the adjustable cabinets, so my jigs were already set. The drawer faces went on much better than the ones I installed on my assembly table, so that was a plus. I still had issues when installing them. I think a lot of that might be the shim that I’m using as a spacer. I might have to start going with the playing card trick instead of a wooden spacer. Time will tell on that front.
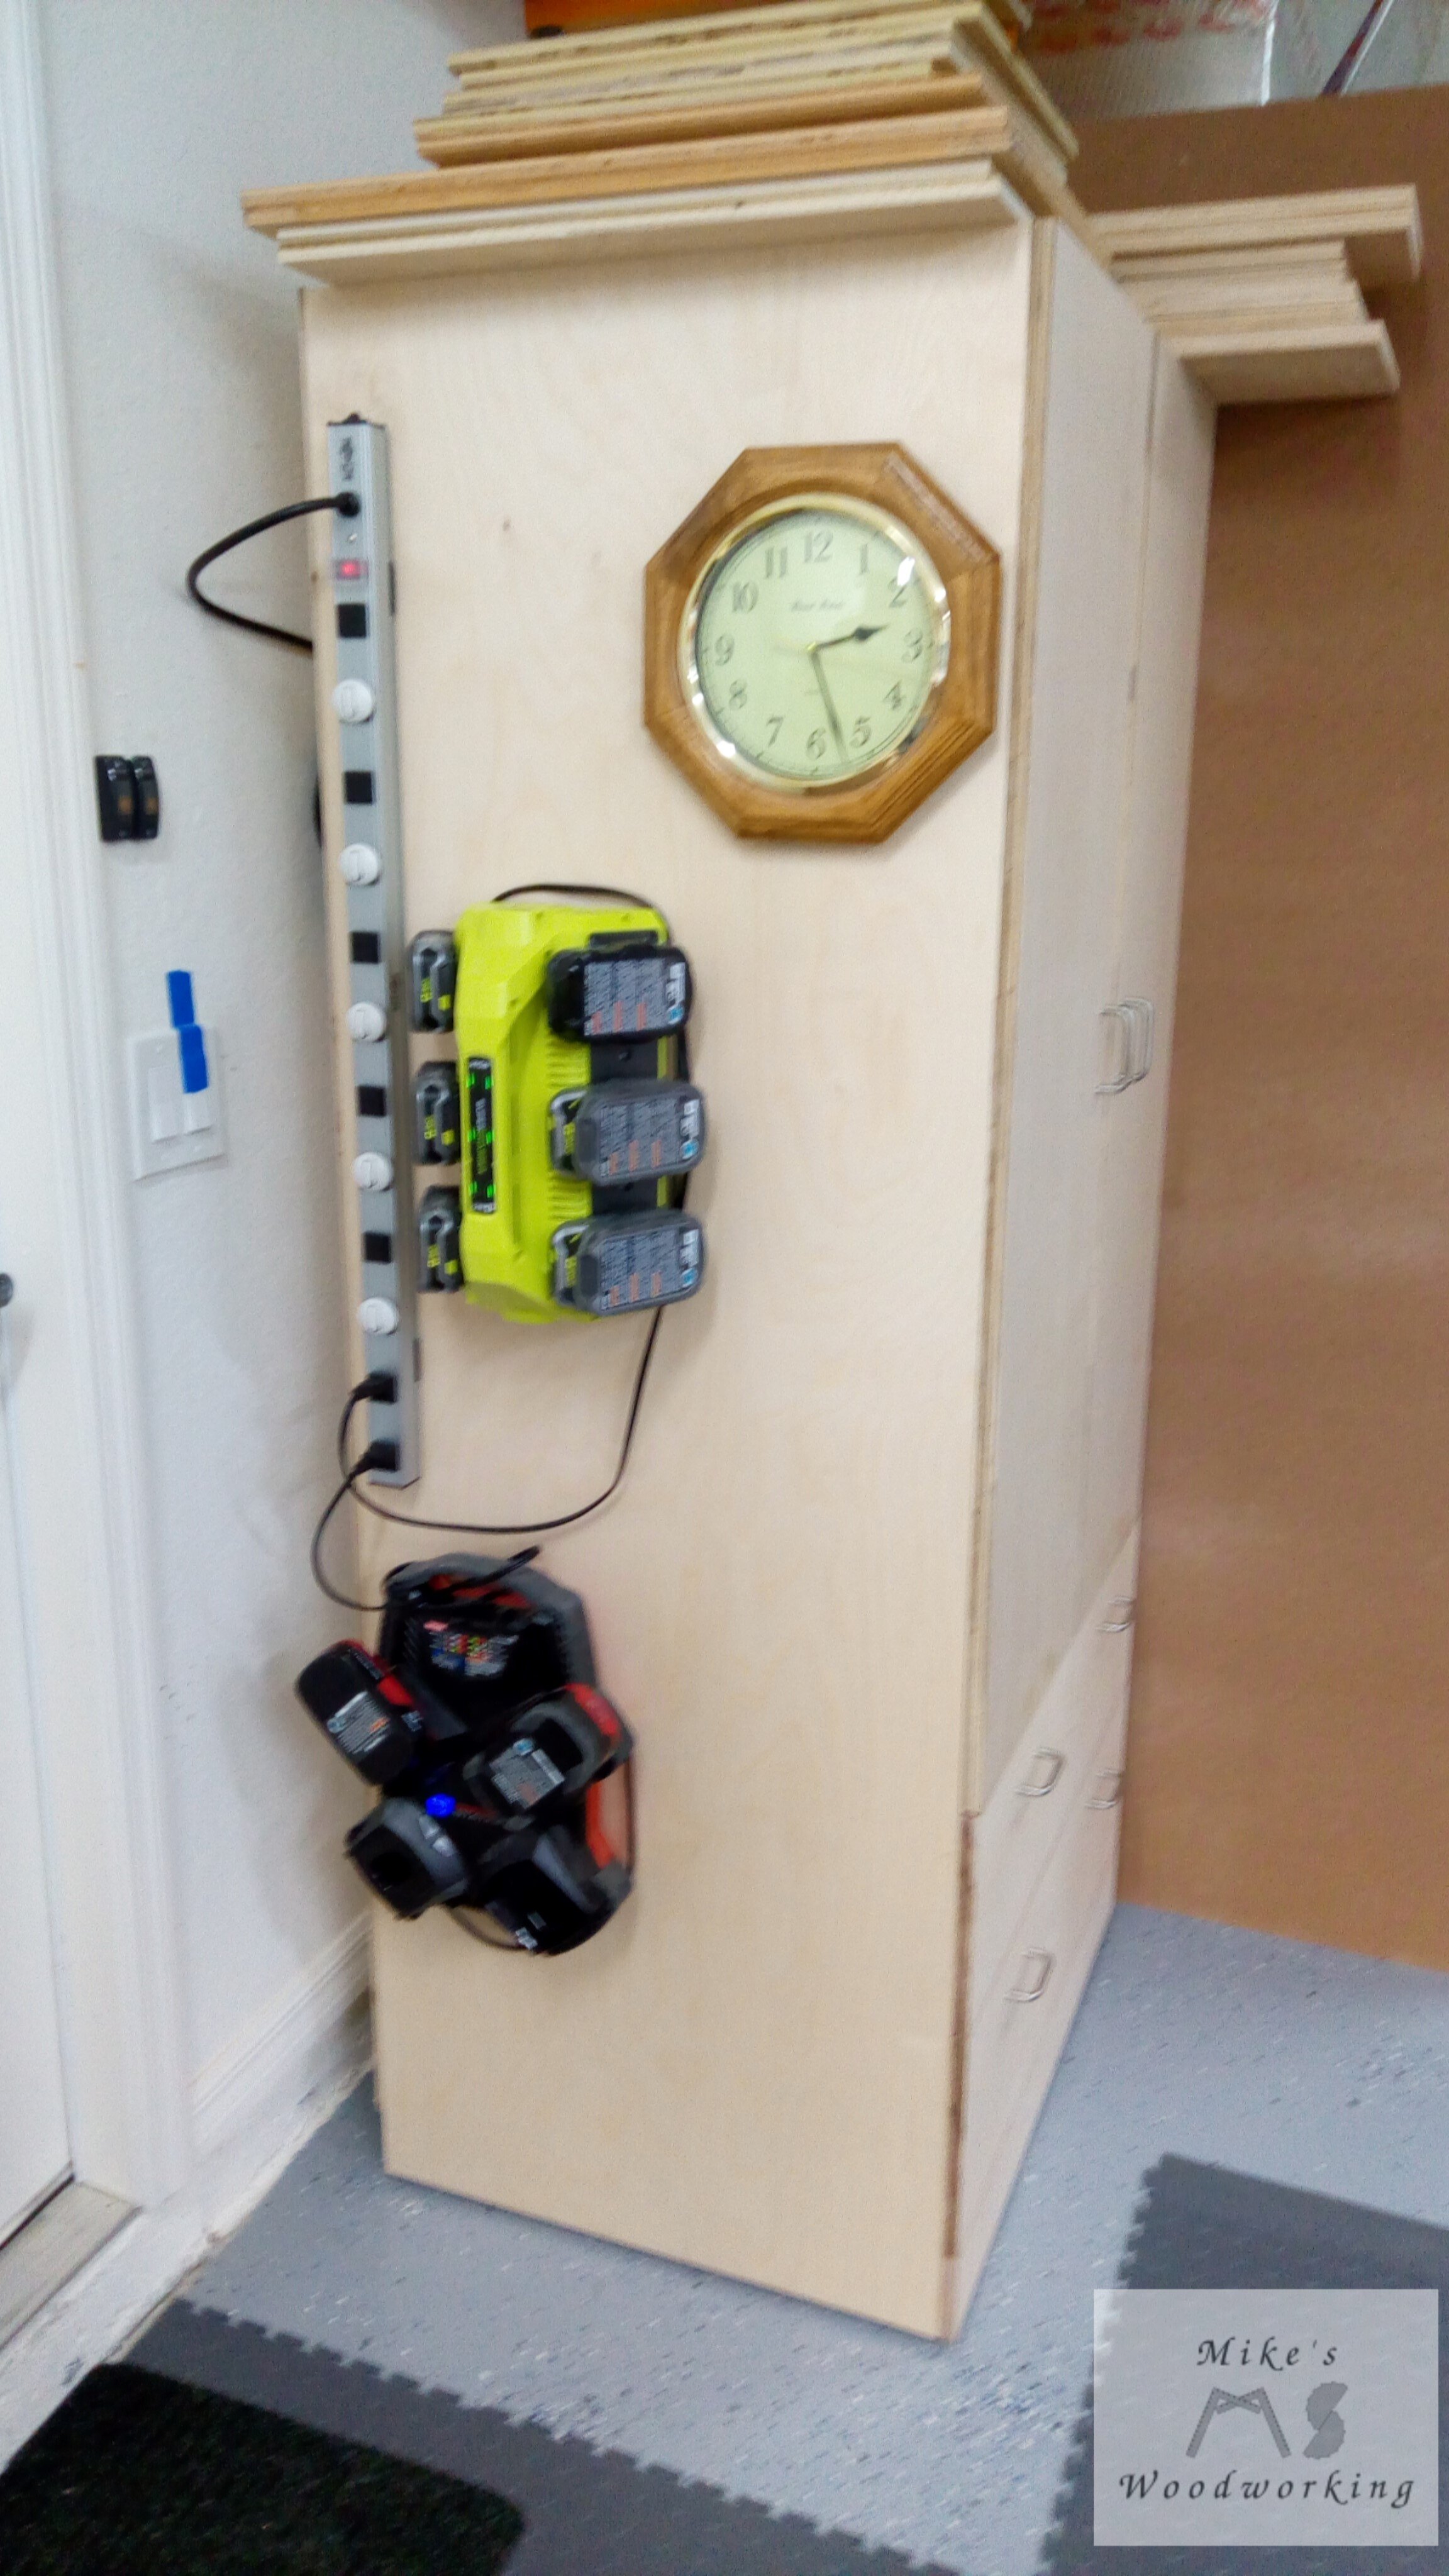
The final step was to add the door handles and drawer pulls. I used some drawer pulls that I purchased a long time ago for this task. I liked these so much that I eventually replaced every drawer pull in the shop with the same ones. Finally I could attach my battery charger to the side of the cabinet along with my clock. I was so glad to have this clock finally hanging somewhere. It had been leaning on my miter saw station forever and was constantly being moved around when I needed the space to cut something.
Now that the project is completed, and I’ve had it in use for eight months or so (August 2020), I’d have to call this one a big win. I removed the lumber cart from the valuable floor space. The scrapwood cabinet is not taking up any floor space, essentially. It’s in the same space as the shelving that previously occupied that location. I don’t have a ton of materials in it at the moment, but that will change over time. I learned a couple of lessons while making this cabinet that will hopefully carry over to future projects. The best part was the fact that I only had a few pieces of scraps leftover from the 13 total sheets of plywood I bought for this project and the Adjustable Storage Cabinets.


***RETIRED: January 2023***
The Scrapwood Storage Cabinet has officially been…well…scrapped. There were a few things about it that were frustrating and I found another solution that offered me a bit more flexibility in the end. The article for that project can be found here. The new project was aptly dubbed Lumber Cart 3.0.
This cabinet lasted me for almost three years, which is quite a long time in my shop for a project. I usually am constantly turning things over as I find other ways of doing/storing things. It wasn’t a total loss, however. I used a good portion of the material from this project to make Lumber Cart 3.0.