
Table Saw Sleds
I’ve had my current table saw for almost three years now. In all of that time, I’ve never made my own sleds and jigs for it. Well, I did make a spline-cutting jig once before, but it could have been better than how it turned out. I bought a rather pricey Incra crosscut sled, but I’ve been less than thrilled with its performance and reliability.
Because of how big the Incra sled is, I have to store in on the wall with the fence at 45° to save some space. Every time I take it back off the wall to use on my saw, it almost always winds up out of square to the blade. The time I have to waste in realigning everything slows me down and is, quite frankly, not acceptable for such a “high quality” item. I’ve purchased other items made by Incra in the past, and this is the only one that has not lived up to the hype (or the price tag, for that matter).
Given the types of projects I have in mind in the coming months, I think it’s about time I finally made my own table saw sleds. I’ve actually got three different sleds in mind at this point. First is a panel-cutting sled used primarily for squaring larger panels. Second, I want to make a dedicated sled for cutting mitered picture frames. Finally, I think it’s about time I made my own version of a cross-cut sled. These have been the cornerstone of many a woodworker, and I think it’s about time I tried my hand at one as well.
Time to Get on Track (Saw)
For all of these sleds, I’m going to be using a sheet of 3/4” Baltic birch plywood I got from the great folks at Hardwood Lumber and Millwork. Baltic birch is pretty much the best material when it comes to workshop jigs and sleds because of it’s strength and stability. In addition to the Baltic birch, the other common item for all of these jigs will be the plastic runners. I first saw them in a video by Marie at DIY Montreal. She used them to make a small-parts crosscut sled for her table saw. They are made from UHMW plastic and sold by Peachtree Woodworking Supply based in Atlanta, Georgia. The runners are great because, at least for the SawStop that both Marie and I have, these runners glide effortlessly in the miter slots and there is ZERO slop between the runners and the slots. Amazon sells the runners, but since the order would have been put through Peachtree in the end anyway, I simply cut out the middleman and just ordered them directly from Peachtree.
Before making any cuts, I first need to check for a square corner on the sheet of plywood. As you can see in the below picture, this one particular corner is perfectly square so I’m good to go here.

Next I need to break down the plywood. I used my track saw to make quick work of this task. This Makita cordless track saw is absolutely great (especially compared to the corded DeWalt one I previously had). Because of the way I laid out the different sleds on the plywood, I initially thought about just ripping the plywood in half on the table saw. I opted to crosscut it instead. This was mainly because I didn’t feel like opening up the garage to rip the plywood on the table saw (pure laziness here). Also, it has been a bit cooler in the mornings here in Florida (at least at the time I was breaking down the plywood) and I didn’t want to lose any heat from the garage.

Now that I’ve got the panel-cutting sled section of plywood cut, I NOW can take it to the table saw and cut the piece that will be the base of the sled. I went with an overall dimension of 24” x 18”. I don’t need the base to be excessively large, as most panels I’d likely be using for projects would fit this dimension, with maybe a couple of inches of overhang at the most in any direction. This sled is really only for squaring the edges of a panel for further processing on the table saw with the rip fence.
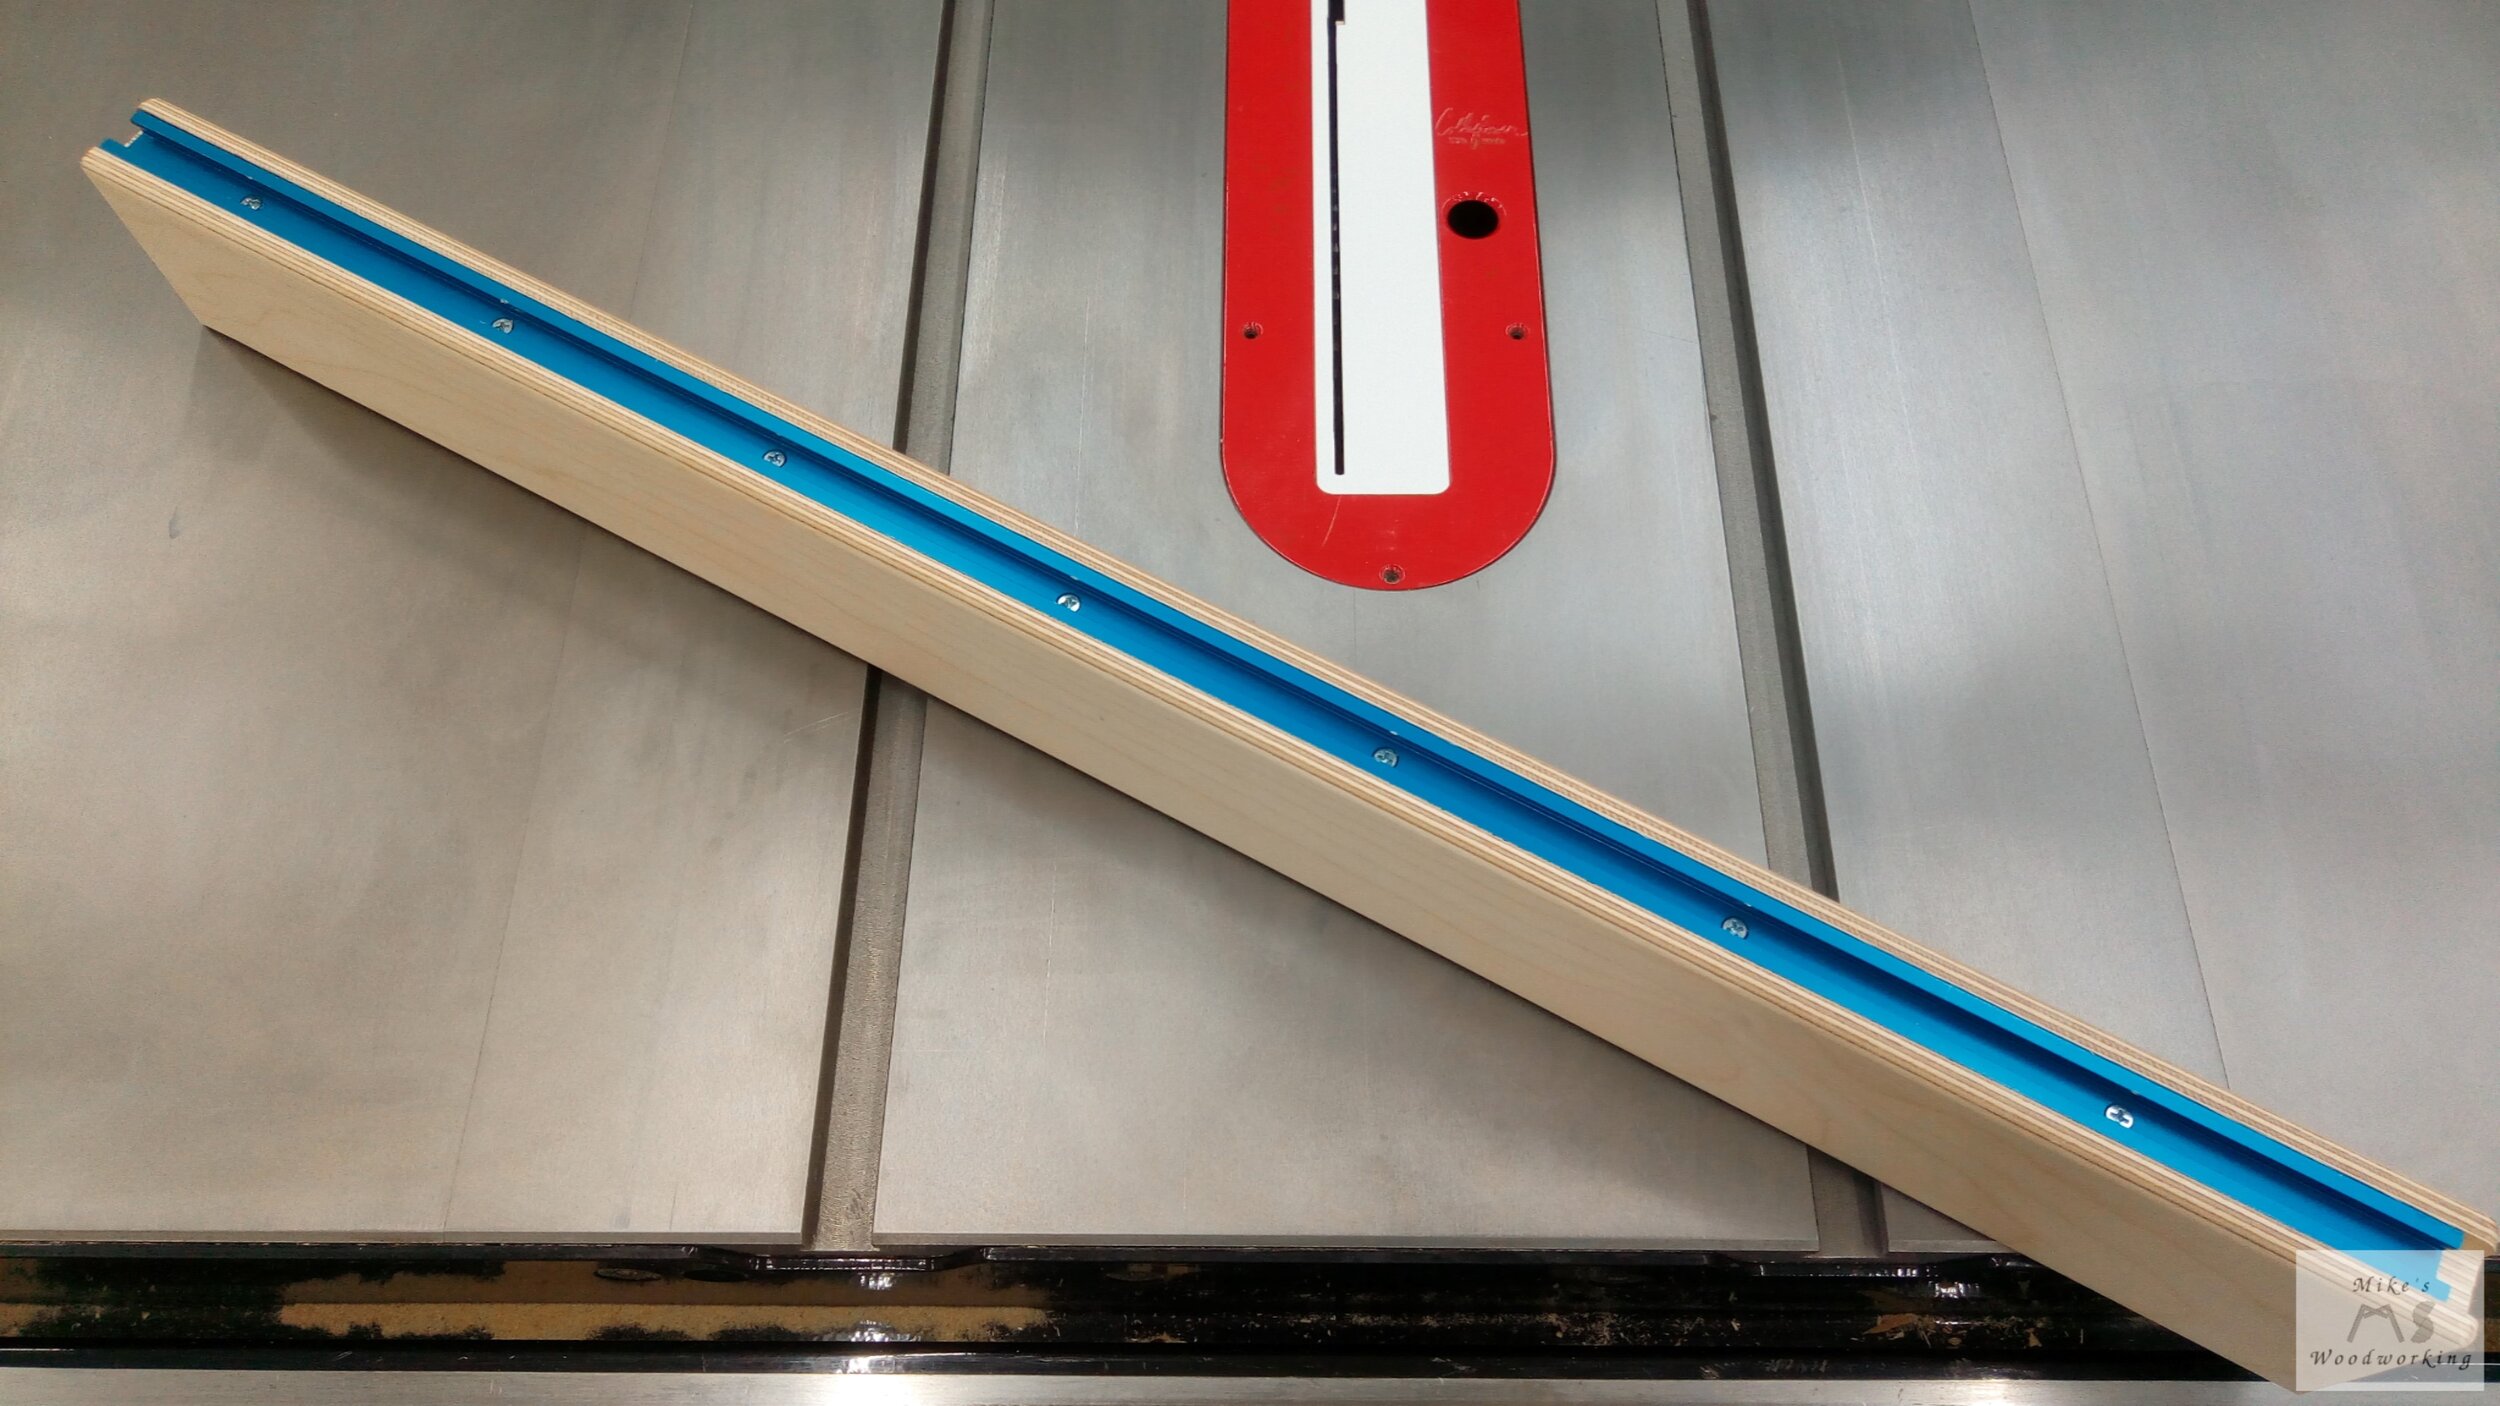
Next up is attaching the plastic runner to the bottom of the sled base. The runners I bought were all 36” long. I opted to leave the runner for this sled at full length to allow the sled enough infeed and outfeed runout, in the event I need to process exceedingly large panels. This is usually a problem because backing the sled too far from the table saw top provides no support for the sled and material. With the addition of the Izzy Swan infeed table, this makes wide panels on ANY sled a breeze.
A (Not So) Sticky Situation
I first placed a few washers in the miter slot of the table saw and placed the runner on top of them. This must be done as the runner itself sits below the surface of the table saw top. I also placed the same number of washers on the table saw top so that I can place the sled panel flat on the runner with full support on the end. Before placing the panel on the runner, I ran a thin bead of Gorilla superglue along the length of the runner, stopping an inch or so from the edge of where the sled would be sitting (the panel will be sitting in the middle of the length of the runner).


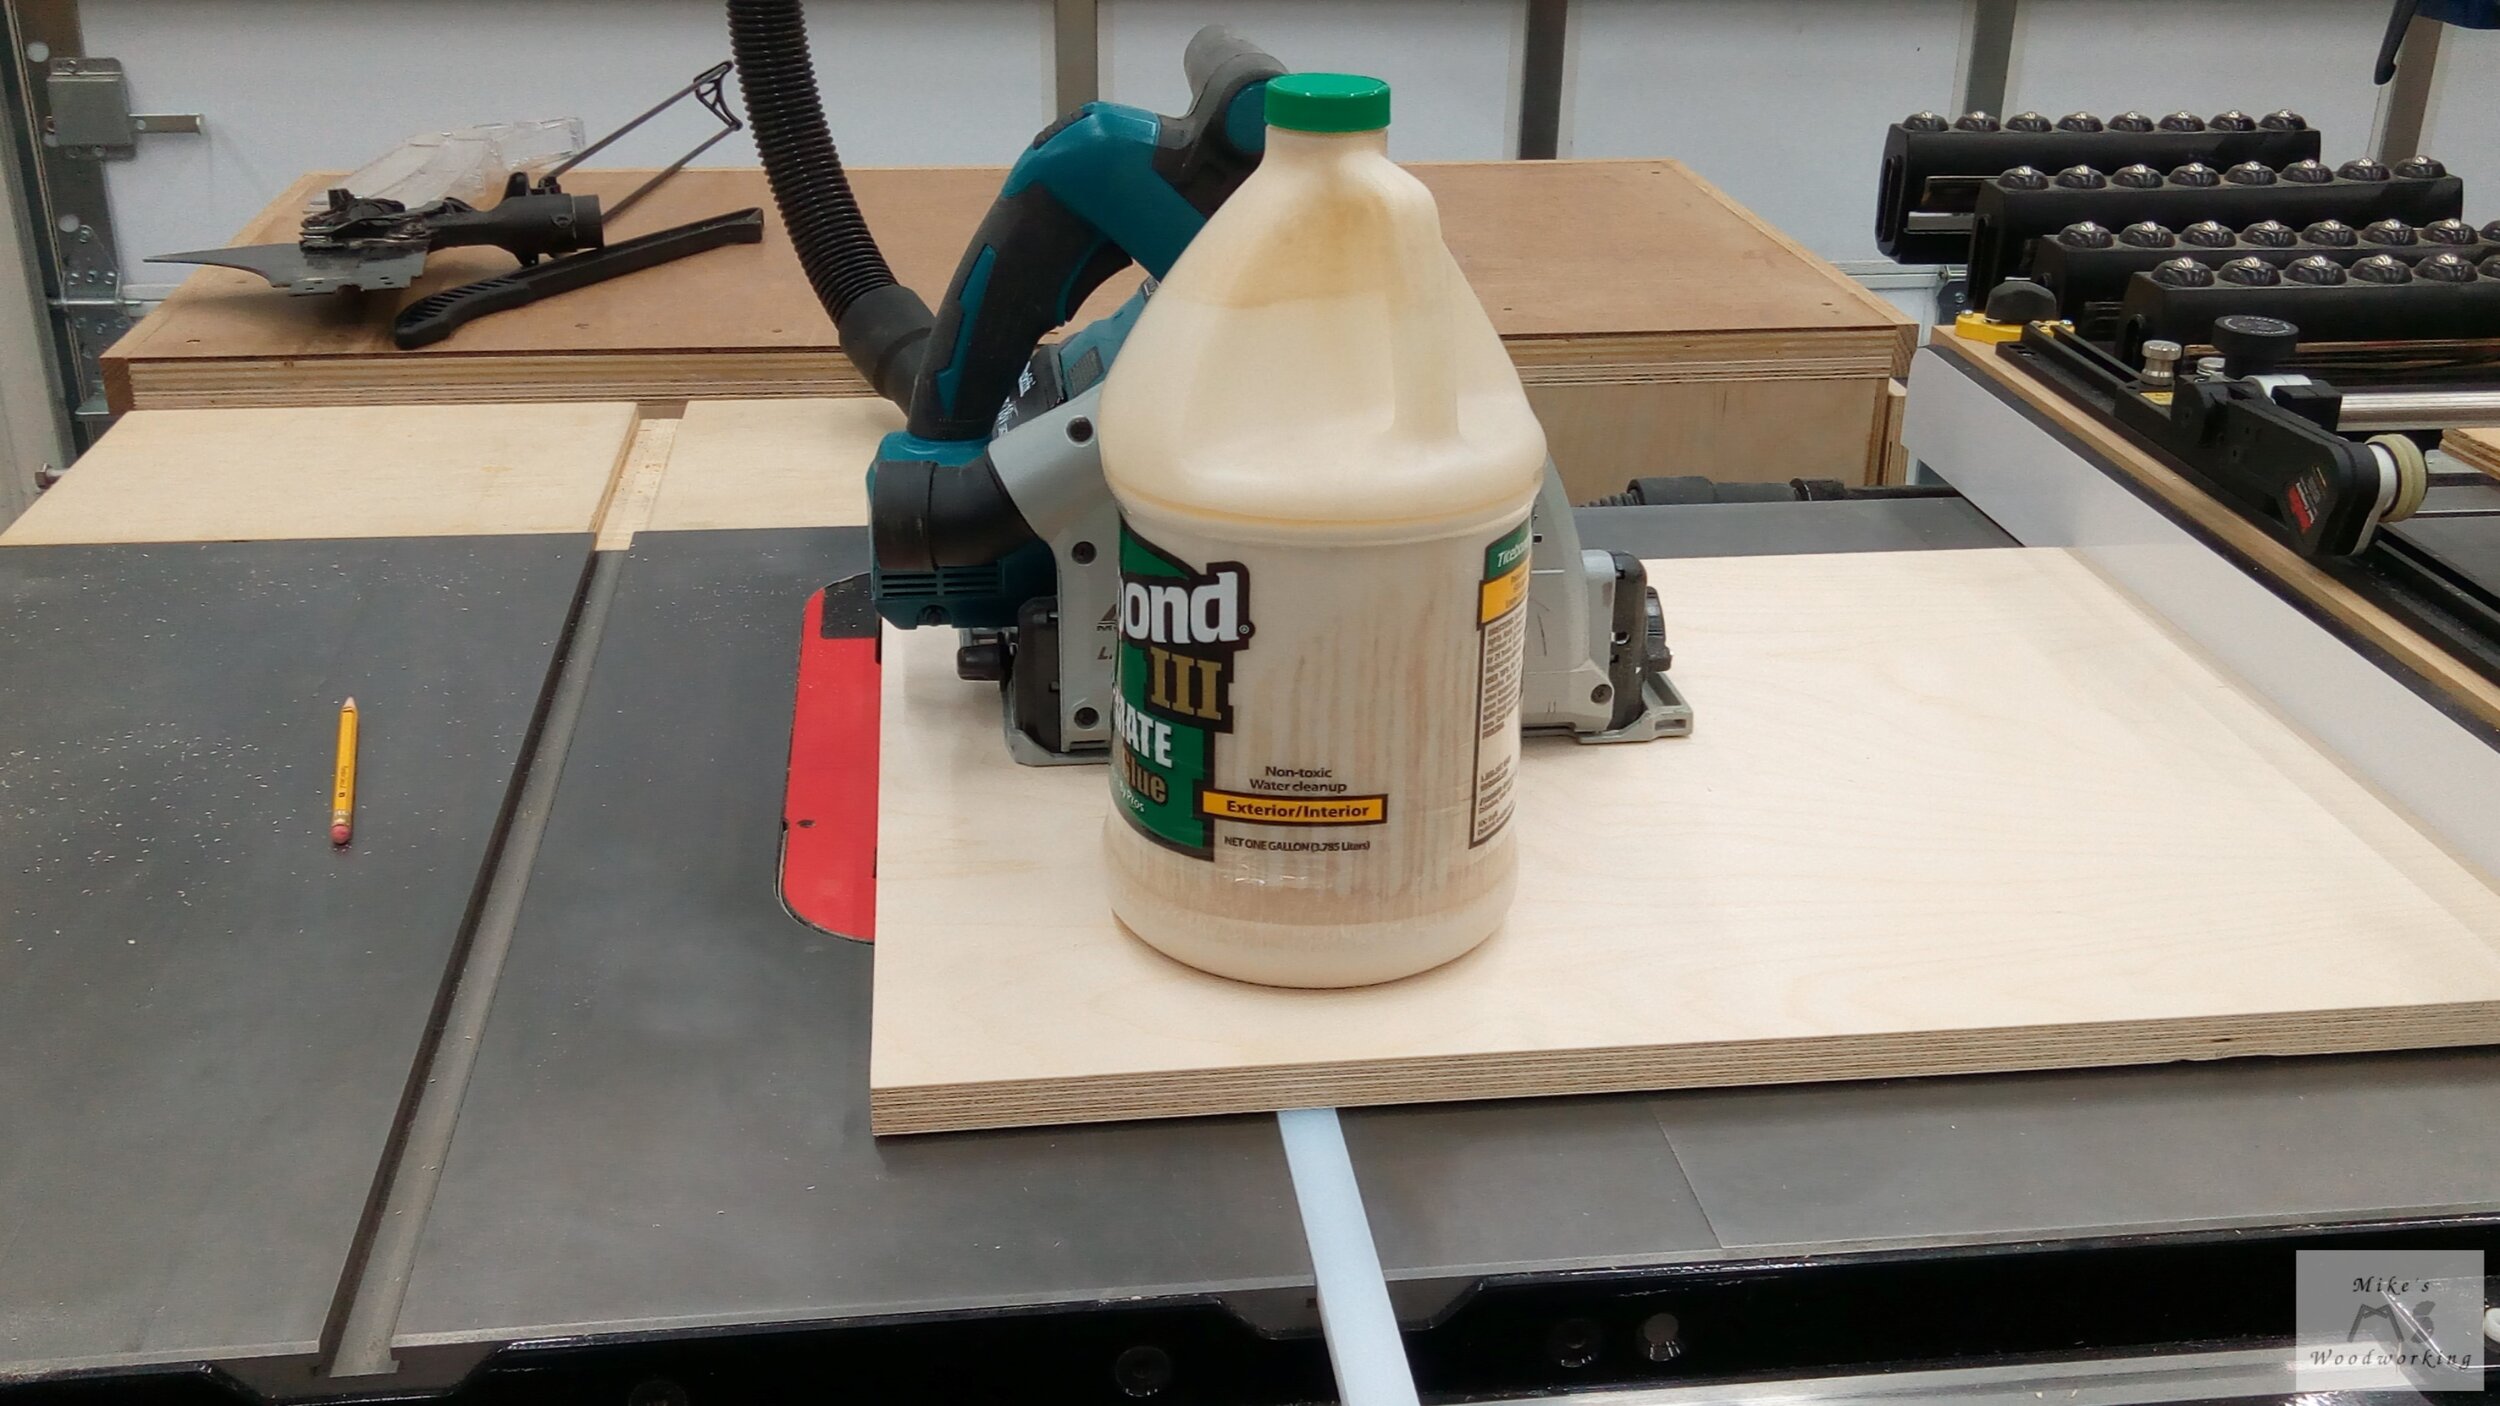
I set the rip fence to allow the panel to overhang the kerf of the blade by 1/4”. This will allow me to make a nice flush squaring cut once the sled is completed. With the glue in place, I laid the sled panel on top of the runner and washers, making sure it was butt against the rip fence and on the marks I made on the runner. Now that the panel was in place, I took my gallon jug of wood glue and my track saw and placed them on top to act as clamps while the glue set up...CLAMP CHAMP!!!
After an hour or so, I took the sled off of the saw and flipped it over onto my workbench. To permanently attach the runner to the sled, I first drilled pilot holes and countersinks in the runners so the heads of the screws wouldn’t interfere with the miter slot. When I was attaching the screws, I noticed that the runner was moving a bit while driving the screws. I didn’t think too much of it at the time, so I finished with the other screws (I used five in all).
I took the sled back to the table saw to test it out. The runner slid in fine until I got to where the first of the five screws were. The further I pushed the sled into the miter slot, the more it began to get wedged into place. Clearly when the runner moved on me while screwing it in place it caused some major misalignment. This was not going to work AT ALL. I took the sled back to the workbench and took the screws out. I pulled on the runner and it came off of the plywood with surprising ease. I think my problem was I used WAY too much superglue in combination with not waiting long enough for it to cure. There was quite a bit of glue squeeze-out along the edges where the runner met the plywood as well.
Well, since this attempt was a total flop, I decided to just start again. I used the off-cut of the plywood piece from the previous panel and cut another one. This time, I went with only a few drops of superglue on the runner and I let the glue set up overnight. I still used the same method of clamping as before, as there really wasn’t anything else I could use that had any weight to it (I’ve used this method before and it worked great on other projects).
The next morning I got back into the shop and went straight for the sled on the table saw. I removed my “clamps”, lifted the panel up...and all I got was the plywood. The runner was still in the miter slot. The superglue basically did not bond the plastic to the plywood. Well, this is a total boner to say the least.
It’s Time for Plan B
I had another idea at this point. Instead of using the rip fence to align the runner square to the panel, I’ll just use a square to align the runner with the panel, only this time I’ll use my pin nailer with 1” pins instead of the superglue to temporarily attach the runner. It doesn’t really matter if the runner is a little out of square with the panel as I’ll be running the sled through the saw to square it up in the end anyway. I used the same panel and runner for this as the little bit of glue that was on the plywood didn’t affect anything. I drilled more pilot holes in the plywood and drove in the five screws.
I went back over to the table saw to try the sled again. It went in a bit easier than its previous iteration, but it wasn’t super smooth. For now, however, it slides well enough to use so I went about attaching the fence to the sled and employing the five-cut method to adjust the fence. I’m not going to get into the specifics of the five-cut method here. If anyone is interested in more information, the fantastic video made by William Ng goes into much more detail.
When I first attached the fence to the sled, I used a framing square to try and get it as close as possible to square and attached it with two screws, one on each end of the fence. The screw farthest from the blade would be the pivot point. My first attempt of the five-cut method yielded the following numbers on the offcut:


If the fence is perfectly square to the blade, the numbers would be identical. Since these are off a bit, the fence needs adjustment.
Based on the five-cut method calculator I used I was out of square by .004”. That’s not too bad, but I wanted it a little better. First, I placed my .004” feeler gauge between the fence and the corner of a piece of plywood I clamped to the sled. I unscrewed the end of the fence closest to the blade, removed the feeler gauge, and moved the fence up against the point of the plywood. I clamped the fence down and attached the screw in a new position. The same screw hole CANNOT be used again, as this would result in the fence being pulled into the exact same position as it was previously.
My second attempt yielded these numbers:


Somehow, I wound up with the fence even further out of square than before. I was off by .012” this time. I repeated the same procedure with the .012” feeler gauge, moved the fence and screwed it in place again. I ran the five cuts again and was astonished when I got these numbers:


I somehow was able to get the fence dead-on-balls accurate (thank you Ms. Vito) on my third try. I took the sled off of the saw and drove in a few more screws to secure it in place. The sled still slides a bit tight, but over time I think it will loosen up a bit. Also, applying some wax should help as well. I attached a couple of toggle clamps to the fence as well, to aid in holding large panels in place while using the sled. These are just some cheap ones I got at Harbor Freight, but they seem to hold quite well.

The "A-ha" Moment
With one sled down, next up is the picture frame sled. This is based on the one I saw David Picciuto make a few months ago. He made another version of this same sled a number of years earlier, but the current one has a couple of alterations.
I started by breaking down the nearly 2/3 of a sheet of Baltic birch plywood left from the first sled. The panel was sized according to the plans. Since this wasn’t quite as unwieldy as a full sheet of plywood, I just made all of my cuts on the table saw. To help keep the plywood tight up against the rip fence, I made sure to employ my Clear Cut TS Stock Guides.

Because of the size and layout of this sled, I will be using a runner in both miter saw slots. However, because the sled base will be at a 45° angle, a long runner in each slot isn’t necessary. I cut the runner in half and this gives me the two smaller runners needed. Now that my panel is all set, it’s time to get it properly aligned to the runners. I locked the rip fence in position and used one of my precision squares to get the base at a 45° angle to the miter slots.
Now, given that my previous experience with these runners was not the most pleasant, I opted to try a completely different approach this time. On the panel-cutting sled, I secured the runner to the sled from underneath, first with 1” pin nails and then with countersunk 3/4” screws. This time, I opted to shoot the pin nails in through the TOP of the sled, holding the sled and runners in place. Because of this different approach, I didn’t want to rely on just a couple of washers to prop up the runners. This would not provide full support across the whole runner and could lead to problems. I found a couple of identical thin scraps of 3/4” plywood and set those in the miter slots instead of the washers.
Now that I’ve got full support under the runners, I got the panel in place with the square and placed my glue jug clamp on top to hold the plywood in position. I double-checked the panel with my square and rip fence and everything was still a go. I drove four 1” pin nails into each runner. With the runner secured in place, I gave it a short slide in the miter slots and it moved quite easily (a good start). Next I drilled a pilot hole and countersink into the plywood, but not too deep. I was planning on using 1” screws this time and a deep countersink would cause the screw to poke through the runner.
With the countersink done, I used a second drill bit to make a pilot hole that went into the runner itself. I drove in five screws into each runner and the screw heads were just under the surface of the plywood...perfect. I sanded over the top of the screws to get everything flat. I removed the glue bottle clamp and gave the sled a quick slide. The sled glided with the greatest of ease. Needless to say, I am elated at this point.

I think my problem with the panel-cutting sled not sliding smoothly is due to the screws being attached from under the sled versus the top. With the screws countersunk into the runners, the heads are forcing the plastic runners to bulge just enough side to side to provide greater friction. Going through the top, however, negates this issue. I just have to make sure I drill a large enough pilot hole to give the screws enough material to grip, while not leaving so much that the runners can bulge.
The Word of the Day is “Safety”
Now that I’ve got the runners securely fastened, next up was securing the aluminum framing square to the sled. Before I did that, I first made a cut into the sled about 4” long with the blade. This kerf cut is the building block for getting the combination square into the proper position to ensure accurate measurements with the jig.
The plans first call for a strip of thin plywood to be glued to the framing square. I had some 1/8” plywood sheathing leftover from the Geeks-R-Us project, so I just cut a couple of small strips from that. I needed to glue the thin plywood strips to the square, but I didn’t have any epoxy as was recommended in the plans. Against my better judgment, I gave the Gorilla superglue a shot one more time (what’s the worst that could happen...it not work AGAIN). I made sure to use only drops of glue instead of a continuous bead, used every spring clamp I had and a few f-style clamps to hold the strips in place while the glue had time to cure. After a few minutes I removed the clamps and the strips appeared to be holding quite well.

Before I could attach the framing square to the sled, I needed to drill a few holes through the square first. With the holes drilled, it was now for the moment of truth. Following the plans once again, the marked a line from the edge of the sled where the long side of the square would be attached. I lined up the square on this line and used my precision square to position the framing square at a 45° angle to the blade kerf I cut into the sled earlier. In addition to all of this, I needed to line up the point of the combination square with the edge of the kerf. This would be my zero mark and ensure that stop on the sled measures accurately later.
I placed a single f-style clamp on the combination square, to help hold its position, while I drove in some 3/4” sheet metal screws. Once I had a couple of screws in place, I double-checked to ensure the combination square was still in the proper position. Hallelujah!!! Everything was still in proper position. I drove in the rest of the screws and next prepped for the most nerve-racking step; cutting the combination square with the table saw.
You see, since I have a SawStop, I have to ensure that I disable the safety system prior to making this cut, else I’ll trip the system and ruin my blade in the process. I made sure I disabled the system and began to VERY slowly begin cutting into the aluminum combination square. While about halfway through the cut, I noticed that I forgot to attach one more screw through the square into the sled. I backed out the sled and turned off the saw to attach the screw. I probably could have made the cut without issue, but I wanted that other screw in place to be extra careful.
I started up the saw and proceeded to finish the cut. Well, that was the plan. I just starting making the cut and then BANG!!! The safety system activated. I forgot to disengage the safety prior to restarting my cut...IDIOT!!! I was so upset with myself for making such a stupid mistake. One good thing is that I now know that the saw works as intended.

I broke out the manual, because I didn’t know what the proper steps were for when this happens, as I’d never experienced it before. Once I finally got the blade and brake cartridge removed from the saw, I gingerly removed the blade from the brake cartridge. To my surprise, I didn’t see any damage to the carbide teeth or the blade itself. With that being said, I did not want to continue using this blade as I had no way of knowing if there were any small cracks that developed in the blade that I can’t see. I consigned myself to throwing away a rather pricey table saw blade. Oh well, live and learn.
You’ve Got to Be Kidding Me
I already had a spare cartridge on hand, so I replaced the broken one and installed a different blade. I turn the saw back on and it fired up with no issue. Now, I didn’t want to use this other blade as it had a different-sized kerf than the one I wrecked. The blade I wrecked would be the one I would always use with this jig, so I opted to get a new one to install in the saw to finish the cut on the combination square. I was now out of commission for the time being.
I ordered my new blade from Tools Today and received it in only a few days later. I checked the kerf of the new blade and it was slightly larger than the old one. Since I would be making the cut on the sled again, the new blade would widen the kerf on the whole sled in one shot and everything would line up fine. This time, I made sure to disengage the safety system, and I finished the cut on the combination square.
Now that the kerf had been cut, I need to file down the both cut edges of the combination square on the sled. This will ensure that the saw doesn’t trip again, wrecking another blade. I took out a couple of my files and started filing the edges. I got my calipers out to check the gap between the two pieces and it was greater than the kerf of the blade, so I figured that was good enough. I put the sled back on the saw and ran the sled through the blade, without the blade turned on. I checked the control box and it didn’t show any errors indicating a detection.
We’re getting to the home stretch. Next up was to cut the stop block for the sled. Since I needed a 45° angle on it, I opted to use my new sled to make the cut. I slowly ran the piece through, and right when I was just exiting the plywood, the safety system went off...again...FML!!! I removed the blade and brake cartridge from the saw, again. I removed the blade from the cartridge, again. This saw blade had actual damage. One of the teeth was nearly sheered off because of the force applied stopping it.
So, I’ve now wrecked two blades in the span of a few days. While waiting for another new blade, I went down to Rockler to pick up another brake cartridge to replace the busted spare I had. I got back and went to install it in my saw, and the cartridge key turns about half of the quarter turn required to lock it in place. I now can’t even power on the saw as it requires the key to be fully engaged. I tried my dado brake cartridge in the saw, in case the brake activations did something to the saw, and the key turned just fine on the dado brake. There’s just something binding with this new brake.
After a frustrating time trying to get any kind of answer from SawStop (and I’m talking about YOU, David), I opted to just go back to Rockler and get ANOTHER brake cartridge. When I got back home, I tried the newly purchased brake in the saw and I was able to install it without a hitch. FINALLY, I’m back in business again.
I was done messing around with trying to just file the framing square to clear the blade. I busted out my angle grinder and just cut the square back a good 1/4” from both sides. This took all of a minute and there was no way the saw would trip again with this sled. I should have just done this in the first place to save myself the aggravation and money in new blades and brakes. Oh well, another lesson learned.
I cut another block of plywood to use as the stop and made the angled cut with the jig...no problems at all. Next up was to make a cut along one edge of the block to allow it to slip onto the framing square. It took a couple of passes on the table saw, but no problems there. Now I needed to screw the toggle clamp onto the stop block. The bolt that came with the clamp wasn’t long enough, so I just used a longer carriage bolt and glued a small piece of cork rubber to it for some grip. After adjusting the bolt to the proper length, the clamp worked perfectly. This sled, after MANY days of delays, was finally done.


Same Old, Same Old
The crosscut sled was going to be the easiest of the sleds at this point. I’d learned my lessons on the previous two, so all I needed to do was apply said lessons on this build. I cut the base of the sled on the table at 24” x 30”. I used the same methods with the runners for attaching them to this sled. With the runners screwed in place, the sled glides effortlessly.
Now I needed to make the front and back fences for the sled. I decided to glue up two pieces of plywood for each fence, giving me a 1-1/2” thick piece for each. This extra thickness was necessary, especially for the rear fence, as I planned on installing a piece of t-track to allow the use of a stop block for making repetitive cuts. With both sets of fences clamped together, it was time to call it a day.

After a multiple day delay, I finally made it back into the shop to finish the sled. First, I scraped off what little glue squeeze-out there was on the fence pieces. I squared an edge on the jointer and ran the other side through the table saw, ripping it to a final width of 3”. I opted to ease the corners on both fences on the router table with a 1/4” roundover bit, instead of just sanding. Before attaching the back fence, I needed to make one final pass with a chamfering bit. For the portion of the back fence that is sitting on the sled facing the blade, having this chamfer allows any accumulated sawdust to move out of the way of the fence to prevent any skewing of stock being cut with the sled.


The front fence doesn’t need to be perfectly square to the blade as it is simply to hold the sled together once the first cut is made. Before attaching the rear fence, I made sure to run it through the router table with a 3/4” straight-cutting bit to plow out a channel for the t-track. I don’t want to have to take the fence back off, after getting it squared-up.
The rear fence went through the same process as the panel-cutting sled. I went about this the exact same way until I go the error down to .001”. I finished attaching the back fence with three more screws to finish the job.


That was it. I was finally done with my three table saw sleds...weeeeeeeeeeeelllllllllllllll…not exactly. I was not too thrilled with the panel-cutting sled’s rough movement through the saw, so I opted to make that one again. I won’t get into the details as it was more of the same as before. This time, attached the runner from the top instead of the bottom, negating any rough movement of the sled. The fence was adjusted to within a minuscule .0009” of error. I decided against the toggle clamps this time, though. I noticed when I used them on the previous version that they tended to move the stock ever so slightly forward, and I didn’t want anything skewing my cuts.

After a rather long journey, I finally finished all three sleds. I’ve used the cross-cut sled a couple of times and it’s great. The addition of the Katz-Moses stop block make for quick and accurate repeatable cuts. I still need to put a block on the back of the cross-cut sled to prevent any accidental touching of the blade when making cuts. Other than that, this project is a wrap.
I made A LOT of mistakes on this one. Busting two $100 blades and two expensive brake cartridges was a steep price to pay for a lesson learned. However, with the employment of these sleds, the quality of my projects can go nowhere but up. With a couple of my upcoming shop improvement projects, the panel-cutting sled will likely get a lot of use. Even with all of the mistakes, this is still a big win for me. Now I just need to find somewhere to store these sleds...sigh.
***UPDATE: December 2021***
***UPDATE, December 2021*** As of around mid-November 2021 I have retired the cross-cut sled. After using it a good number of times it became clear that it was simply too big and way too heavy for me to move around all of the time. I decided to go with a commercial cross-cut sled made by Infinity Cutting Tools. I’ve used the new sled a few times and I really like it. It is much smaller and a lot lighter than the one I made.
Also, I have FINALLY gotten a chance to try out the picture frame sled. It was used in the construction of a Christmas present and the results were excellent. The Incra sled I have is going bye-bye. It gave me nothing but problems and its accuracy was lackluster nearly every time I used it. Not to mention I was having to constantly resquare the fence every time I went to use it.
The panel-cutting sled is still in use in the shop. I find that sled indispensable when breaking down plywood panels for projects. When used with my Izzy Swan infeed table, the panel-cutting sled can handle even very large panels with ease.
***UPDATE: January 2023***
***UPDATE, January 2023*** The panel-cutting sled has been permanently retired. Over time, I’ve found that I get much better results and more square cuts if I use my track saw with my Woodpeckers Track Square. I recently went to use the sled and I checked it for square against my table saw blade and it was slightly off. I didn’t feel like adjusting it again, so I opted to just scrap it instead.
The only remaining sled still in use of the three I originally made is the picture frame sled, and I will be using that to clean up the joints on the failed frames from Picture Frames Galore (yes, I kept ALL of those pieces).