
Chess Board
Last Christmas, I made the Taekwondo Belt Display and Charging Station for Lisa’s cousin Bill’s two boys, Maddox and Cayden, respectively. While visiting them on Christmas day, I learned that both of the boys are learning to play chess. Maddox picked it up from a sensei at taekwondo, and he was actually starting to show Cayden how to play. During part of my visit, I sat down and played a game of chess with Cayden and we had a great time. He’s still very green, but he’s learning quickly. I’m no expert player, so I fully expect either of them to best me sooner rather than later.
The chess board they had was a smaller travel one that folded up for easy packing on a trip. I immediately thought the perfect gift, for both of them, would be a nice full-sized chess board they could take out and play while at home. They could still use the smaller travel one on vacations or if they visit a friend’s house.
Making a chess board is a relatively easy project, very similar in nature to a cutting board (which I STILL haven’t made yet). I wanted to up my game a little bit and make a full set of chess pieces as well as a case with drawers to store all of the pieces. I wanted both the board and pieces to be “official” in size, so I needed to do a bit of research first. I think what I came up with satisfies all requirements.


The board itself will be made from walnut and maple. The pieces, likewise, will be the same two contrasting woods. As for the rest of the case, a combination of, again, walnut and maple will make the rest of the outer case and the two storage drawers. The drawers will have a bottom in the same species as the pieces stored in said drawer, with a contrasting insert that will hold the pieces in place. As for a drawer pull, I haven’t decided on that as of yet.
The more I looked at the whole thing, the more I disliked there being SO MUCH walnut. The board and pieces were fine, but the border around the board needed to be something different. I had an idea in mind, so I asked Lisa for her opinion before moving forward.
First, I showed her the walnut and maple version as it is in the above pictures. No surprise, she loved it. However, I showed her my idea of swapping the walnut and maple (minus the board and chess pieces), for cherry and hickory, respectively. The final result still looked great, and the amount of walnut wasn’t so overwhelming.

The inside of each drawer will remain the same with a bottom matching the pieces and a contrasting insert.
I was hoping I would not have to buy any more material for the chess board, but I simply did not have enough walnut. I almost had enough cherry, but I was a bit short there as well. I had plenty of maple leftover from my office furniture builds, and I had a nice piece of hickory sitting on a shelf also. One other item I did not have was a piece of 1/2” plywood big enough for the base of the chess board.
For the hardwood, I knew I could go to my usual haunt at Hardwood Lumber & Millwork, but I didn’t want to buy a full sheet of 1/2” birch plywood to only need a roughly 20” x 20” piece. I just don’t have the space, or the need, to store big pieces of sheet goods anymore.
Instead, I figured I would head on down to the Rockler in Brandon, FL, as I knew they had a decent selection of hardwoods, plus they offered smaller pieces of plywood. I found a nice 8/4 walnut and 8/4 cherry board that were both S3S (surfaced on three sides), so they measured around 1-3/4” thick. This would be perfect for what I wanted to do (or so I thought…more to follow).
I cut off a section from each board with my miter saw and resawed them both on my band saw. I finally was able to use my 3/4” Resaw King blade and that thing cut through both the cherry and walnut like a hot knife through butter. Once cut to rough thickness, I left the pieces on edge on my workbench for a few days because I knew there would likely be some movement and tension released.
The cherry boards cupped a little, but nothing too serious as I’ll be cutting them in half lengthwise on the band saw (which will reduce the cup more on each piece). The walnut, however, had A LOT more movement. A couple of the boards developed a bit of twist, so my plans on a final thickness of 3/4” for the chess board were not looking too promising. Time to break out my planer sled.
Up until now, I was using a 4-foot piece of an 8-foot melamine shelf with some sandpaper glued to it and some shims to get pieces flat. For the most part that worked, but there were a few times when it didn’t and I wound up wasting some material. This time around I used the other piece of the melamine shelf and held the material to be flattened in place with a few small dabs of hot glue, shimming where necessary.
When all was said and done, I was much happier with the hot glue method than my previous way of flattening uneven boards with my planer. The large hunks of hot glue can be easily removed by spraying it with isopropyl alcohol. Any little pieces remaining on the sides will be cut away when dimensioning the lumber with my table saw sled.
The maple I planned on using for the chess board was still flat from previous milling, so I only had to worry about the walnut. Once I got the maple and walnut planed to thickness, I wound up a little under 3/4”, which was fine.
With dimensioning out of the way for the maple and walnut, I cut them into four 2-1/4” strips each. I opted for 2-1/4” squares as this is what is recommended by the United States Chess Federation (USCF) for a championship board. I alternated each species until I had my eight pieces and glued them up like any hardwood panel (I used Titebond I). I did not use anything for alignment, like biscuits, as this is not an overly large panel…just simple clamping of the glued-up edge joints would suffice.
After letting the glue set overnight, I sanded both sides of the walnut/maple panel to get rid of any remaining glue squeeze-out and flatten everything. With that done, I used my track saw and Woodpeckers Track Square to cut just a bit off one end so I could run it along the table saw fence. I made sure to make the whole panel wider than I needed just for this purpose.
Once at the table saw, I cut the panel into eight more 2-1/4” strips, this time cutting across the grain. I had enough material for one extra strip, and it turned out I needed it as the first one I cut did not come out great. I flipped every other strip over and got my chess board pattern set. I glued these strips up just like I did before, paying VERY close attention to make sure the 2-1/4” squares all lined up. When gluing the strips, I opted to go with Titebond III to give me more open time to position the strips.
After another overnight wait, I removed the clamps and began the sanding process once again to remove the glue and flatten each side. Using my 5” 3M random orbit sander (ROS) with the 3M 775L sanding discs made quick work of getting everything flat. My old ROS’s just can’t compare with these 3M ones.
Next up was to cut the 1/2” plywood panel onto which the chess board would sit. I cut it to overhang the chess board by 5/8” on all sides, allowing for a 1/2” insertion into a dado in the outer frame with a 1/8” gap between the frame and the board (for expansion/contraction). After cutting the plywood panel, I applied some glue to the bottom of the chess board (not a lot…just a small glue line along the middle of each row) and set it in place on the panel. I clamped around the perimeter of the chess board and this seemed to work just fine. The chess board had the slightest amount of upward bow in it, so the clamps guaranteed the board would sit flat on the plywood.
With that done, I opted to apply finish to the board at this point. I taped off a 1/8” gap around the plywood panel and got to finishing. This time around, I decided to go with Bumblechutes All-Natural Wood Finish. This is simply tung oil mixed with a citrus solvent to allow quick application and drying/curing time (plus it doesn’t smell bad, either). I must say, that after applying the first coat, I was very impressed with this product. I might be switching to this for most of my other builds in the future, maybe even picture frames (although I do like spray lacquer for those).

The tung oil really brings that maple and walnut to life…LOVE IT!!!
Next on the docket was to make the frame to encapsulate the chess board. I busted out the cherry and milled that down to 3/4”. I replaced my regular 40-tooth saw blade in my table saw with my flat-bottomed blade so I could make the 1/2” groove in each piece.
After taking my time and getting a perfect fit on the plywood, I noticed something might be wrong. There was only a VERY thin piece of cherry left on either side of the groove which was very weak and showed too much of the sides of the chess board. I double-checked my drawing and saw that I screwed up BIG TIME. The sides were SUPPOSED to be 1-1/4” thick, NOT 3/4”. I don’t know why I thought the sides were 3/4”. I didn’t even think to check my Sketchup drawing before milling everything.
Because of this mistake, I needed to get ANOTHER cherry board from Rockler. Thankfully, the boards that I screwed up won’t go to waste…they are actually a good width to use as picture frames in the future, and we ALL know how Lisa always keeps me busy with making picture frames :)
With a new piece of material at the ready, I milled it to the correct thickness of 1-1/4” and proceeded to cut the grooves once again. I was so upset after getting an absolutely perfect fit on the first set of grooves, but I took my time and snuck up on the perfect fit once again.
With the pieces fitting nicely, I took out my picture frame sled to make cutting the mitered corners MUCH easier. Like with the grooves, I took my time to sneak up on the correct fit for each piece. Everything was fitting nicely, so I glued up the frame and let it sit overnight. The next day I sanded both sides of the frame, being careful not to mar the finish on the chess board sides in the process. There were a couple of gaps that needed filling, so I mixed up some cherry sawdust and wood glue to make some DIY wood putty. After letting it dry, I sanded everything one final time prior to applying finish.
After applying the first coat, I looked in just the right light and noticed a spot of dried glue I missed during the sanding of the wood filler. I didn’t even see it when I was applying the finish, but it was as plain as day when I went to apply the second coat.

It isn’t easily seen in the picture, but in certain light in the shop this stood out like a sore thumb, not to mention you could feel it by rubbing a fingertip over it.
I busted out the ROS and made quick work of the glue spot, cleaned off the dust and applied the next coat of finish. That’s one thing about this type of finish…it is easy to repair by simply sanding and reapplying the finish right over it.

Going with a cherry frame instead of the walnut was DEFINITELY the right move.
With the board and frame completed, I decided to make the bottom portion of the case next. It was more of the same as with the top portion, only it had a 1/4” plywood panel versus 1/2”. It came out just fine, so I sanded it, placed my brand on the underside and applied finish. I opted to work on the chess pieces next since it would be easier to lay out the drawers with the chess pieces for measurements.

I think I’ve finally found the right combination of heating the branding iron and burning it in…only took a few years :)
As with the chess board, the sizing of the pieces were in accordance with the USCF recommendations for championship play (I referenced this article). Everything is based off the size of the king, which in this case is 3-3/4” high and 1-1/2” in circumference (square in my case). All other pieces were a percentage of the king’s height and width. Here is a breakdown of the measurements I went with (WIDTH x HEIGHT):
King: 1-1/2” x 3-3/4”
Queen: 1-3/8” x 3-3/8”
Bishop: 1-1/8” x 2-3/4”
Knight: 15/16” x 2-3/8”
Rook: 7/8” x 2-3/16”
Pawn: 13/16” x 1-15/16”
I set up the table saw with a featherboard to keep the stock tight against the fence while making each cut. Two passes through the saw made for a nice and perfectly square blank. After each set of blanks were cut, I used my cross-cut sled to cut each set of pieces at the same time with the same settings. Each initial piece of stock got gradually smaller, so multiple different pieces could be cut from a singular piece of 1-1/2” stock.
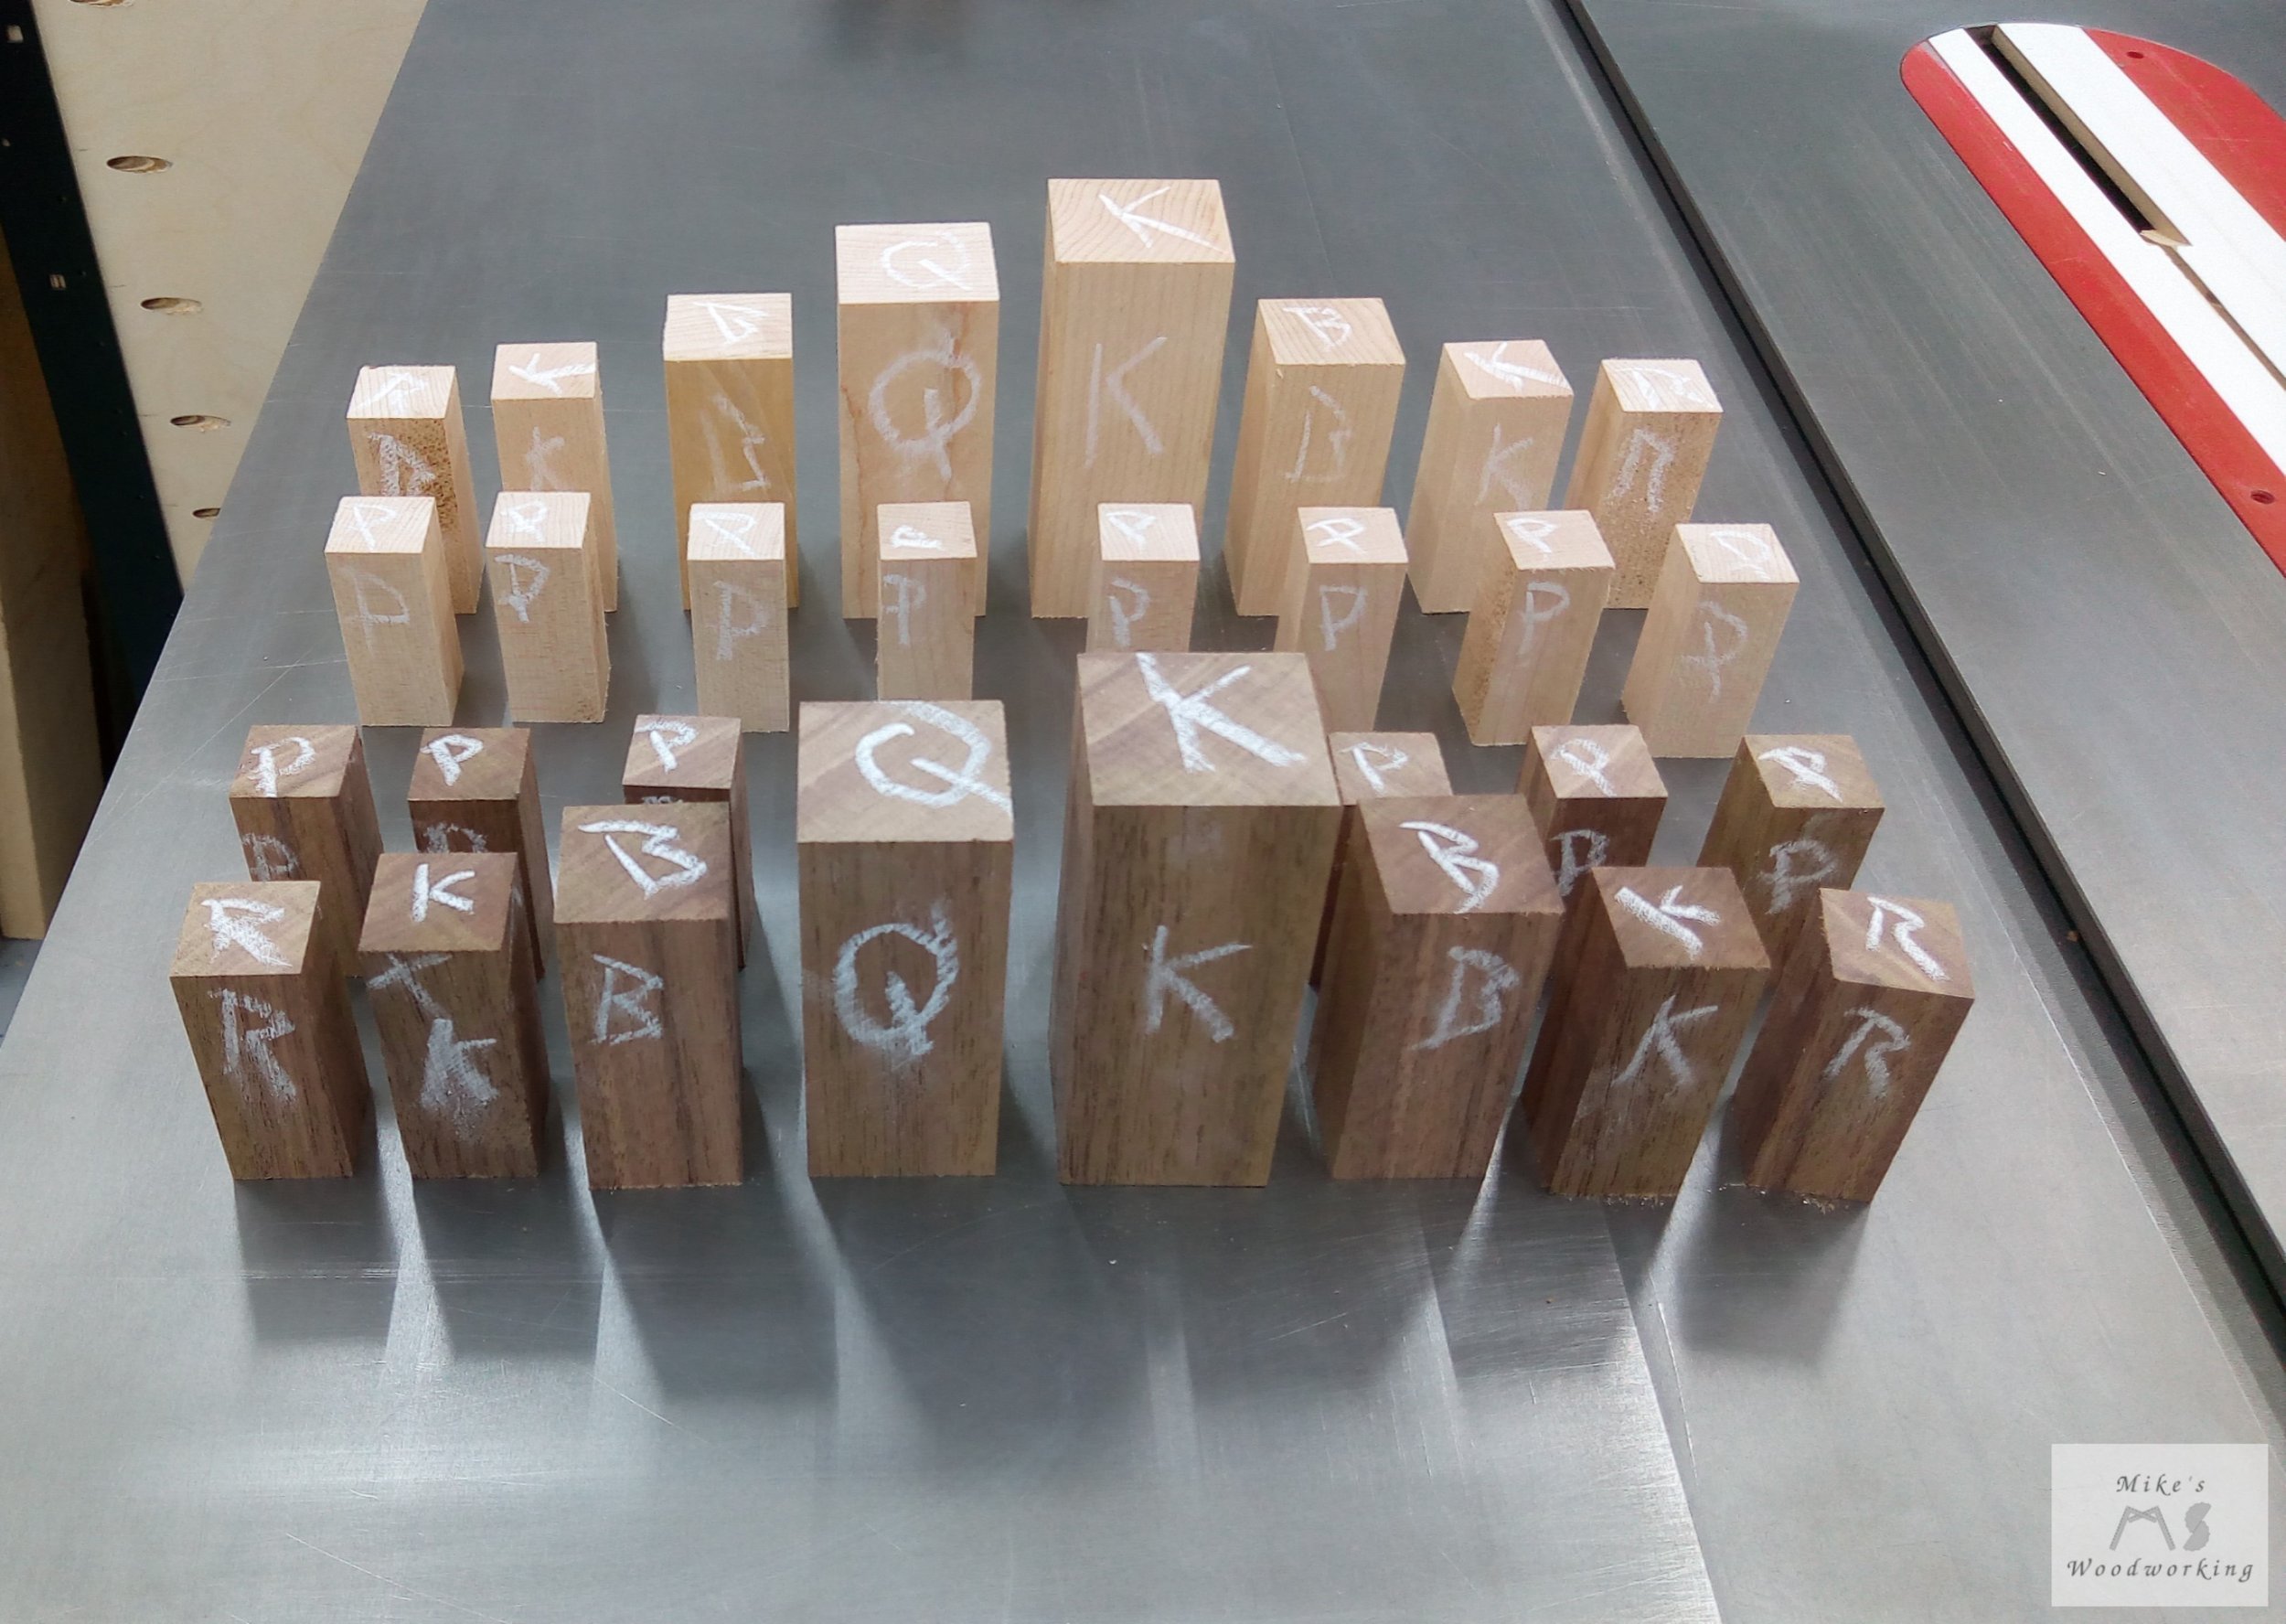
This is only PART of the work on these chess pieces.
Before I go any further, let me reference where I got the inspiration for these chess pieces. It was from, surprise surprise, a YouTube video (two actually). First was a video by Foureyes Furniture. The other was an older video by Shaun Boyd (of Foureyes Furniture) that I found months later. Some of the pieces for his board seemed a bit too thin to me, so that’s why I decided to go with the USCF standards for mine. The overall look for the pieces is still the same, just the size is a bit different.
Next up was the most time-consuming part…cutting all of the grooves and making the angled cuts. I decided to work on all of the angled ones first, since they required the most prep work. The tops of the kings and queens were essentially the same 30° angled cut, just on opposite sides of the tilted blade. I referenced the Shaun Boyd video for these cuts as they showed them a bit better. I took my time in setting my blade height and stop block. I used my stock Sawstop miter gauge with a piece of plywood attached, then clamped a stop in place for this operation.
I cut a couple of extra king and queen blanks to use as test pieces, that way if I screwed anything up I didn’t mar the good ones. I was able to make all of the angled king and queen cuts on the first try, thankfully, so I just sent them all right on through.
The knight took a little bit more finagling to get it just right, but I was able to manage with the aid of a couple more extra blanks. As for the bishops, the steep angles for those were actually cut on the band saw versus the table saw. These were the ONLY cuts made away from the table saw. The angled cuts were sanded flat with my Ridgid oscillating belt sander.
All of the rest of the cuts were made at 90° and utilized a single 1/8” kerf cut at a depth of 1/8” (with the flat-bottomed blade, of course). This included the towers for the rooks. It was a lot of work on the miter sled, but with my trusty “old-fashioned” wooden pencil and eraser to hold the pieces down, I was able to make all of the cuts safely.

Just look at those cuts on the kings and queens…absolutely PERFECT!!
Yes, all of the pieces came out great, but there was one thing that still needed to be done…SANDING!!! And there is A LOT of sanding to do on these things. All of the edges of those grooves needed to be eased over. It must have taken me a couple of hours or more to get all of the sanding done to the point I was satisfied.
Next up came applying the finish to all of the chess pieces. All of those pain-in-the-ass grooves were just as big a problem with finishing as they were with sanding. After struggling with trying to use a shop rag in conjunction with a screwdriver, it dawned on me that I had some small foam brushes in my finishing cart. This revelation allowed me to make “quick” work of those grooves. With all of the work sanding and applying finish, I think the results were DEFINITELY worth it.

The tung oil finish just makes that walnut pop…MWAH!!!
I focused my attention now to getting the case put together. This started with milling and cutting the corner pieces to size. This was simple enough with my crosscut sled, for both the straight cuts and the mitered ones. After that, I milled and cut the 1/2” cherry sides to width and length, taking into account the need for a 1/2” long by 1/4” thick tenon on both ends. Once the tenons were cut to the size I wanted, I made the corresponding grooves in the corner pieces. I’ve found cutting grooves to the size of tenons is much easier than doing it the other way around.
On a little side note, the piece of material I thought was hickory actually turned to be ash (I think). It was just too light-colored to be hickory. I think when I initially bought it I either pulled from the wrong pile or it was placed in the wrong section (either of which can happen). Either way, I actually liked the lighter look of the ash versus hickory (which can be bit darker).
Anyway, to attach the corners to the bottom/top sections, my plan was always to use 1/2” dowel pins, two in each section of a corner, for a total of 16 dowel pins. It would be easier to drill all of the holes prior to gluing the corners together, so I set up a quick jig at the drill press to make life easier on myself (or so I thought). My apologies for not including pictures of some of these setups…I simply get caught up in the work and forget to snap some photos a lot of the time.
With the dowel pins measuring 1-1/2” in length, I drilled the holes a little deeper than 3/4” to give me some wiggle room. After drilling the holes for the bottoms of the corners, I glued them together with the aid of some blue tape and left them to dry. I, however, neglected to flip each of the individual corner pieces over to drill the corresponding holes to attach to the top section of the case…oops. I would figure this out later (after gluing them up) and make the necessary holes at the drill press (not really an issue as I hadn’t moved the table or depth stop).
As for the holes in the bottom and top frames, I first laid out where the corners would sit. Then, I used some dowel centers to mark a small dimple in each location. After that, it was easy enough to use my Rockler Portable Drill Guide to drill all 16 holes with a 1/2” forstner bit. I think I might be off in a couple of spots by like 1/16”, but it isn’t noticeable to the untrained eye. I dry-fit everything and it looked absolutely awesome. I refrained from gluing the corners and sides in place until a little later in the build.

With the dowel points and the Rockler drill guide, these holes were a breeze.

The dry fit showed what the final piece will look like…VERY nice. The grooves in the corners were cut a litle deeper than needed to give me room for any excess glue.
I only had the two drawers and some little things left at this point, so I went with cutting and fitting the drawer divider first. I found a piece of 1/2” plywood and cut it to width and height. With the divider in it’s proper location (again dry only), I measured for the depth of the drawers, knowing that the chess board has strayed a little from my initial Sketchup drawing.
The drawers were pretty simple construction. I went with just glue and butt joints for the fronts/backs with dowels for added strength. Given the drawer stock was 1/2”, I had to use the same 1/4” poplar dowels I used for the Charging Station. Since the drawers were maple, the poplar wasn’t likely to appear too out of place.
Once the drawers were glued up, I had one small problem when it came to drilling for the dowels. With the charging station, I was able to us my drill press for the holes, given that box was not very big. These drawers were around 14” wide, and were WAY too tall for my drill press table. I thought about trying to use the Rockler drill guide again, but the drawers were a bit too wobbly for that. Clamping the drawer in my moxon vise was a no-go as well.
I thought if i just took the table off the drill press that the drawers might still fit beneath the 1/4” drill bit, but it was a couple of inches too tall still. Then, I remembered that the section of bench top around the drill press was removable (for cleaning/maintenance). I took it off and set one of the drawers on the base of the drill press and it fit perfectly. With a scrap of plywood under the drawer (for protection more than anything), I was able to drill all of my holes…PHEW!! I REALLY didn’t want to try and drill these holes freehand. Looking back, I suppose I could have made a crude guide block and done it that way, but that didn’t come to mind at the time…oh well.

It may look a little sketchy, but it worked like a charm.
With the dowels glued in place and the drawers sanded, the dowels look just like the maple.


Now that the drawers are done, it’s time to work on the next most time-consuming part…the drawer inserts that will hold the chess pieces in place. The chess pieces will match the drawer bottoms, with an insert of the opposite species with holes cut to hold the pieces. This will help keep the pieces from shifting around and allow for them to be stored in such a way as to be in the correct positions for placement on the chess board itself.
I’m not going to get into the exact spacing I used for the drawer inserts, but here is how things look prior to cutting. When test-fitting the inserts into the drawer, I made sure to have some tape “handles” attached so I could more easily remove the inserts.

These inserts were each a small panel glue-up (three walnut boards and two maple boards). Their final thickness was around 3/8”. I made sure to get a Pica pencil with some white leads to mark on the walnut (best thing EVER).
Next up, it was time to drill 32 starter holes and head over to the scroll saw for the first time in about a year. I tried on a scrap piece of cherry first, and it looked absolutely TERRIBLE. I’m still not great at making those sharp 90° turns just yet. With that, I sat down and started cutting. I made a couple of small flubs while making some turns, but nothing that was too awful to fix. It must have taken me well over an hour to do all of that cutting. It was very monotonous, but I pushed through and got it done.
I was checking the cutouts with the chess pieces after each cut, and a couple of the holes were just a shade too small (just that much more sanding to do).
Overall, I’m very happy with how the drawer inserts came out. After A LOT of tedious sanding, all of the pieces fit in their proper spots with just a little bit of wiggle room.

After all the sanding and applying finish, the inserts look GOOD!!
Next to cut were the runners for the drawers to ride along inside the case. I found a small piece of walnut that was the perfect thickness and width to make the four runners. Once cut to proper size, I cut a small groove in each piece, making sure that the runner surface would be up about 1/8” from the bottom of the lower frame (it turned out to be a little shorter, but no big deal).
With them set in place, I set the drawers on them and they were perfect. I made sure to sand off a tiny inclined section from one end of each runner to act as a “ramp” for the drawers when inserting them into the case. After sanding, I applied multiple coats of spray lacquer. As these pieces will get a bit more use, I figured the lacquer would hold up better than just the tung oil. I glued them in place with some super glue.

Everything else is still dry fit at this point (even the drawer divider).
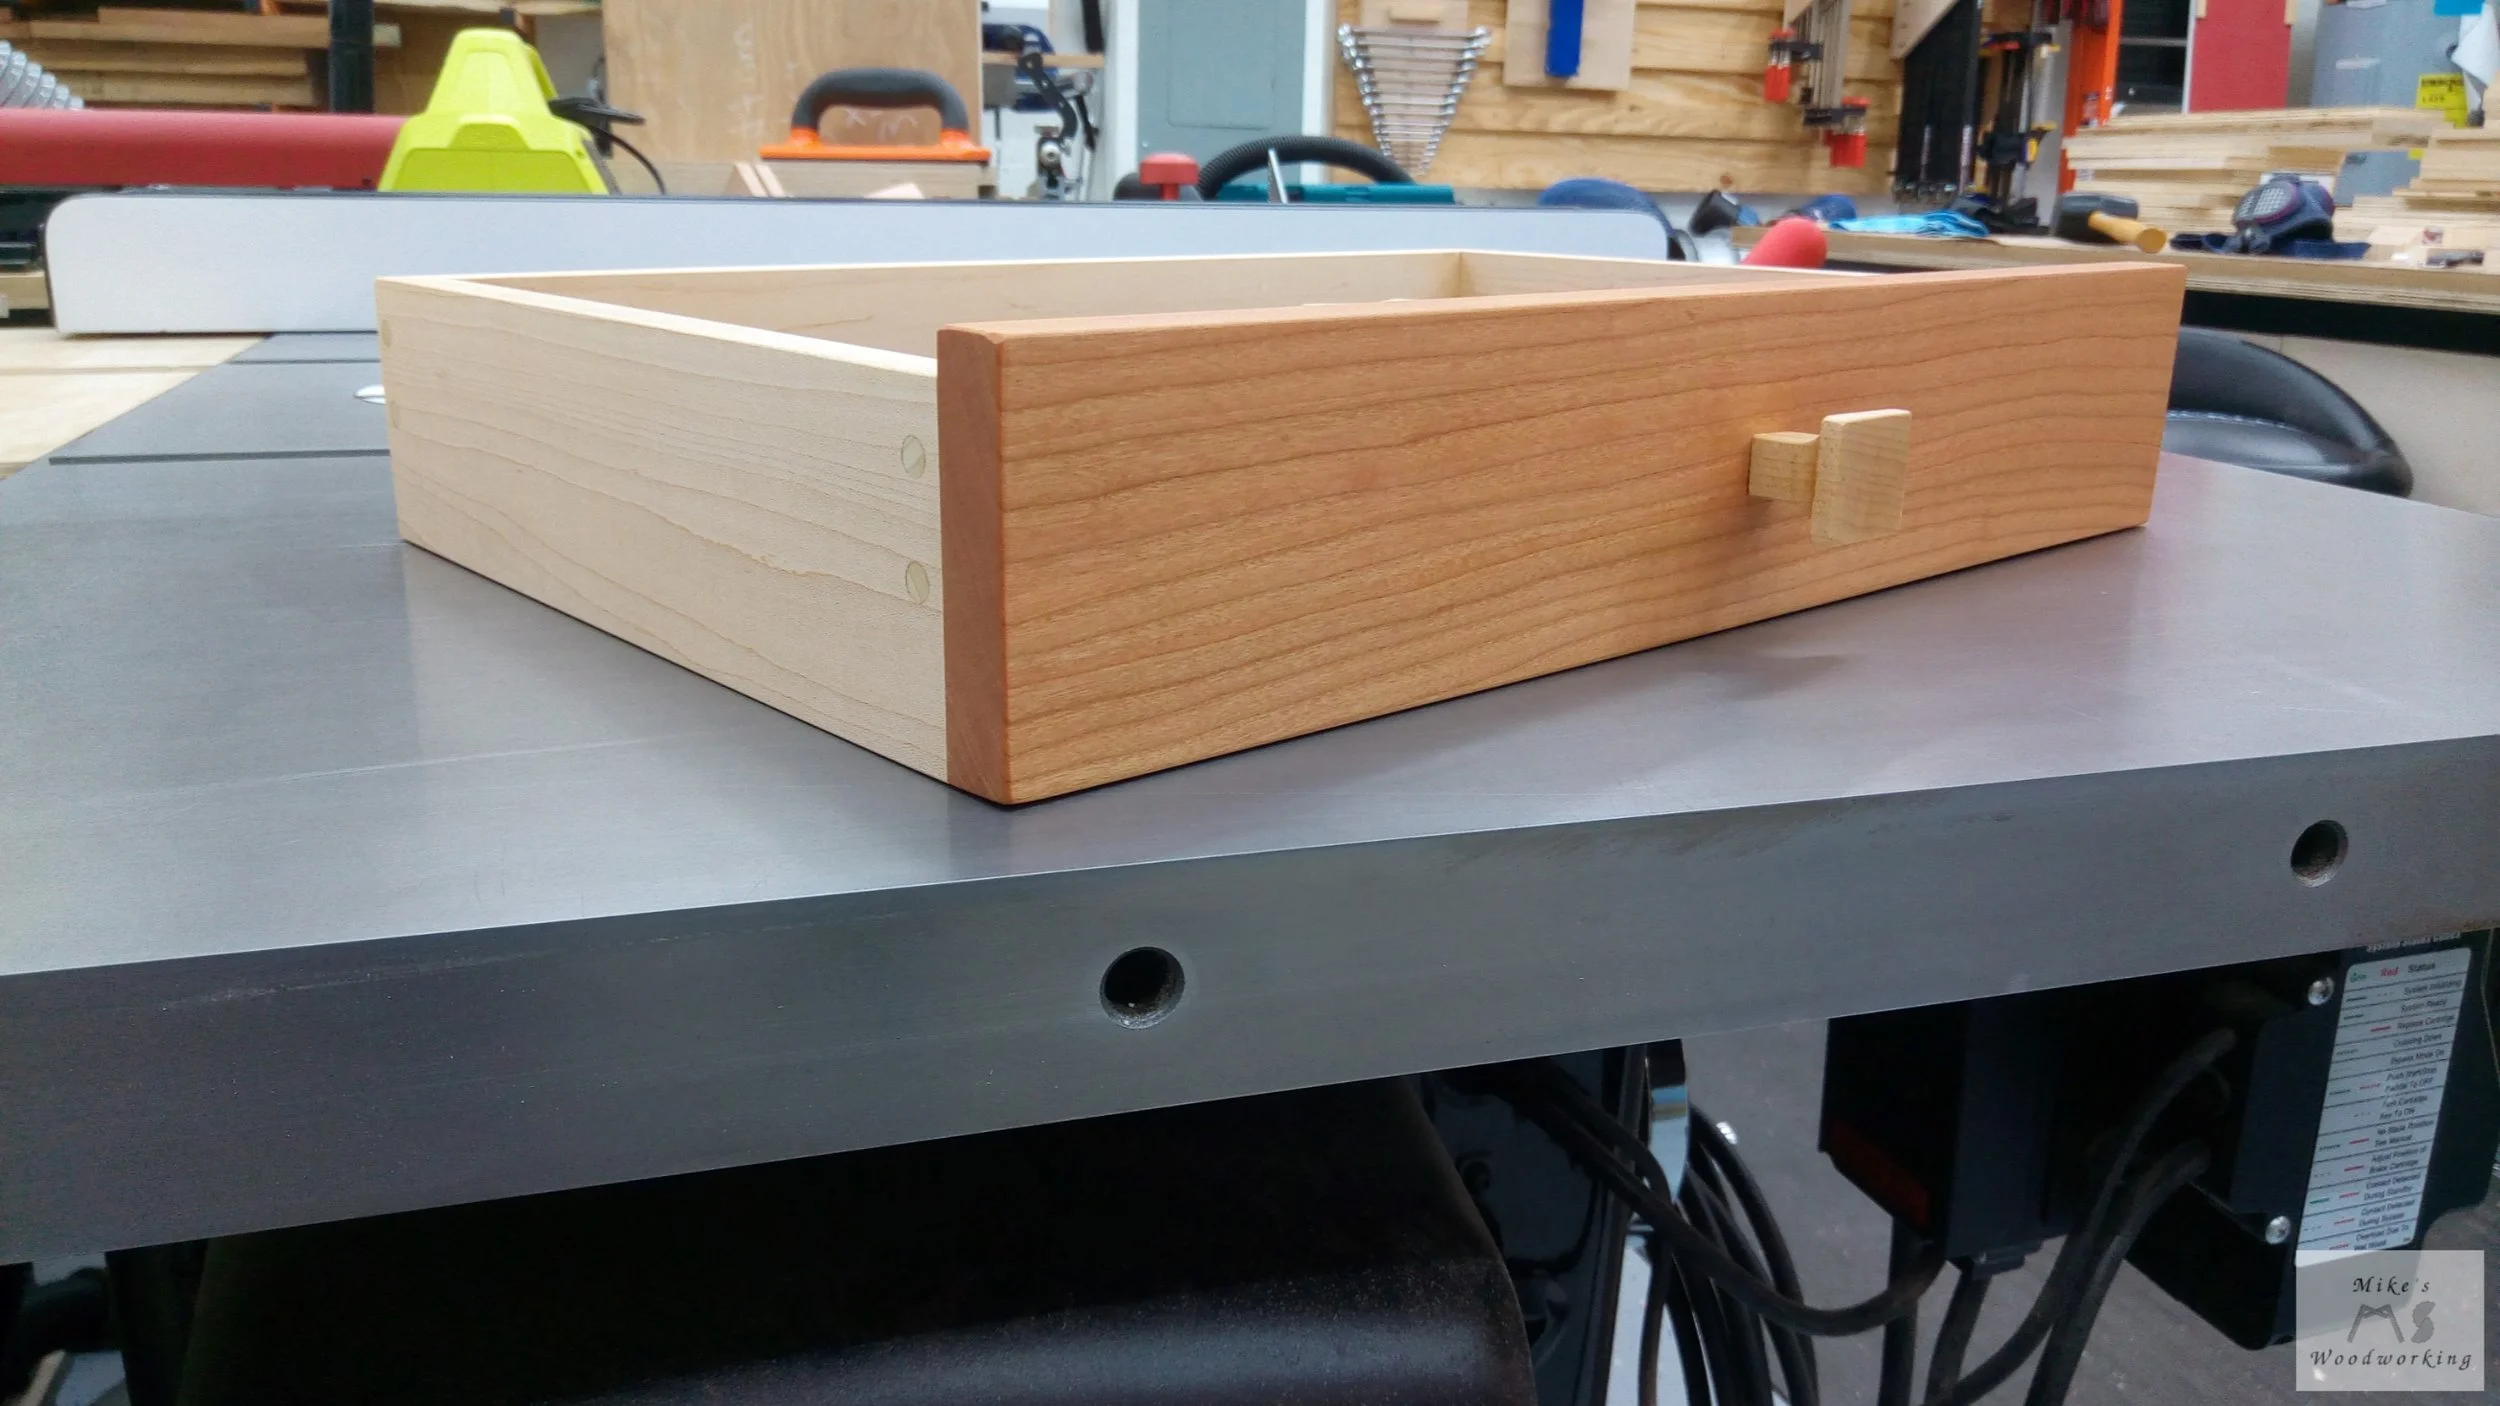
The final things to cut were the drawer faces. These were made of cherry like the rest of the main body of the case itself. They were simple enough to cut to size as they were flush to the sides and bottoms of the drawers, with only a little additional height to allow for a 1/8” reveal at the top of the drawer opening.

The faces were just glued in place on the drawers…they are not going ANYWHERE.
With the drawers done, I applied finish and then glued in the inserts (making sure I didn’t mix them up). I used super glue to hold the inserts in place in the drawers, adding some weights to hold them down in the corners as they wobbled just a tiny bit.
Oh yeah, I almost forgot about the drawer knobs. I didn’t want any metal fasteners for this build, and that included the knobs. I found a few knobs on Lowe’s website that sort of went with what I had in mind.


With these shapes in mind, I had an idea on how to make something similar. I tried to draw it up in Sketchup, but I was having difficulties in getting things to work. I was sure what I wanted to do would work, so I just went forward and hoped for the best.
I used a piece of 1” square maple stock (leftover from the chess pieces) and made marks 1/4” from each side. With two stop blocks in place on my drill press, I used a 1/2” forstner bit to drill straight through the piece. After drilling, I turned the stock 90° and drilled straight through again. I did this on all four sides and the resulting profile was exactly what I thought it would be. I cut the knob at 1”, made a few small cuts at the table saw to remove some waste from the sides and I was left with a 1/2” square “stem” which curves up to the 1” head of the knob.

You can sort of see what I have in mind here (minus the other two curves cut with the drill bit).

I forgot to take a picture before attaching to the drawer, but here’s what one of the knobs looks like.
I used a shortened 1/4” dowel pin to attach the knobs to the drawers with glue. The final results speak for themselves.
With everything now cut and finished, the only thing left to do was glue everything in place. I started with the drawer divider. There was a little bit of a dip in the 1/4” plywood in the center of the panel, so to make sure I got a good bond with the divider, I placed a piece of 3/4” plywood under the bottom while pressing down from the top of the divider. Using the same super glue as for the runners and drawer inserts (Flex Seal super glue), after a minute or so the divider was rock solid and the 1/4” plywood held firmly in place.
I was gluing everything in sections at this point, so I glued the corners and the side panels in place next. I used regular Titebond I for the dowel pins and some Titebond Quick & Thick on the tops and bottoms of the corner pieces, as I didn’t think the regular wood glue would adhere well to the finished cherry. I gave them overnight to dry and by the next morning they were solid.
The final piece was the top. I went to do a dry fit one final time (since things were now glued in place), and I was a little worried at first. I couldn’t get one dowel pin to fit properly and, because of how the holes were laid out and drilled, I couldn’t just turn the board and get it to fit. The corners had a little bit of wiggle room, so I thought maybe they shifted a bit while gluing. I removed what I thought was the problem dowel and the top fit fine. I tried it again with the dowel in place and it was just a bit of a snug fit. A little bit of pressure would be all it needed…PHEW!!! Honestly, if I didn’t have one out of eight dowels in place, this thing probably wouldn’t budge anyway.
I applied glue one final time (remembering to put some super glue on the top of the divider), got the top in place and clamped it down. To get pressure on all four corners, I had to place the chess board on my finishing cart. This gave me just the right amount of room needed in the corners for clamping. While the clamps were in place, and the glue squeeze-out wiped off, I applied finish to the corners and sides of the case.
After letting the glue dry, I removed the clamps, placed all of the chess pieces in their respective drawers, inserted the drawers and the chess board was FINALLY complete. Here are the finishing shots I took with the chess board on our dining room table. The lighting isn’t as good as the shop, but I wanted a nice background.


A couple of other things I forgot to mention. Prior to gluing the drawer divider in place, I drilled and glued in a neodymium magnet that corresponds to a similar magnet on the back of each drawer. This provides just enough grab to hold the drawers in place (if you shake the board, they’ll still come out). And because I have the magnets at different heights on either side, the drawers won’t hold in place if they are placed in the wrong opening.
As can be seen in a few of the pictures, the chess pieces have felt on the bottom. I bought a pack of some very thin felt sheets from Amazon. I tried to cut them with my paper cutter and that actually worked out great.
Lastly, I attached four silicon cutting board feet to the bottom of the case to give it some grip on a table, as well as to enable lifting it up easier (this thing is NOT light). I went with 1” low-profile feet in black, but there are many different sizes/colors to choose from. Check out cuttingboardfeet.com for more information. These were created by a small woodworking business in Vermont, and have MANY other applications other than just cutting boards.
I could not be more ecstatic with how everything came out. From the board, to the case, to all of the chess pieces and their respective drawers, the totality of the project took just shy of four months. I had a number of down days because I just wasn’t up for shop work (being tired plus shop time is a big NO GO).
As of this article’s publication, the boys have yet to see their present, but once they do, I’ll be sure to include an update here.
With this piece actually being completed just short of Halloween, I called it a year in the workshop. I have a number of things I’d like to get done around the yard/house, not to mention I really want to get going on my book again. After doing some much-needed cleanup in the shop, I will bid it adieu until after the new year.
UPDATE: The chess board was a rousing success. The boys played a quick game as soon as I helped take it out of the custom box I made. All of the work was definitely worth it.