Garden Hose Box
Like most people with a yard, we’ve got a sizable length of garden hose for use around the house. In all, with a couple of hoses strung together, we’ve got around 150’ of hose (and we need another 50’ to reach from one corner of the house to the other). Storing this much hose is a major pain. There are wall mounted units, but I don’t care much for drilling holes into the side of my house and they don’t offer any protection from the elements. I prefer some kind of reel to make collecting and dispensing the hose much easier and tidier.
We’ve had an Ironton rolling hose reel cart that I bought from Northern Tool and Equipment for a number of years, but it’s seen better days. Even with being mostly covered from the elements (it sits on our screened-in lanai in the back of our house, so it can still get wet), it’s been rusting for quite a while. Along with the tires always going flat and dry-rotting, I think it’s time for something new.

I really like the reel that this cart comes with, but I’m not so keen on the metal tubing and the fact that it has wheels. I would much prefer to having something that is stationary. There are ones like this available at the big box stores, but the majority of these are cheap plastic and just won’t last in the baking Florida sun. If you get more than a couple of years out of them you’re lucky. Not to mention, I don’t particularly care for the look of these hose reels.
I set out to design a box that would house the garden hose reel that comes with the Ironton hose reel cart, but would be hearty enough to last many years in the Florida sun. The obvious choice of materials is cedar. It’s naturally rot resistant, most bugs can’t stand it and it’s relatively inexpensive.
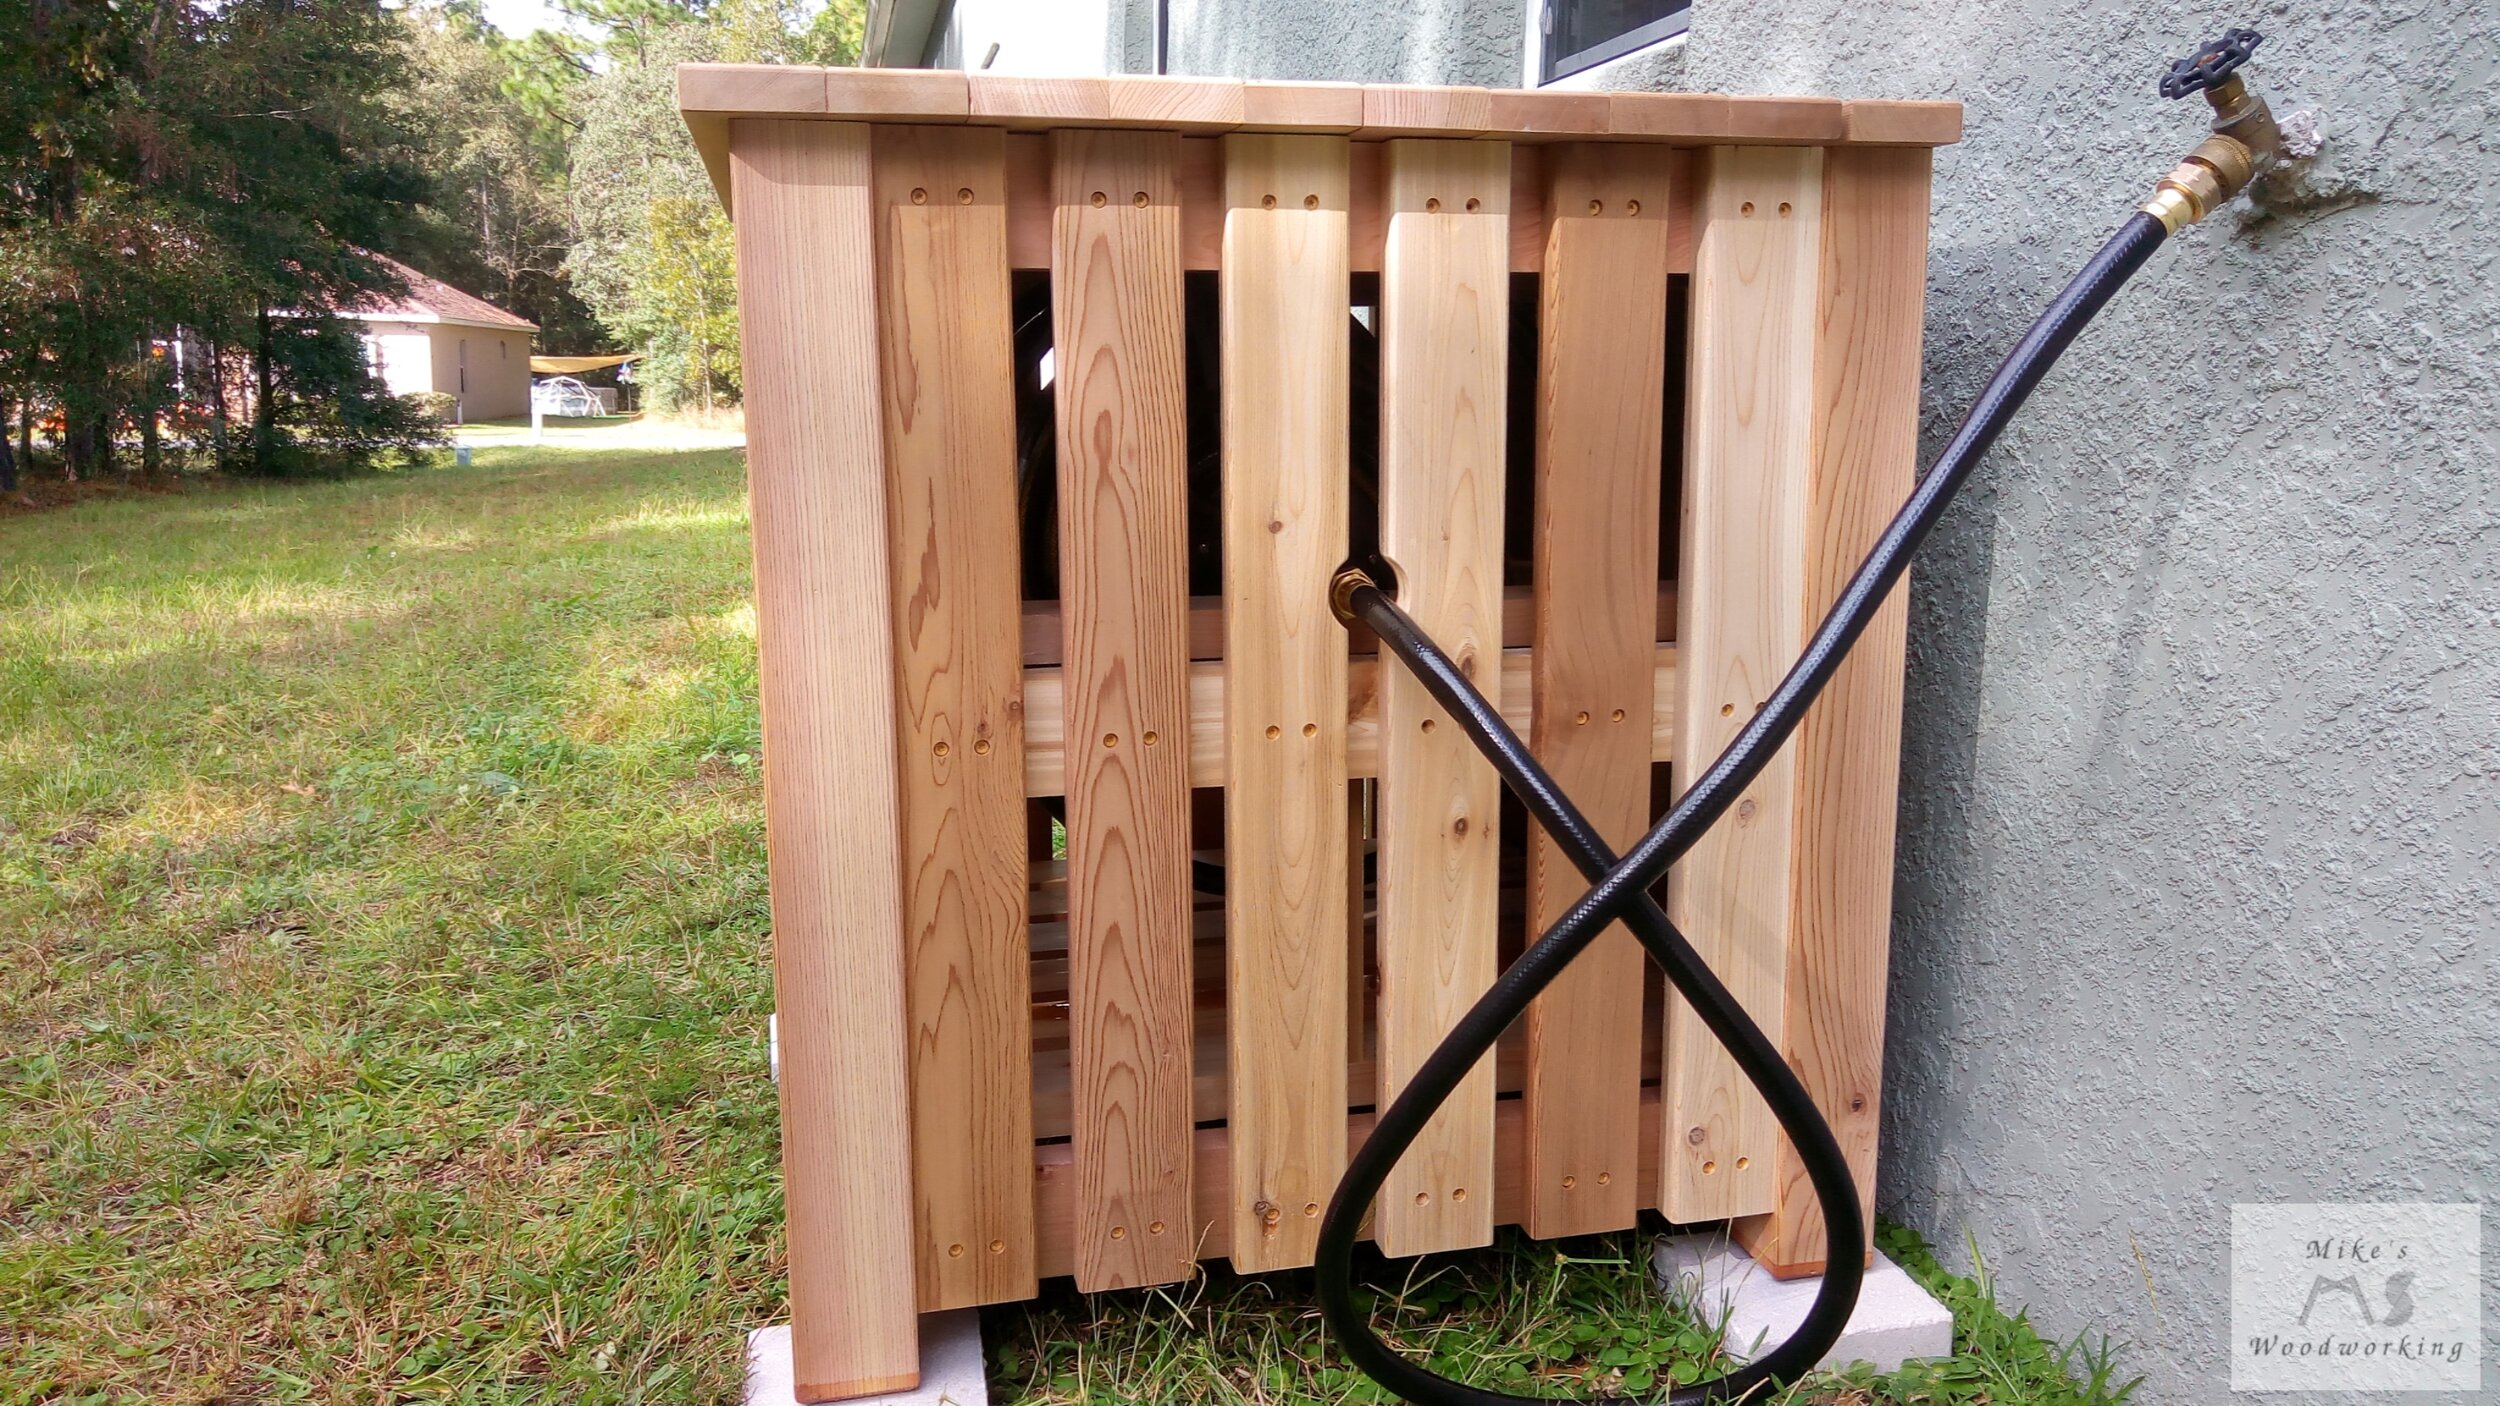
Given the odd dimensions of the hose reel, I need to make the box a bit bigger than a regular hose reel box. The overall measurements are 29”W x 29”D x 31”H. I know, it’s rather large, but this thing is definitely not going to just blow away in a stiff breeze like those smaller reels can. The corners are 3” x 3” posts with three stretchers connecting them together. The slats on the outside are 1” thick and are spaced 1” apart. I thought about just completely enclosing the hose, but I would prefer for it to get some air movement through it. Not to mention, that would increase the weight a bit too much (I’d like to be able to move this thing in the future, if needed).
The front of the box is a little different than the sides and back. There is a 16”W x 3”H opening to allow for the hose to be reeled in and out. The 16” is based on the distance between the inside of the two ends of the reel itself. On the right side, where the leader hose connects to the reel, I’ll have to drill out a bit of a hole to allow easy connecting to the reel. On the left side, the handle for the reel fits perfectly between the slats with no further cutting needed. The spacing of the slats was more or less dictated on the diameter of the handle. Now that the particulars of the box are set, it’s time to get to work.


Cedar...It’s Everywhere!!!
I laid out everything in Sketchup (as evidenced above) and figured that I would need two 4” x 4” x 8’ posts and 15 2” x 4” x 8’ boards. I asked Lisa to come with me to pick up all of the wood from Lowe’s. I probably could have managed by myself, but it would have taken a bit longer, plus it’s nice to have the company. I opted for Lowe’s for the materials because it’s closer than Home Depot, plus it ultimately cost me less with my military discount (can’t pass that up).

All of the cedar for the garden hose box on top of my assembly table. Some of this was pretty wet, so I left everything to sit, sticker-stacked, for a few days.
I started by cutting all of the boards to rough length. In all, I wound up with 4 posts, 13 stretchers, 24 vertical slats, 6 bottom slats and 10 lid pieces. There are a couple of other parts that will be needed later for the build, but I’ll wait to cut those until I need them.
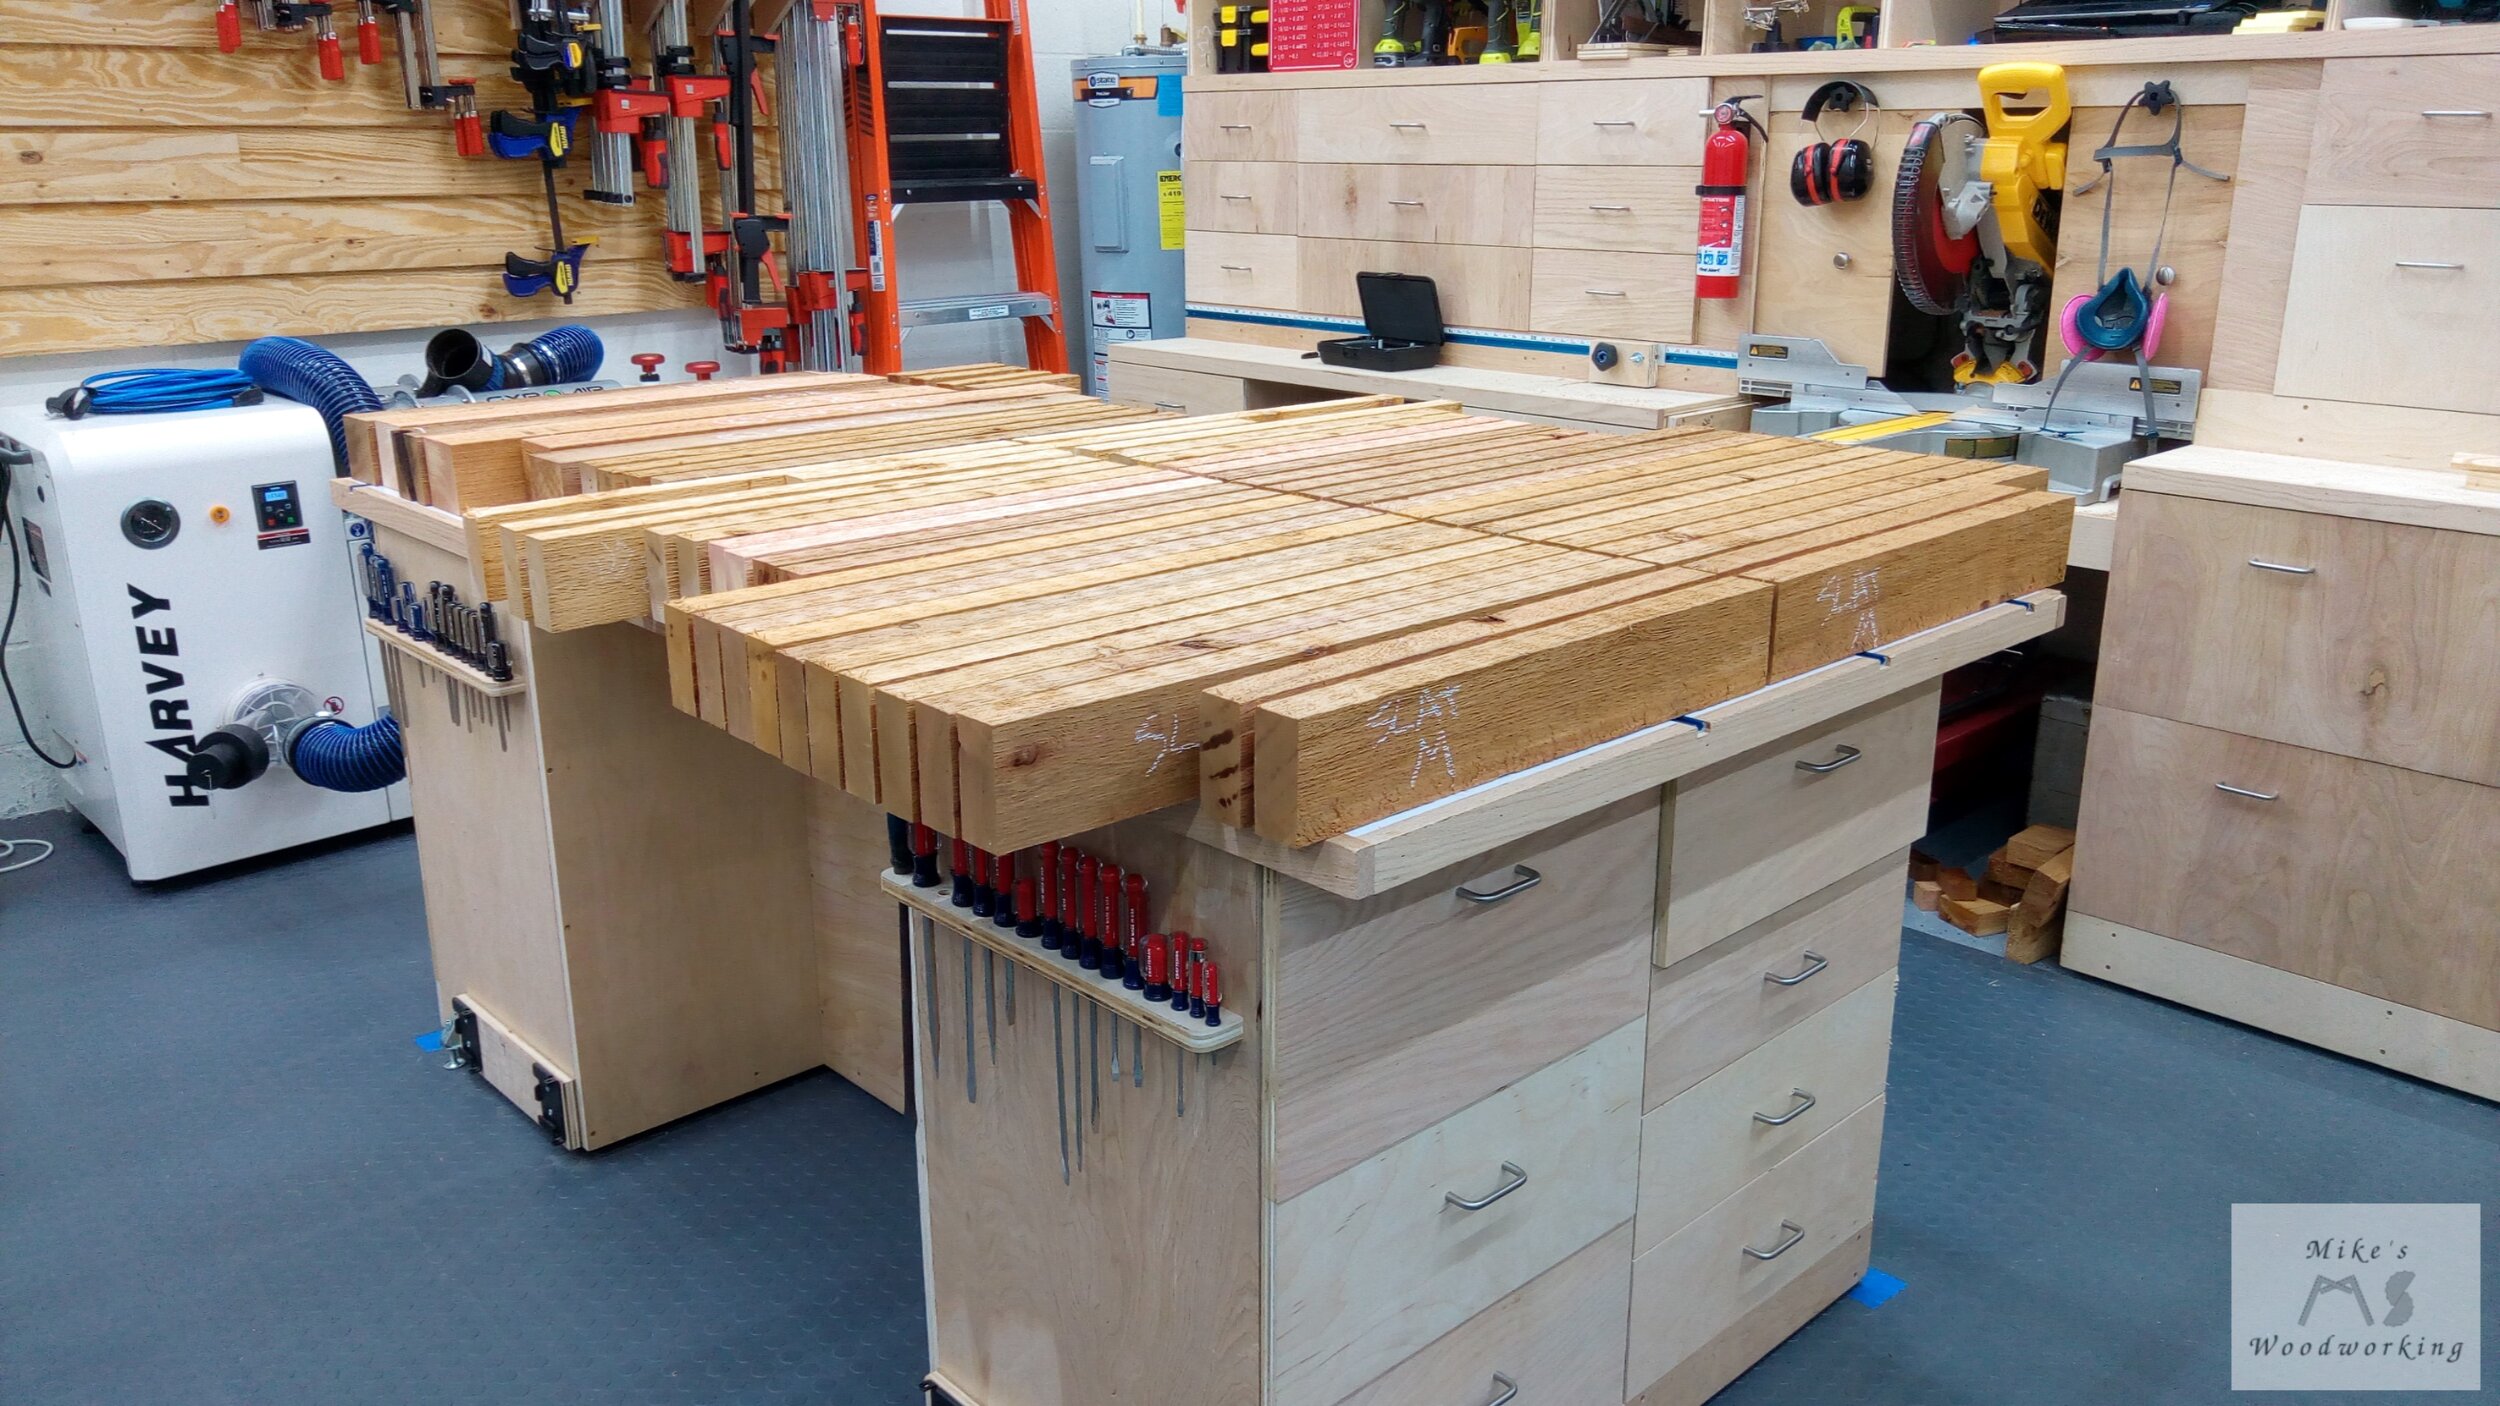
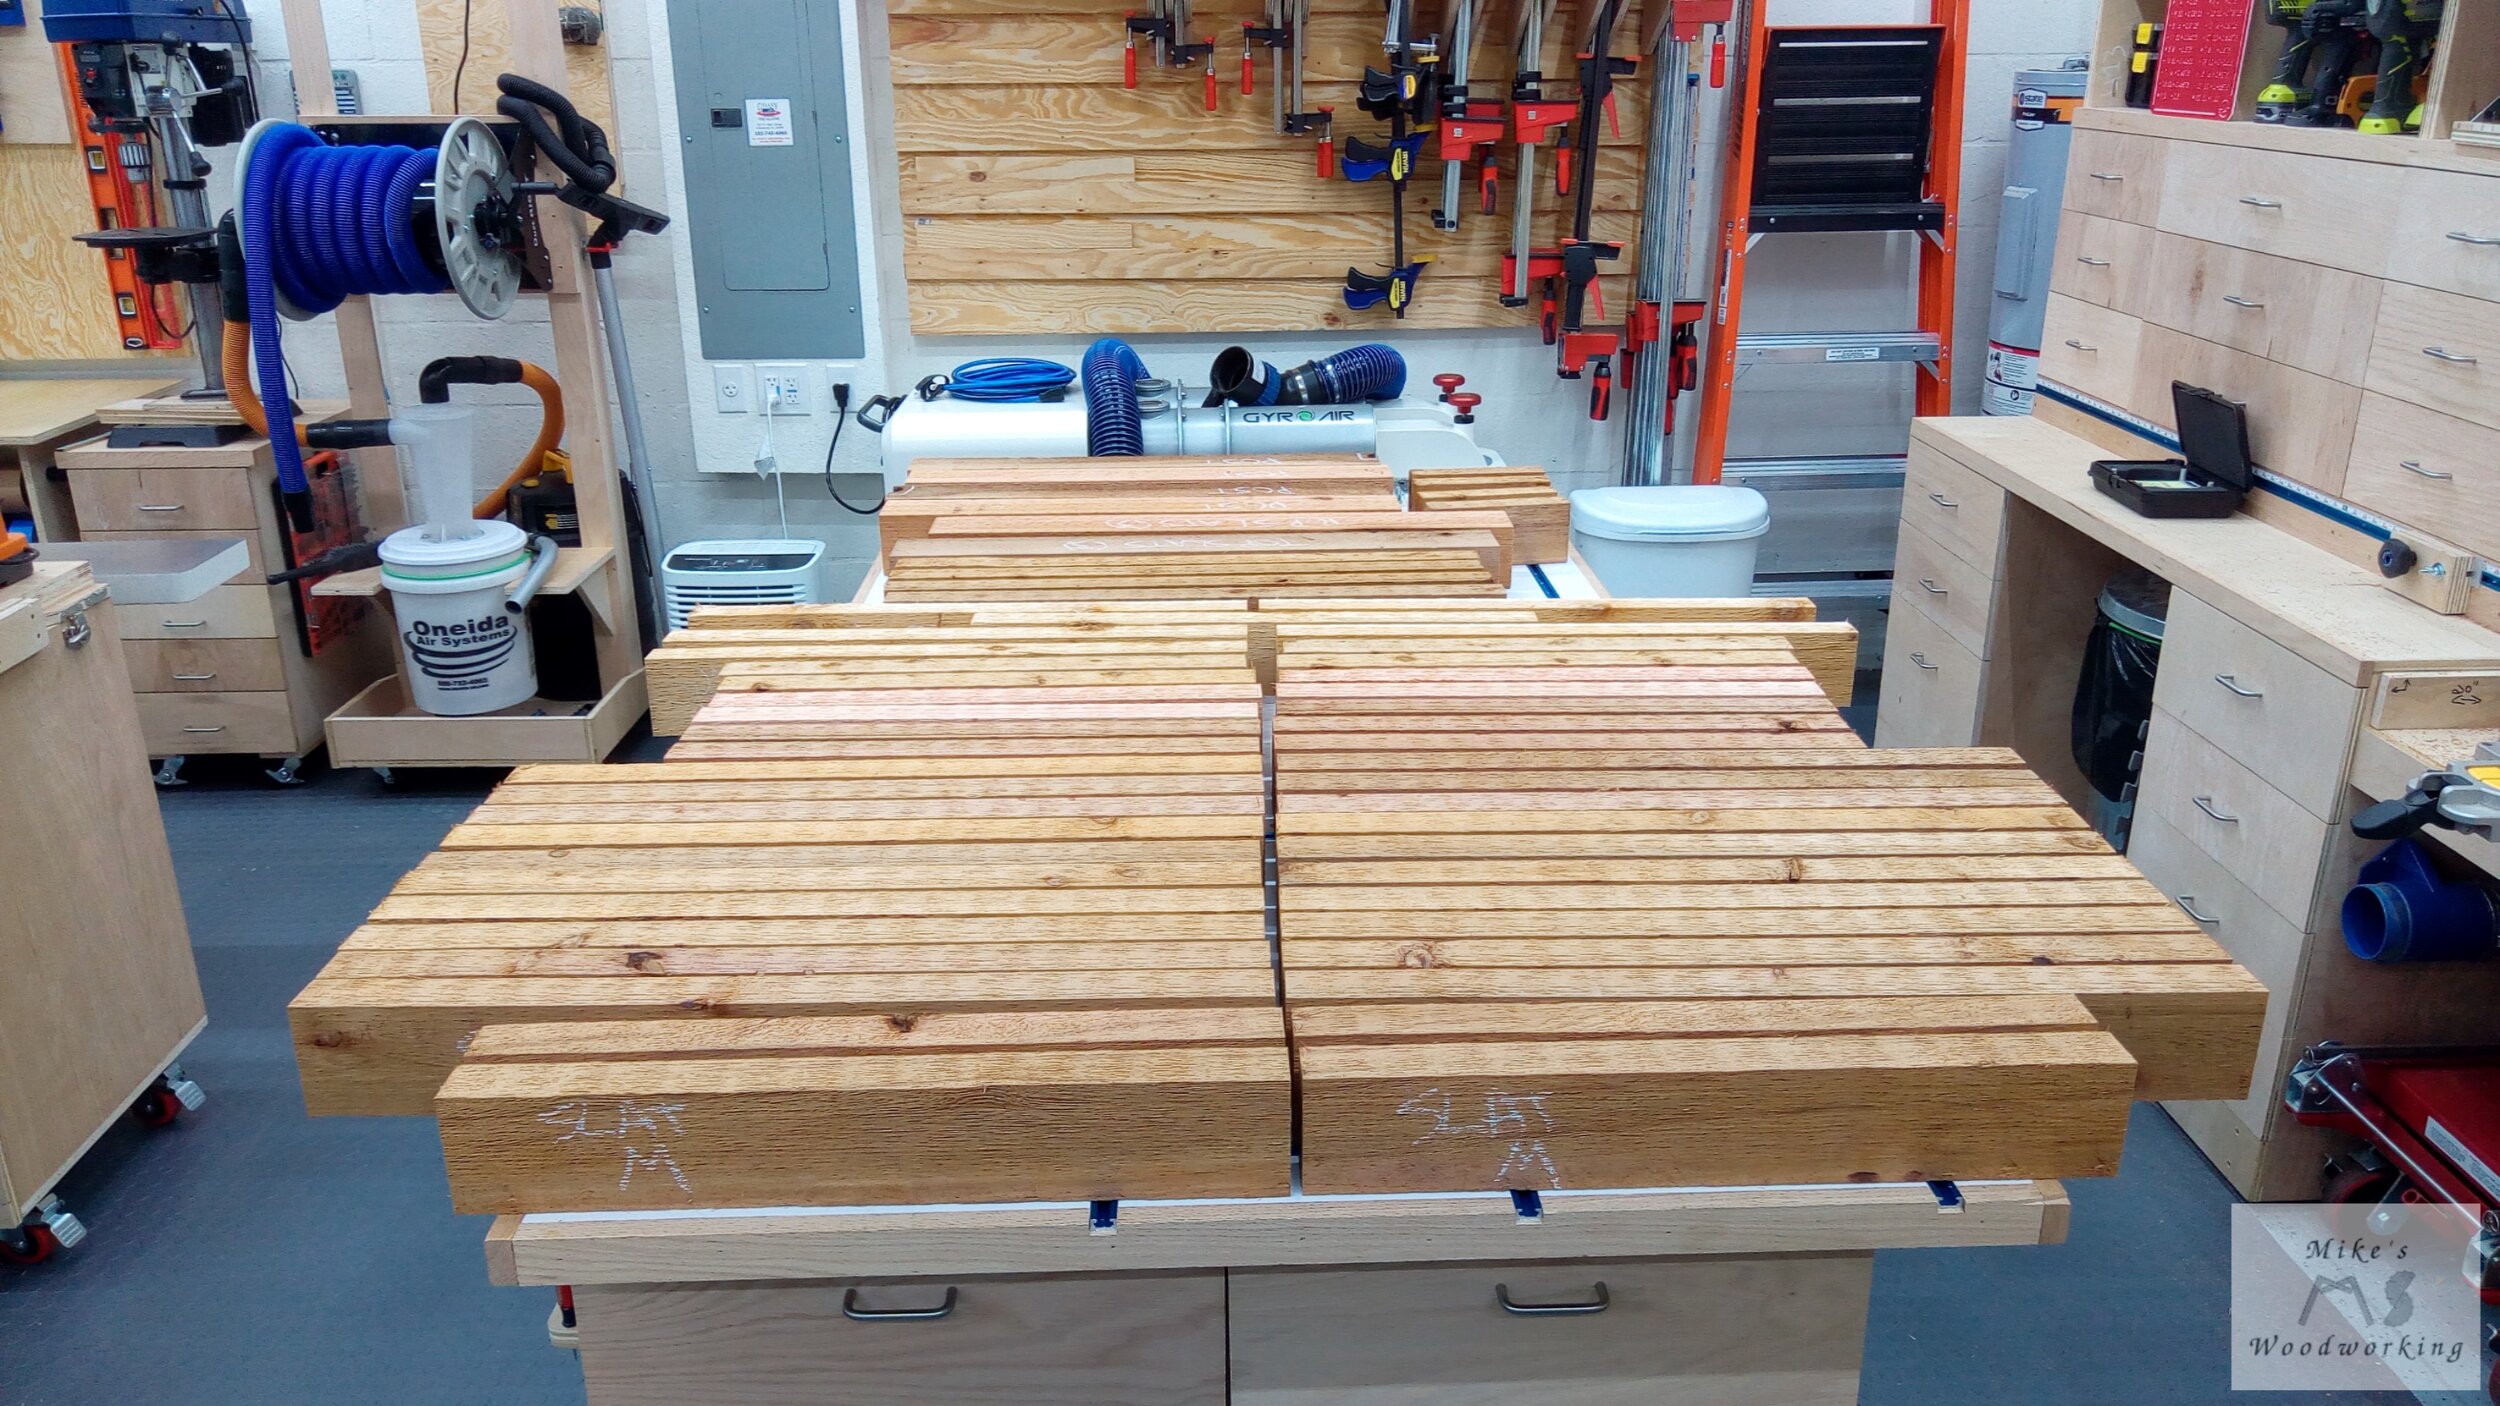
After all of the cutting at the miter saw, a few of the boards were still quite wet on the inside (I knew some were wetter than others just based on their weight). It’s going to be an outdoor project, so I’m not too concerned with the moisture content.


Next I headed over to the jointer. I started with the 4 posts. I flattened one face and one edge and then headed over to the table saw. I didn’t want to remove over 1/2” of material on the planer (that would have taken forever anyway). I installed an Amana 40-tooth Electro-Blue general purpose blade in my table saw, set the fence to 3” and raised it up as high as possible. I ran a post through the saw, but it was too thick to make a clean cut all the way through. I flipped the post end for end and finished the first cut. I rotated the post 90° and made the final cut, this time in one pass. I did the same for the remaining 3 posts. I know I should probably use a blade with fewer teeth for ripping, but this blade did great and left the smoothest finish on the cut edges.
Now that the posts are at final thickness, it’s time to work on the stretchers and the bottom slats. I jointed one face and one edge, but this time I headed straight for the planer. There wasn’t going to be a ton of material to remove since I was going for 1-1/4” final thickness, so I figured just the planer would due in this instance. It took a little bit, but all of these pieces were at final thickness and I had no problems with snipe, so I was happy.
Next came the vertical slats and the lid pieces. I was going for a final thickness of only 1” on all of these, so bulk removal with only the planer was out of the question. I, instead, opted to use the band saw after jointing the boards. I set the band saw to leave about 1/8” of material. Given that cedar is quite soft, running all of these pieces through the band saw was an absolute breeze. Once everything was thinned down on the band saw, I finished them to 1” on the planer.


Processing all of that cedar filled up my dust processor on multiple occasions.
This was the bulk of my day, so I decided to call it a day after that. I left the boards on their edges to rest for a couple of days before I returned to finish processing everything.
Houston, We Have a Problem
After I let everything rest for a couple of days, it was time to get back to work on ripping everything to final width and cutting to final length. I inspected all of the pieces before proceeding and I quickly found a couple of problems. One, on four of the slats, when I planed them after cutting on the band saw, I ran them through on the wrong side and wound up with the band saw marks still on one side (what a dumbass). Not a huge deal as I could simply just face the bad side inwards and no one would be the wiser.
However, I noticed a much bigger problem on a few more of the slats. I was getting a lot of splitting on the ends and the faces of the boards. This would only get worse over time, so these boards weren’t going to cut it.


Since I didn’t have enough material leftover to replace the cracked pieces, I needed to get more. With that in mind, I went back to Lowe’s and bought 3 more 2” x 4” x 8’ cedar boards. This allowed me to replace the cracked ones AND the ones with the band saw marks in them. All of the now defective pieces will find use in other ways.
I processed the new boards in the same fashion as before, this time making sure to REMOVE the band saw marks. I left them overnight and decided to start fresh the next morning.
The Little Details
Now that everything has been sitting for a little while, there wasn’t a whole lot of movement happening in the cedar, so I decided to begin final processing. All of the pieces were to be 3” wide, so I ran everything through the table saw and got everything to final width. Next I took everything to the miter saw and cut everything to their final lengths, with the exception of the lid pieces.
With everything at final dimensions, I needed to do a bit more work on some of the pieces before I could start assembly. First, I wanted to chamfer the bottoms of the posts to prevent any chipping if the box is dragged on a hard surface. I tried what I thought was a decent chamfer on a test piece and liked the results, so I went with that. I decided to run the pieces on the router table, since it would be easier to control them. However, I didn’t take into account the fact that the bearing would want to ride on the newly cut chamfer, so I had to be careful with all of the cuts. I screwed up on the first one, but it’s not too bad (see if you can spot it below).

All of the slats, along with the posts are going to get a round over on the edges. The posts get round overs on three sides (yes, only three...the inside edges don’t need one). The slats that will be butt against the posts only get a round over on one edge. Also, I need to round over all of the edges of the slats that might come into contact with the hose as it is getting reeled in/out. The final pieces to get a round over are the two stretchers that will contact the hose as well.
Assembly (well, some of it)
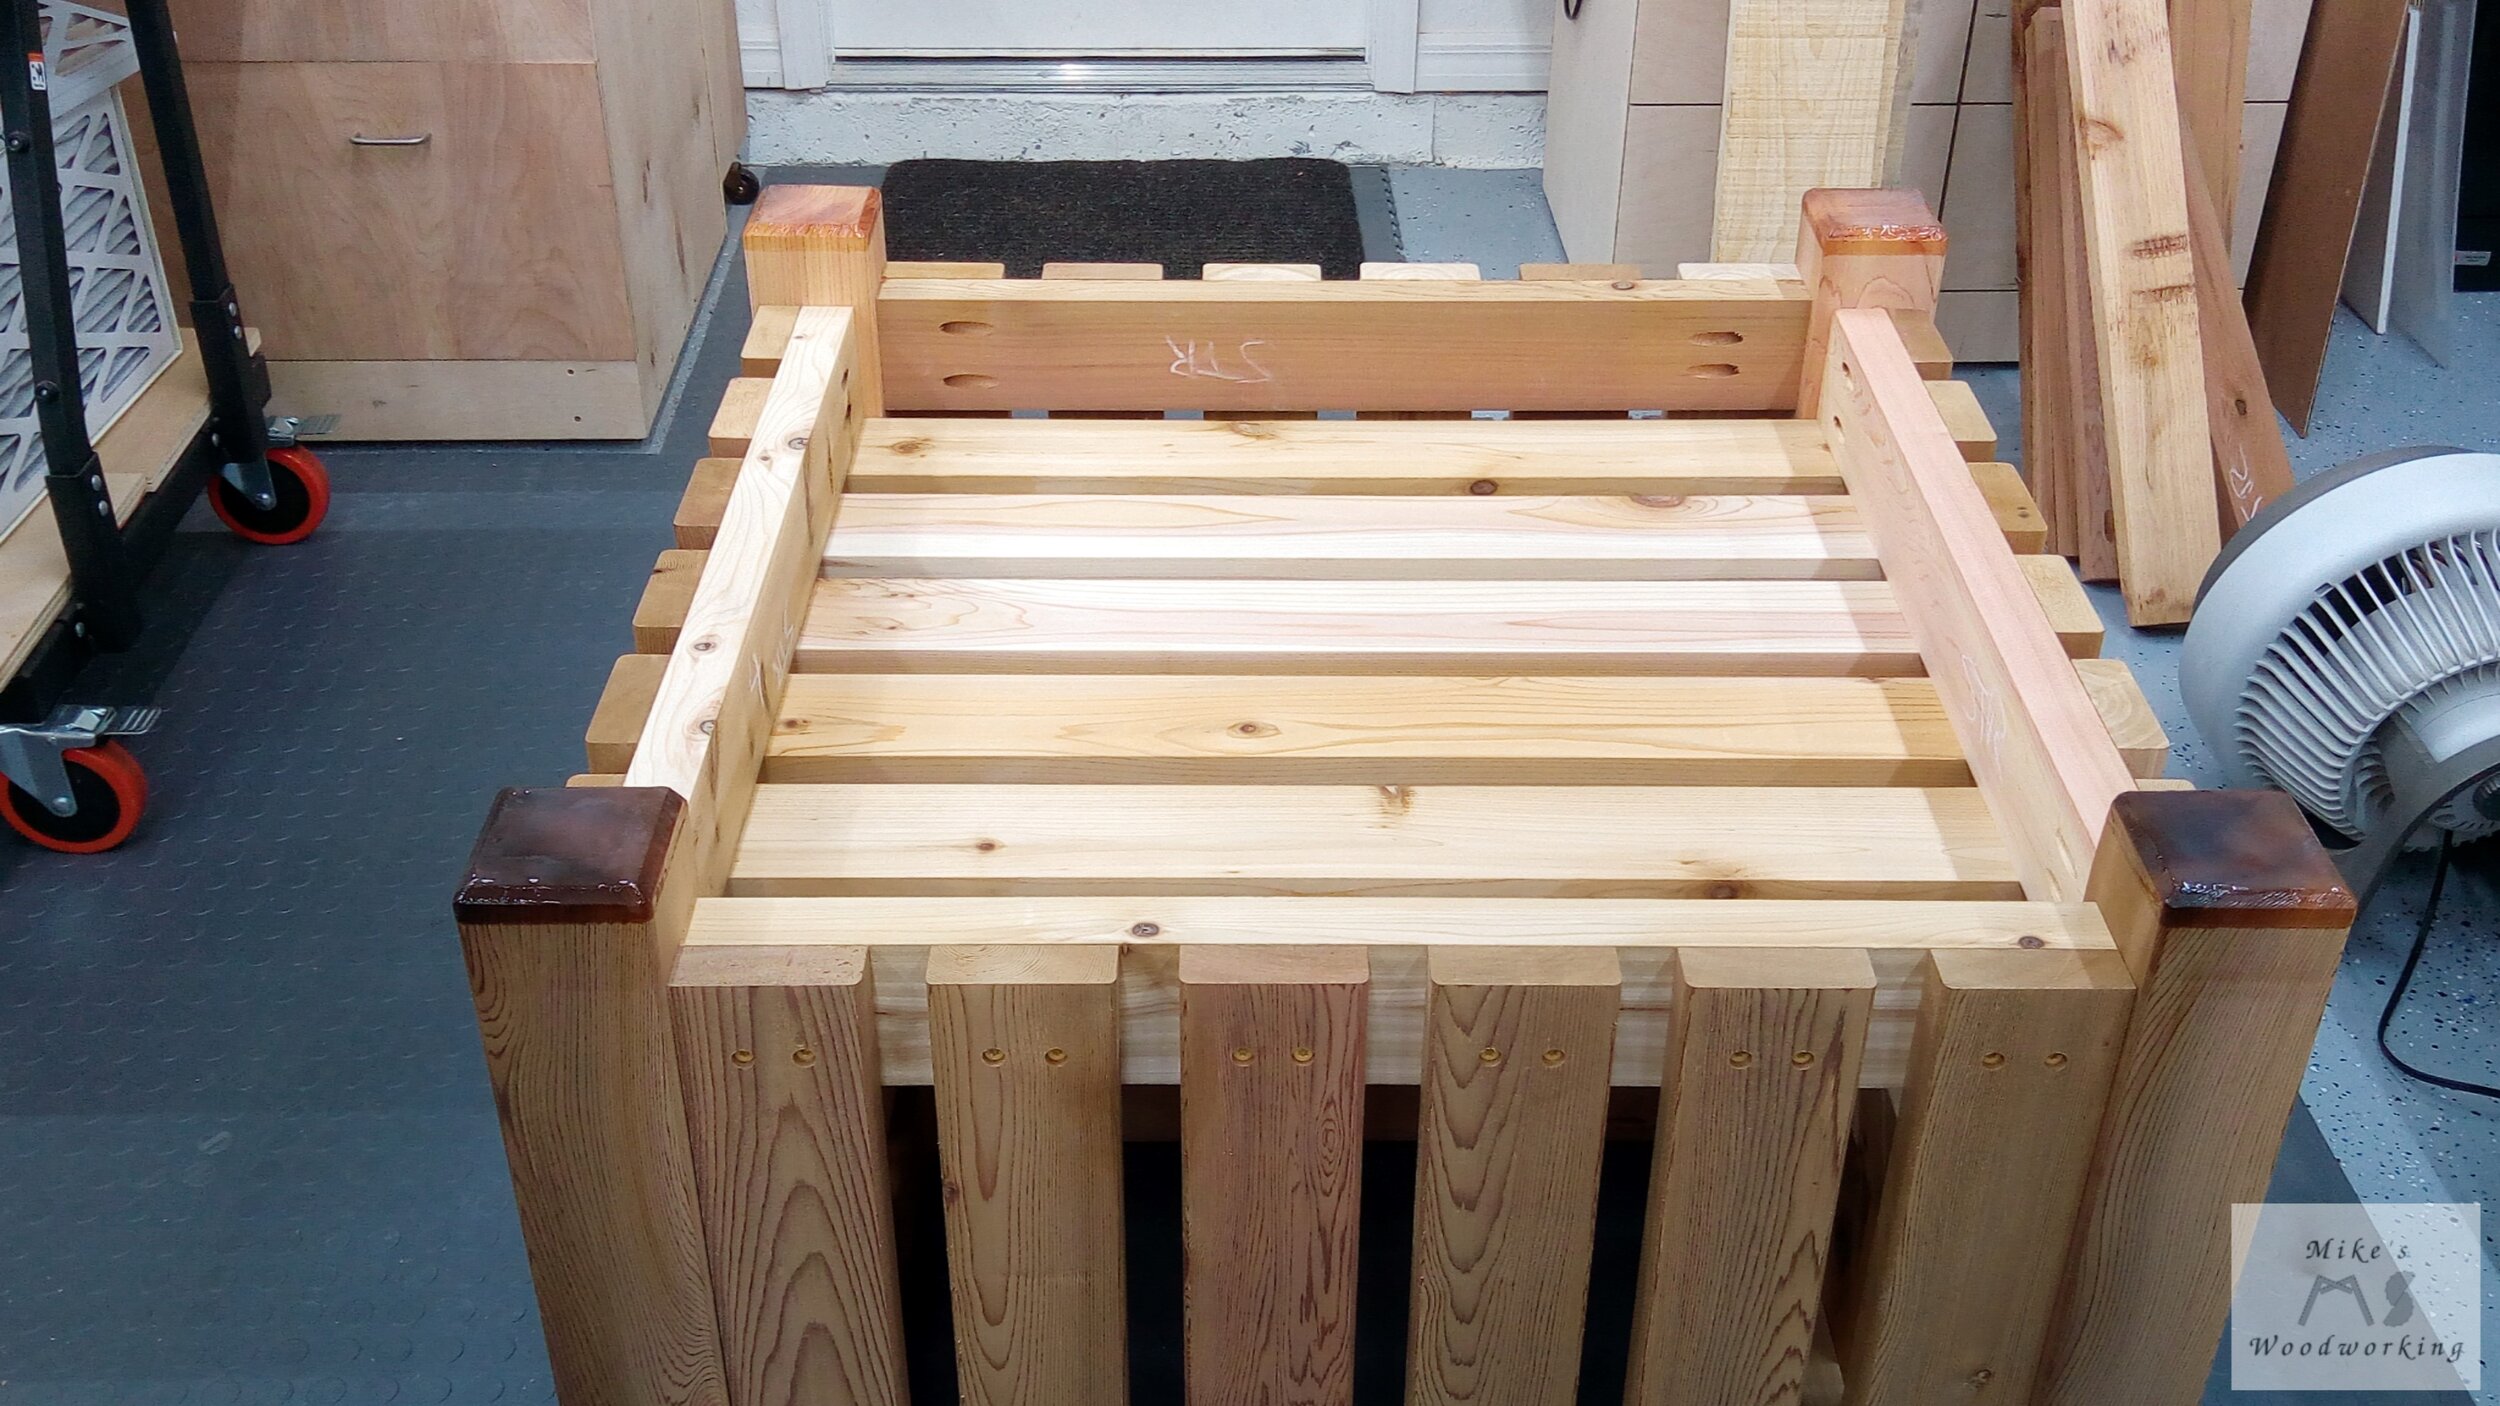
To join the stretchers to the posts, I’m going with simple pocket screw construction. I’ve got a ton of these 2-1/2” Blue-Kote pocket screws that I’ve never had a need for (they came with an assortment I bought a long time ago). Since they are meant for outdoor use, they’ll be perfect. I need to be careful on the layout of the pocket holes on the stretchers that are to be screwed into the same post. I don’t want to run the risk of the screws hitting each other, so I’ll be sure to stagger them. One side will have the screws in a wider position than the other side. As long as I continue the pattern all the way around, I will be fine.

I knew the positioning of the top, bottom and hose opening stretchers as they were at fixed measurements. I connected all of these and then I had to figure out where to place the final stretchers. These would be determined on the height required for the hose reel to spin freely in the box with the lid closed. I wanted them all to be at the same height so that the box wouldn’t look strange.
I first clamped them at the exact halfway mark just for the hell of it. I put the hose reel on top and it turned out to be perfect. The top of the reel still had a few inches of clearance at the top, so I was good to go. I screwed the remaining stretchers into place and now I could work on attaching the slats.
My plan is to screw all of the slats into place with 1-5/8” polymer-coated screws. Two screws would go directly in the center of each stretcher on each slat. This meant that I needed to find a way to make a ton of pilot holes in the slats and have them all line up. Time to rig up some kind of jig.
Gettin’ Jiggy With It (if you’re younger than me, you likely don’t get that reference)
For the top and bottom holes on the slats, the same measurement could be used since the slats were flush on their ends with the stretcher. This was a fairly simple setup at the drill press. I forgot to take pictures before/after drilling the holes to show the setup (I’m still getting used to this kind of thing). It was simply a couple of blocks clamped in place as stops to line up the two holes.
This made quick work for over half of the holes, but I had to figure out something for the holes that would go in the middle stretcher. What I came up with was basically a kind of short t-square that would allow me to drill one hole, flip the slat end for end, and then drill the second hole. I needed a couple of tries to dial everything in (I tried on some back slats as they wouldn’t really be noticeable), but they came out great. Even the ones I “messed up” still look fine.
The holes for the front slats that have the extra stretcher, I decided to just mark and drill those by hand. Since there weren’t that many, I figured that would be the best option. They all came out great.
I attached all of the slats, with the exception of the two middle ones on the right side. You’ll find out why a little later.
The Reel (Real?) Problem
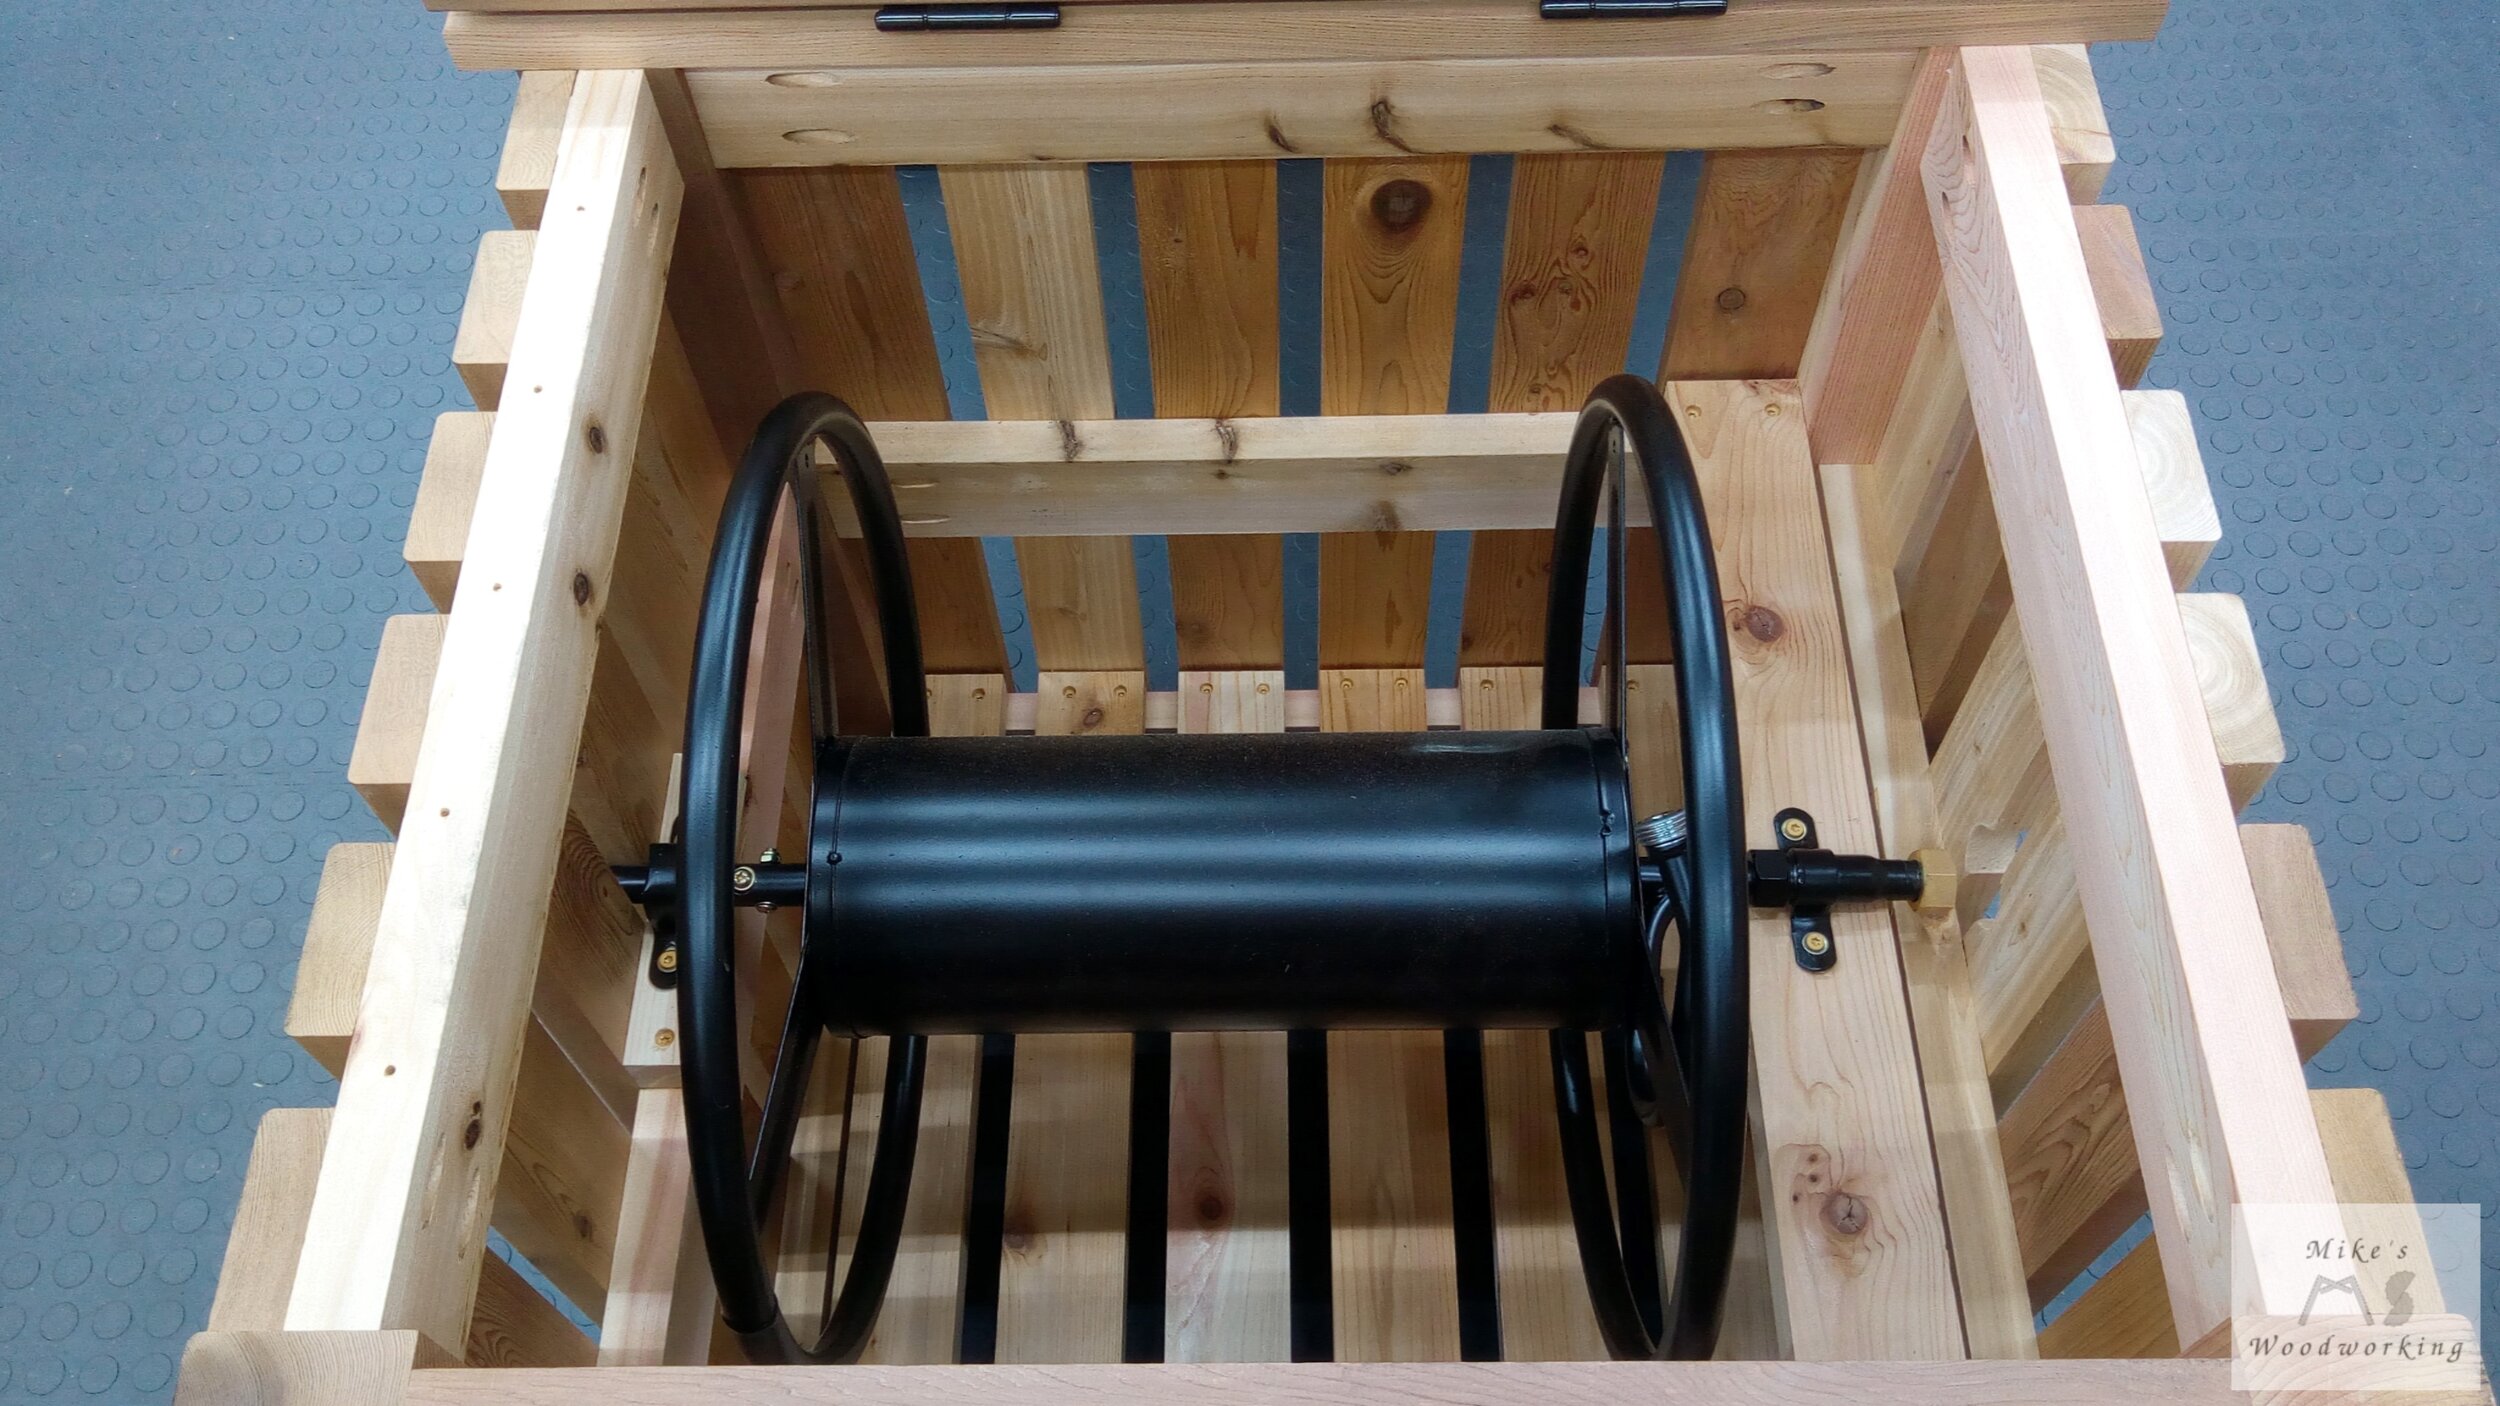
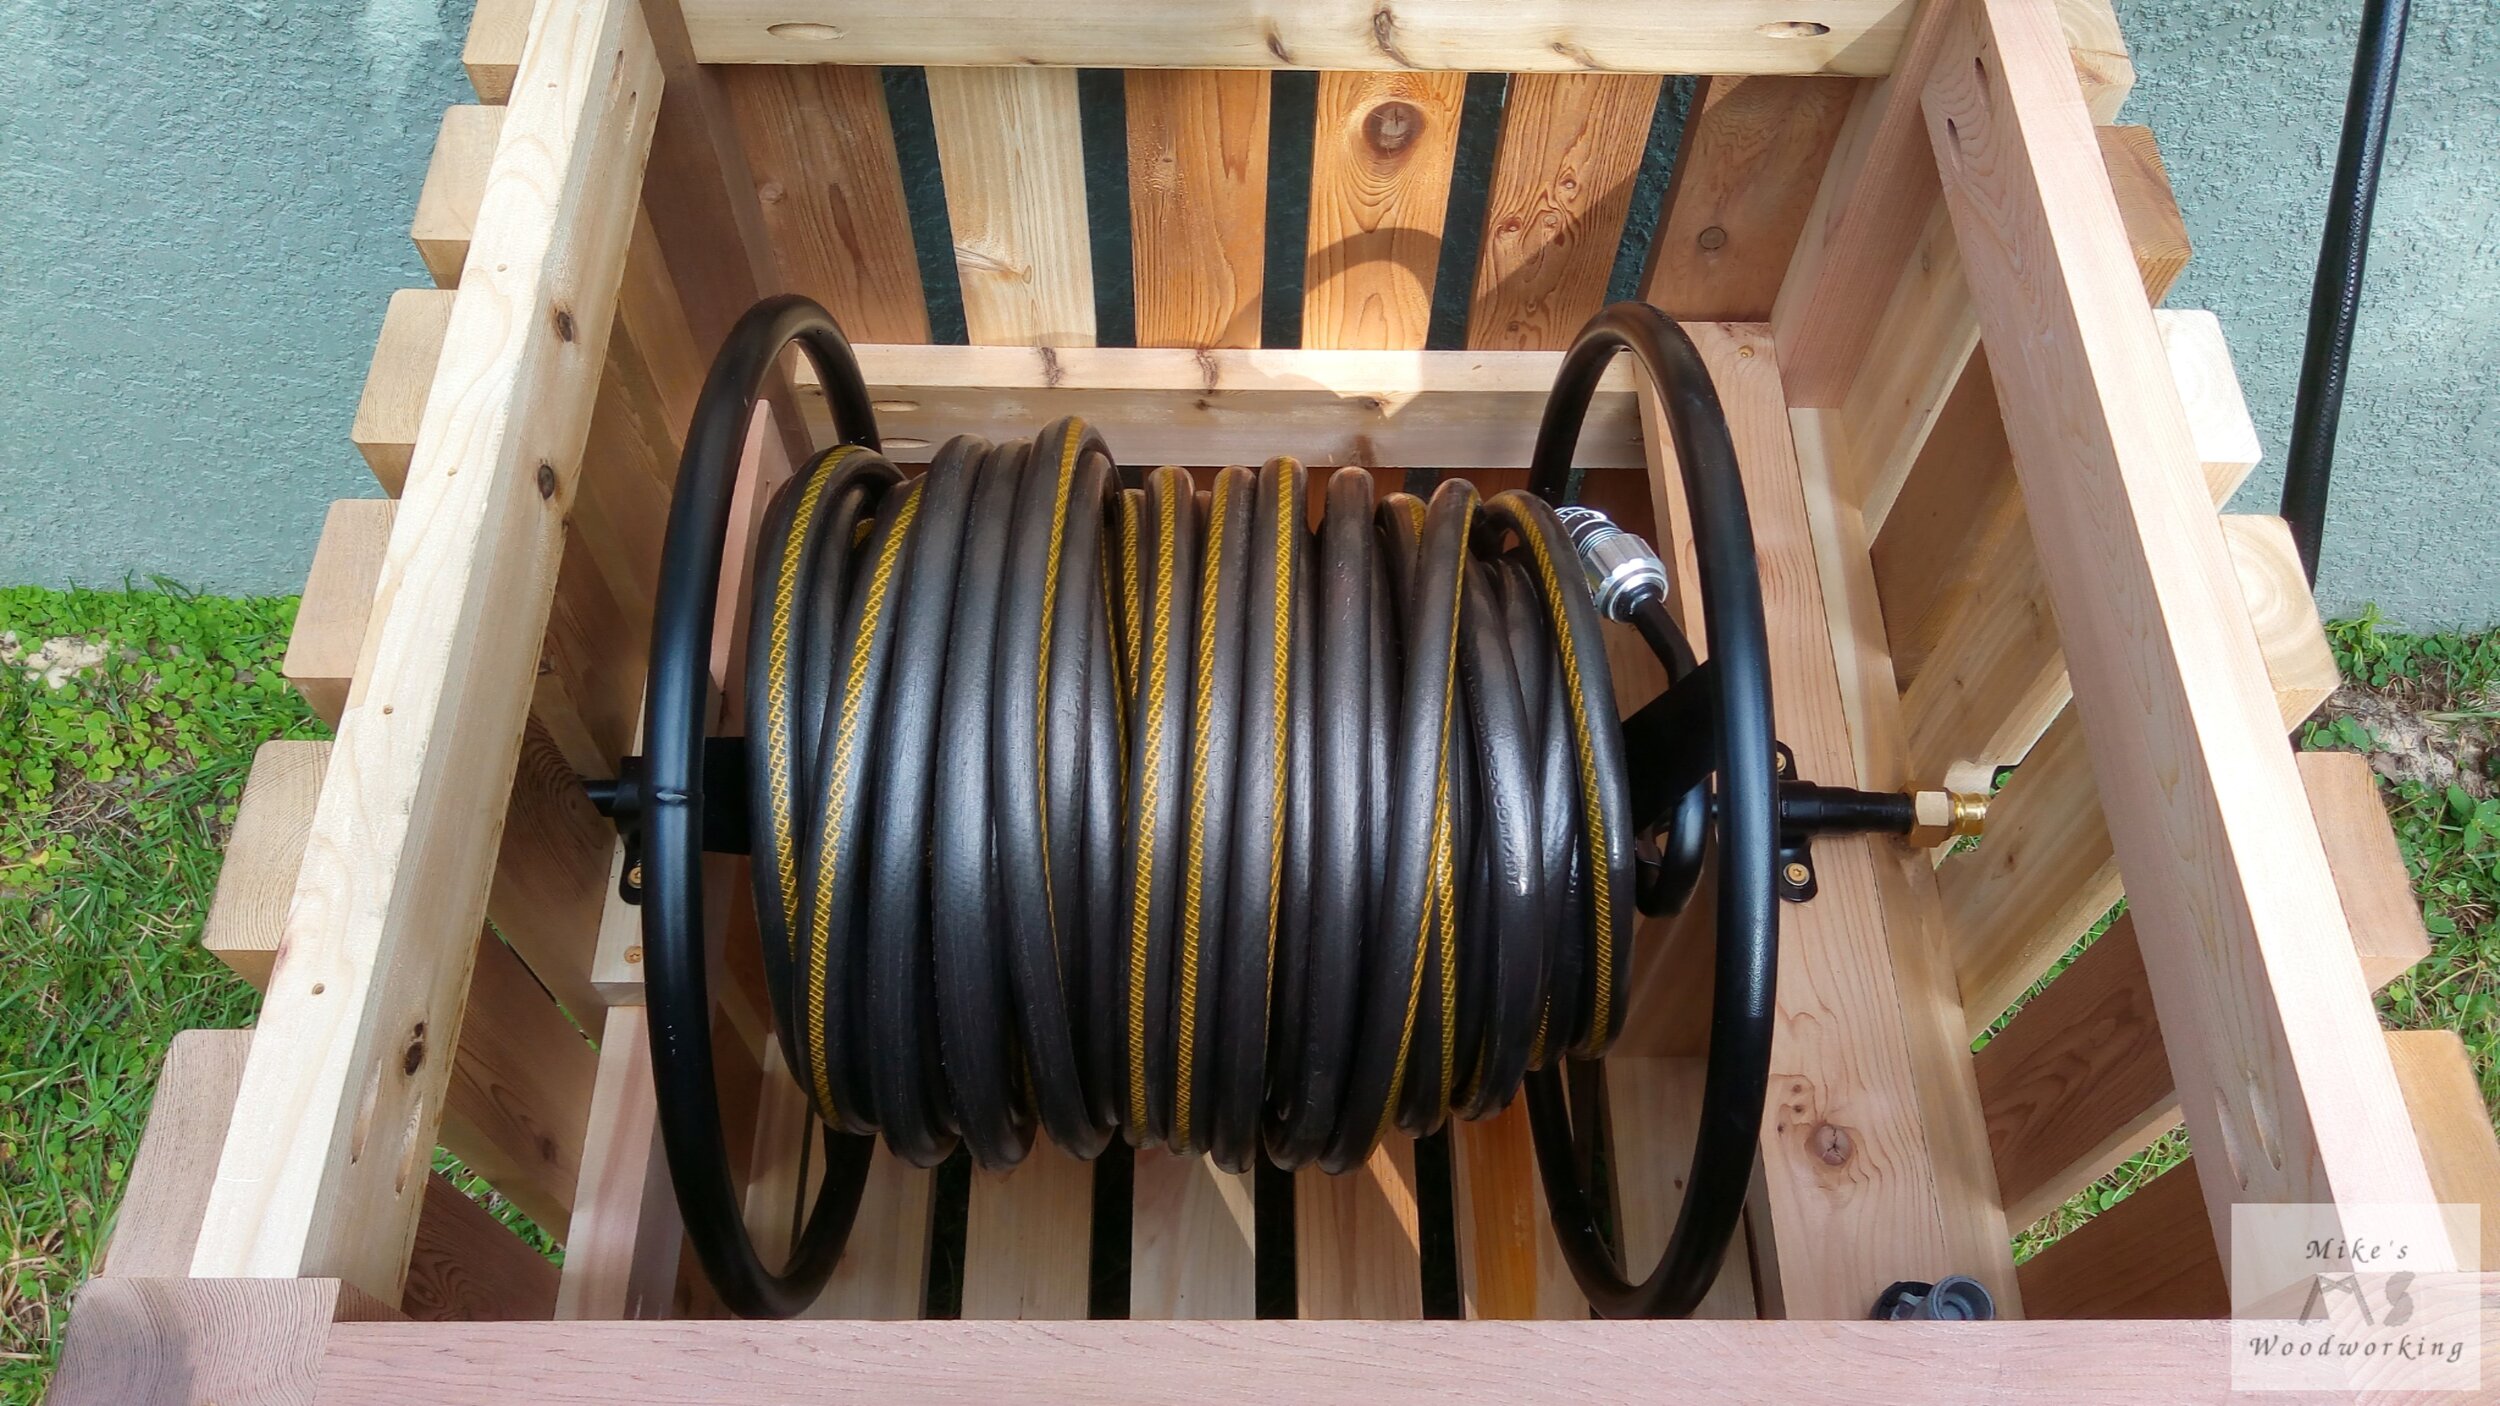
With most of the slats in place, I need to figure out how I’m going to attach the right side of the hose reel. The left side, which has a mount that the handle passes through, can simply attach directly to the stretcher.

However, the right side can’t be done that way. The right side’s mount is a few inches away from the right side middle stretcher, so another attachment method will need to be used.
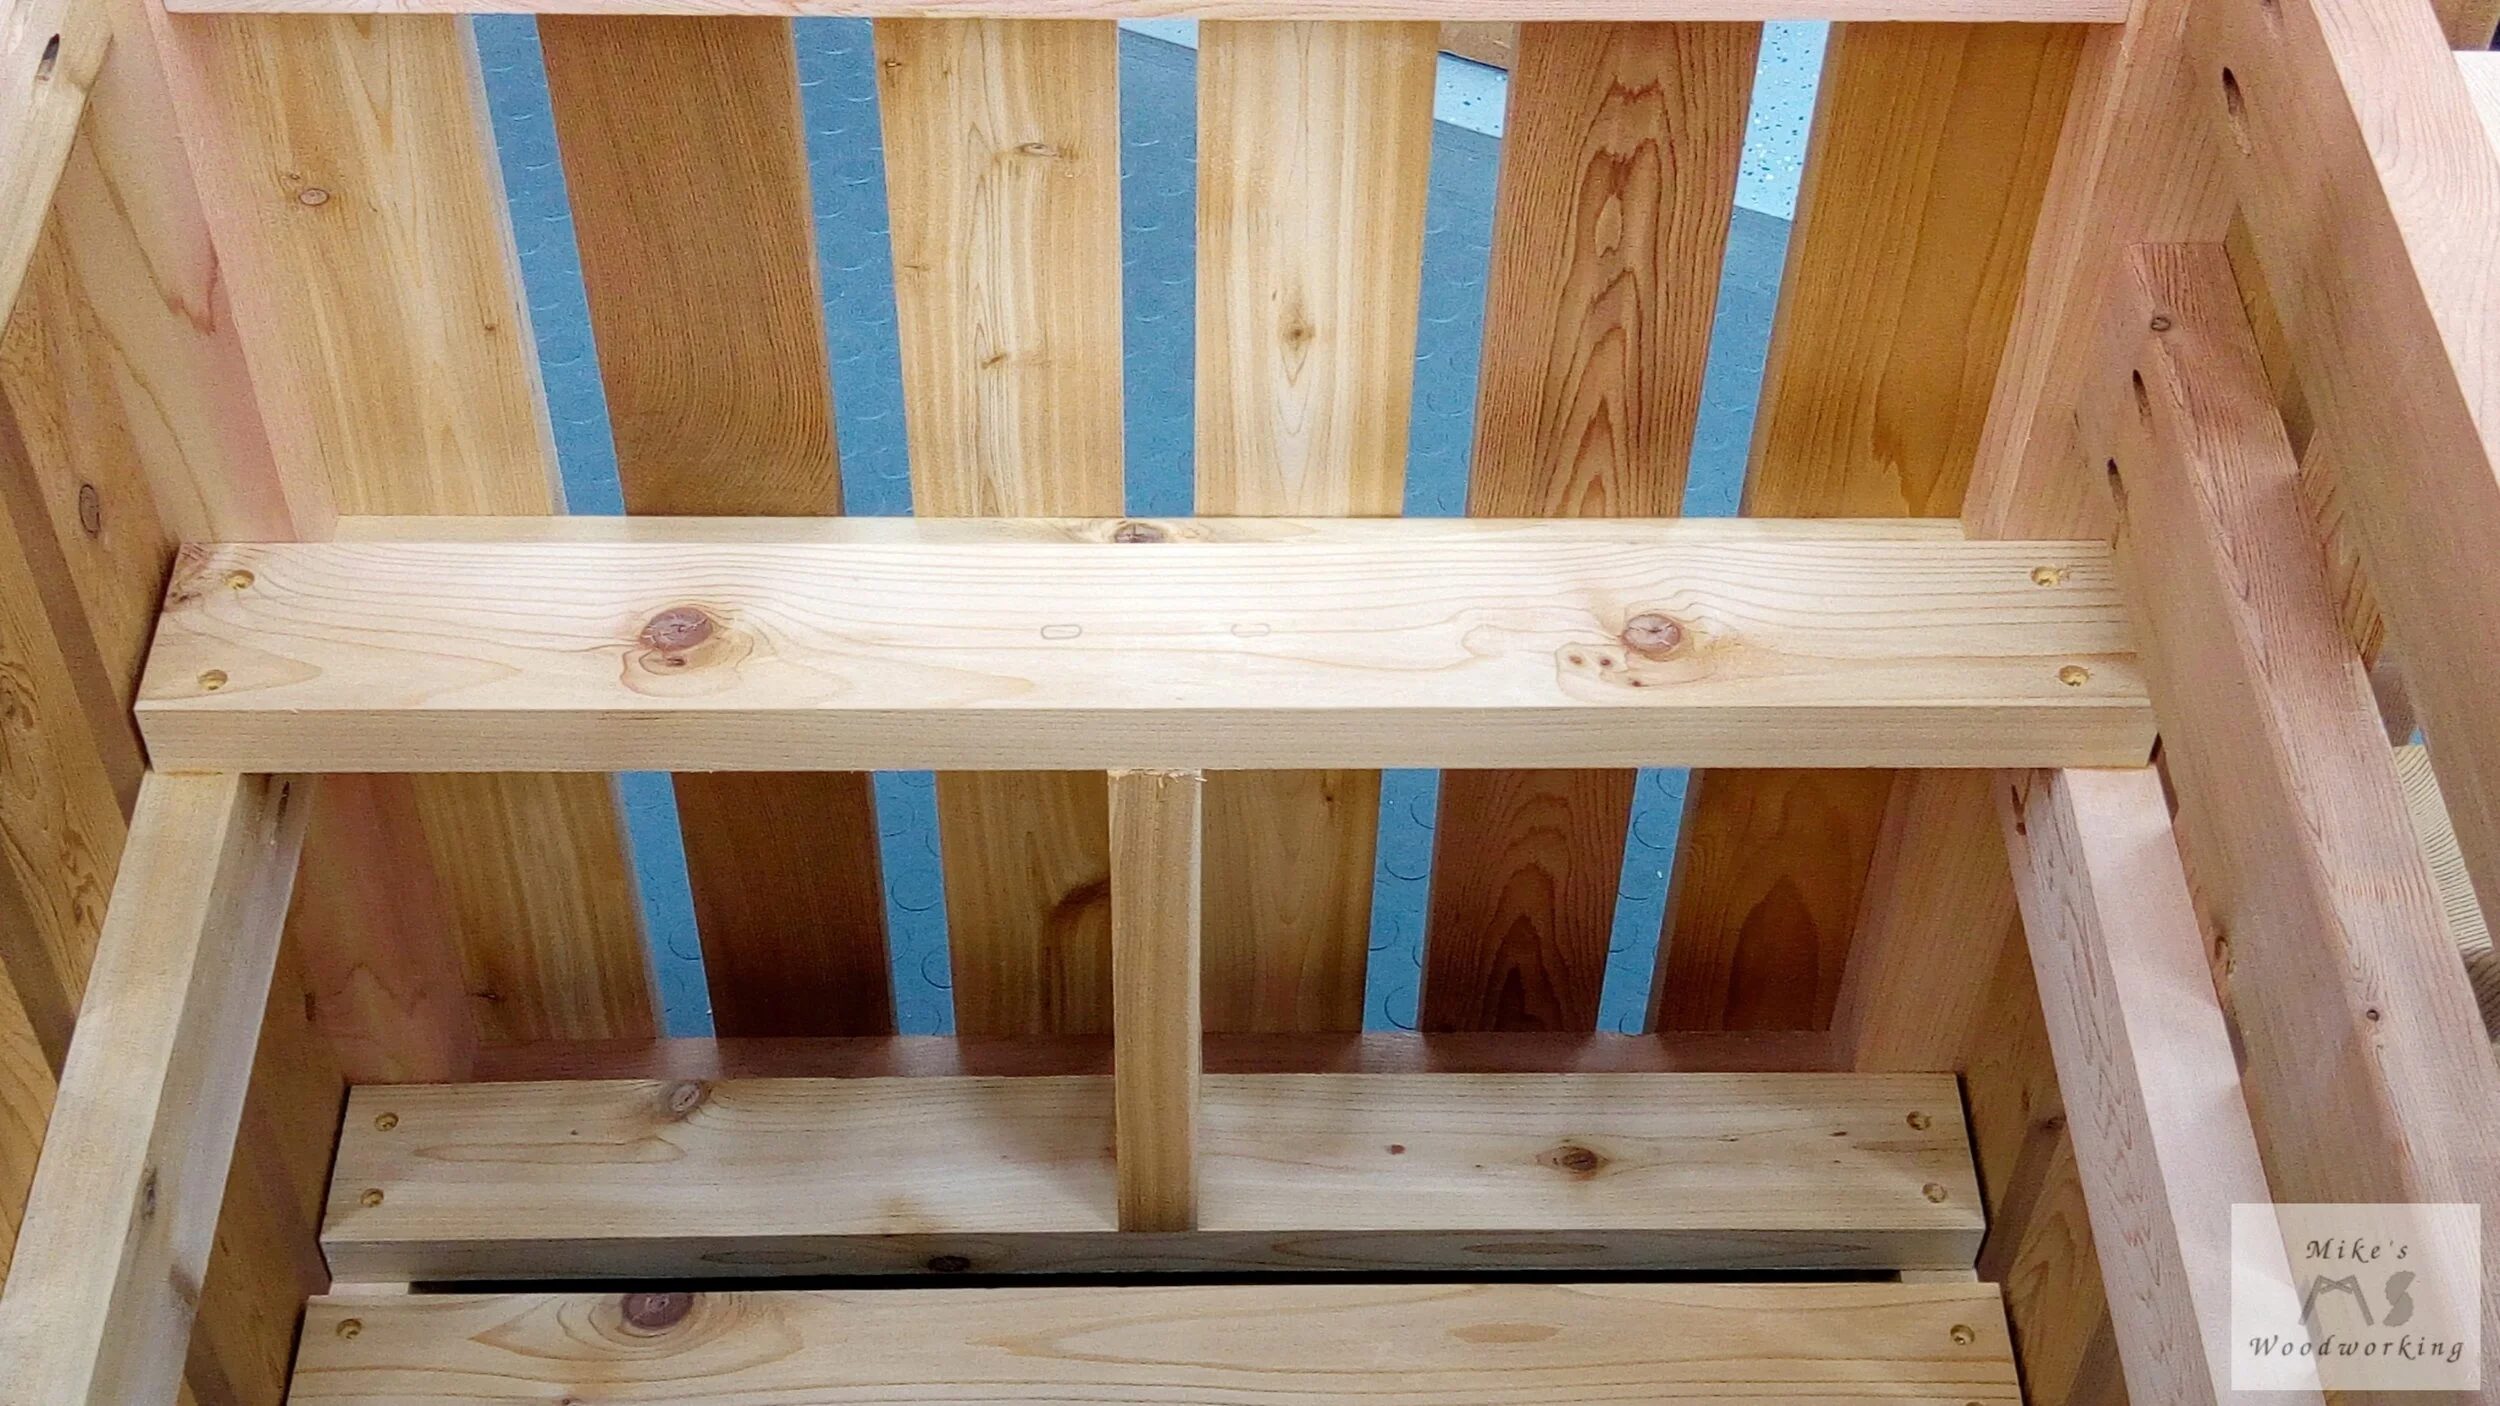
It took a little while to figure this out, but it dawned on me that since the middle stretchers are all at the same height, I could simply run a bottom slat across the middle stretchers to give me a mounting point. I would need to add a piece of the same thickness to the left stretcher, to bring them both level. I can add a vertical piece under the middle of the new slat to give it support. I cut up and milled another bottom slat and glued and screwed it in place. I did the same for the small piece added to the left side middle stretcher. Since I still had plenty of clearance at the top for the reel, this added height wouldn’t be a problem. Phew, problem solved.
Gettin’ a Bit More Jiggy (o.k., I’ll stop now)
On the left side of the box, the handle for the hose reel easily fits through the middle two slats without issue (all part of master plan, mwahaha). However, the right side of the hose reel, which contains the connection for the leader hose, will not be protruding through the slats, but will be inset a couple of inches. I want to have a wider opening than just the 1” gap between the slats for the connection. I figure a 2” hole will give me plenty of clearance for the end of the leader hose.
I carefully measured how far the center of the brass nut was from the bottom of the slat. I only had the two middle slats clamped in place at this point, so I removed them to figure out how to drill the hole I wanted to make.
I can’t just clamp the two boards together and drill a 2” hole. When the boards are put back in place the hole won’t look right and would be spaced oddly apart. What I need to do is clamp the boards together with a 1” spacer to fill the void where the hole will go. I found a scrap piece of cedar and cut it into a 1” square blank. I clamped it between the two slats and marked where the center of the hole would be, based on my previous measurement. Again, I forgot to take pictures of this step (I promise I’ll get better with that in the future).
I took it over to the drill press and carefully lined everything up and made the hole with a 2” forstner bit. I was worried for a second because I wasn’t sure I made it all the way through into the backer board on the drill press table when I ran out of travel on the spindle. Luckily, it just pierced through and had finished boring the hole. I’m so glad I have a variable speed drill press to slow down that big-ass bit.
I sanded the semicircles I created in the slats and screwed them in place. I checked the opening with the leader hose and it was perfect.

Put a Lid on It (in a good way)
Up until this point, I still hadn’t cut the pieces for the lid to proper length as of yet. I wanted to wait until the majority of the box was constructed so that I had an exact measure. The box was just a shade under 29” in each direction, and with a 1” overhang on the sides and front (the back is flush with the posts) that means all of the pieces will be 31” wide.
I laid out all of the pieces for the lid and there was one with a big busted-out knot on one edge, so that would be the fixed back piece.

Pay no attention to the screw holes on that top left stretcher.
The rest of the pieces were then shuffled around until I liked what I saw. All of the lid pieces will be secured in place with screws from underneath, through three braces that span the length of the inside of the box. The only exception would be the piece that is overhanging the front. Since the braces won’t be able to reach this piece, I’ll have to glue it to the piece next to it. I made sure I had the straightest boards for this and applied some Titebond III, clamped them up and left them until the next day.

In my original design, the front piece of the lid was going to be overhanging by over 1” which meant it would need to be trimmed a bit and then have the roundover applied again. However, when it came time to get the braces screwed in place, I noticed three of the boards had a bit of a bow in them which would leave a sizable gap in the lid. A very tiny gap wouldn’t be a problem, but this would be a solid 1/16” and that was unacceptable. So, I took the boards that had bowed over to the jointer and cleaned up the edges. I put them back in place and with the extra material removed, my overhang in the front was now exactly 1”...couldn’t have worked out any better.
I got the braces attached to the lid pieces and screwed the back piece into the two posts and the stretcher. However, in my haste to attach the back piece, I neglected to check that I was screwing it into the back side of the box. Yeah, I screwed it into the left side instead...oops.

If you look closely, you can see that the fixed back piece for the lid is screwed onto the left side of the garden hose box. It pays to look before you screw (that didn’t come out quite right, did it).
Since the box is a square it wasn’t a big deal to put it in the right place. I just have a couple of unwanted screw holes in a few places that NO ONE is going to ever see anyway.
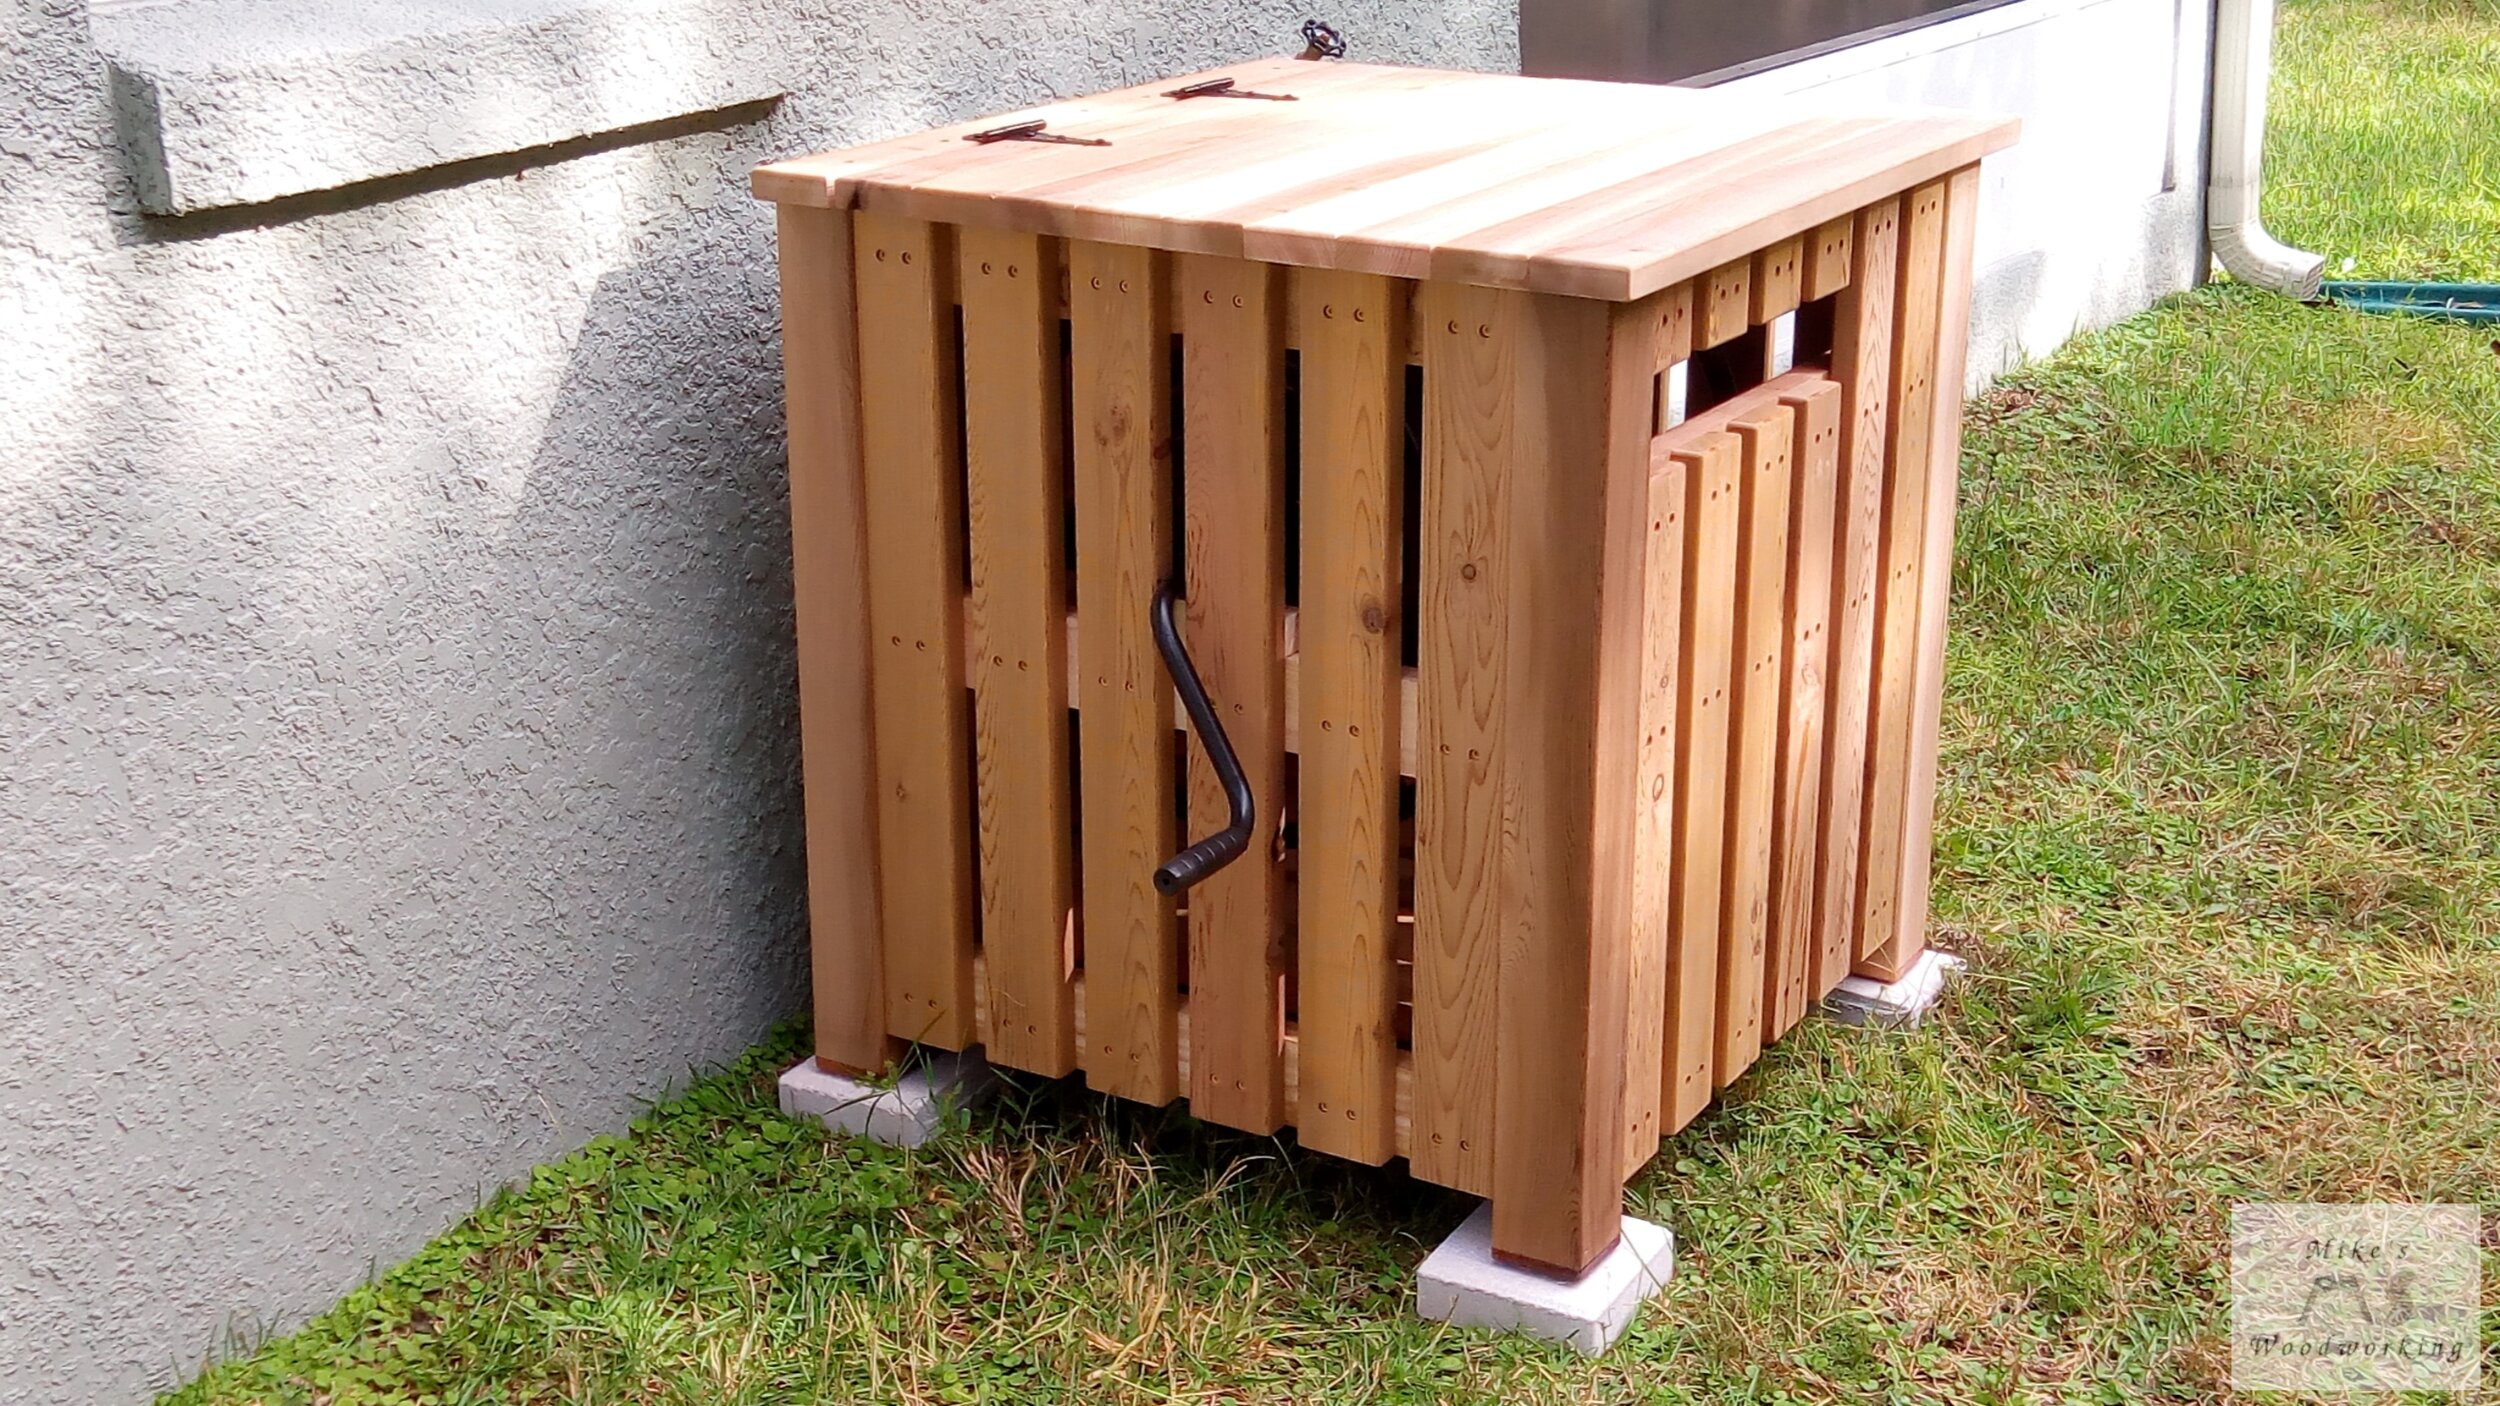
I screwed on the hinges and tested out the lid and it works great.


FINISH IT!!! (insert Mortal Kombat voice here)
Given all of the rust that accumulated on the old hose reel parts, I wanted to offer some protection to the new ones. As you can see, these parts had some pretty bad rust on them. When comparing them to the new parts, the difference is quite noticeable.

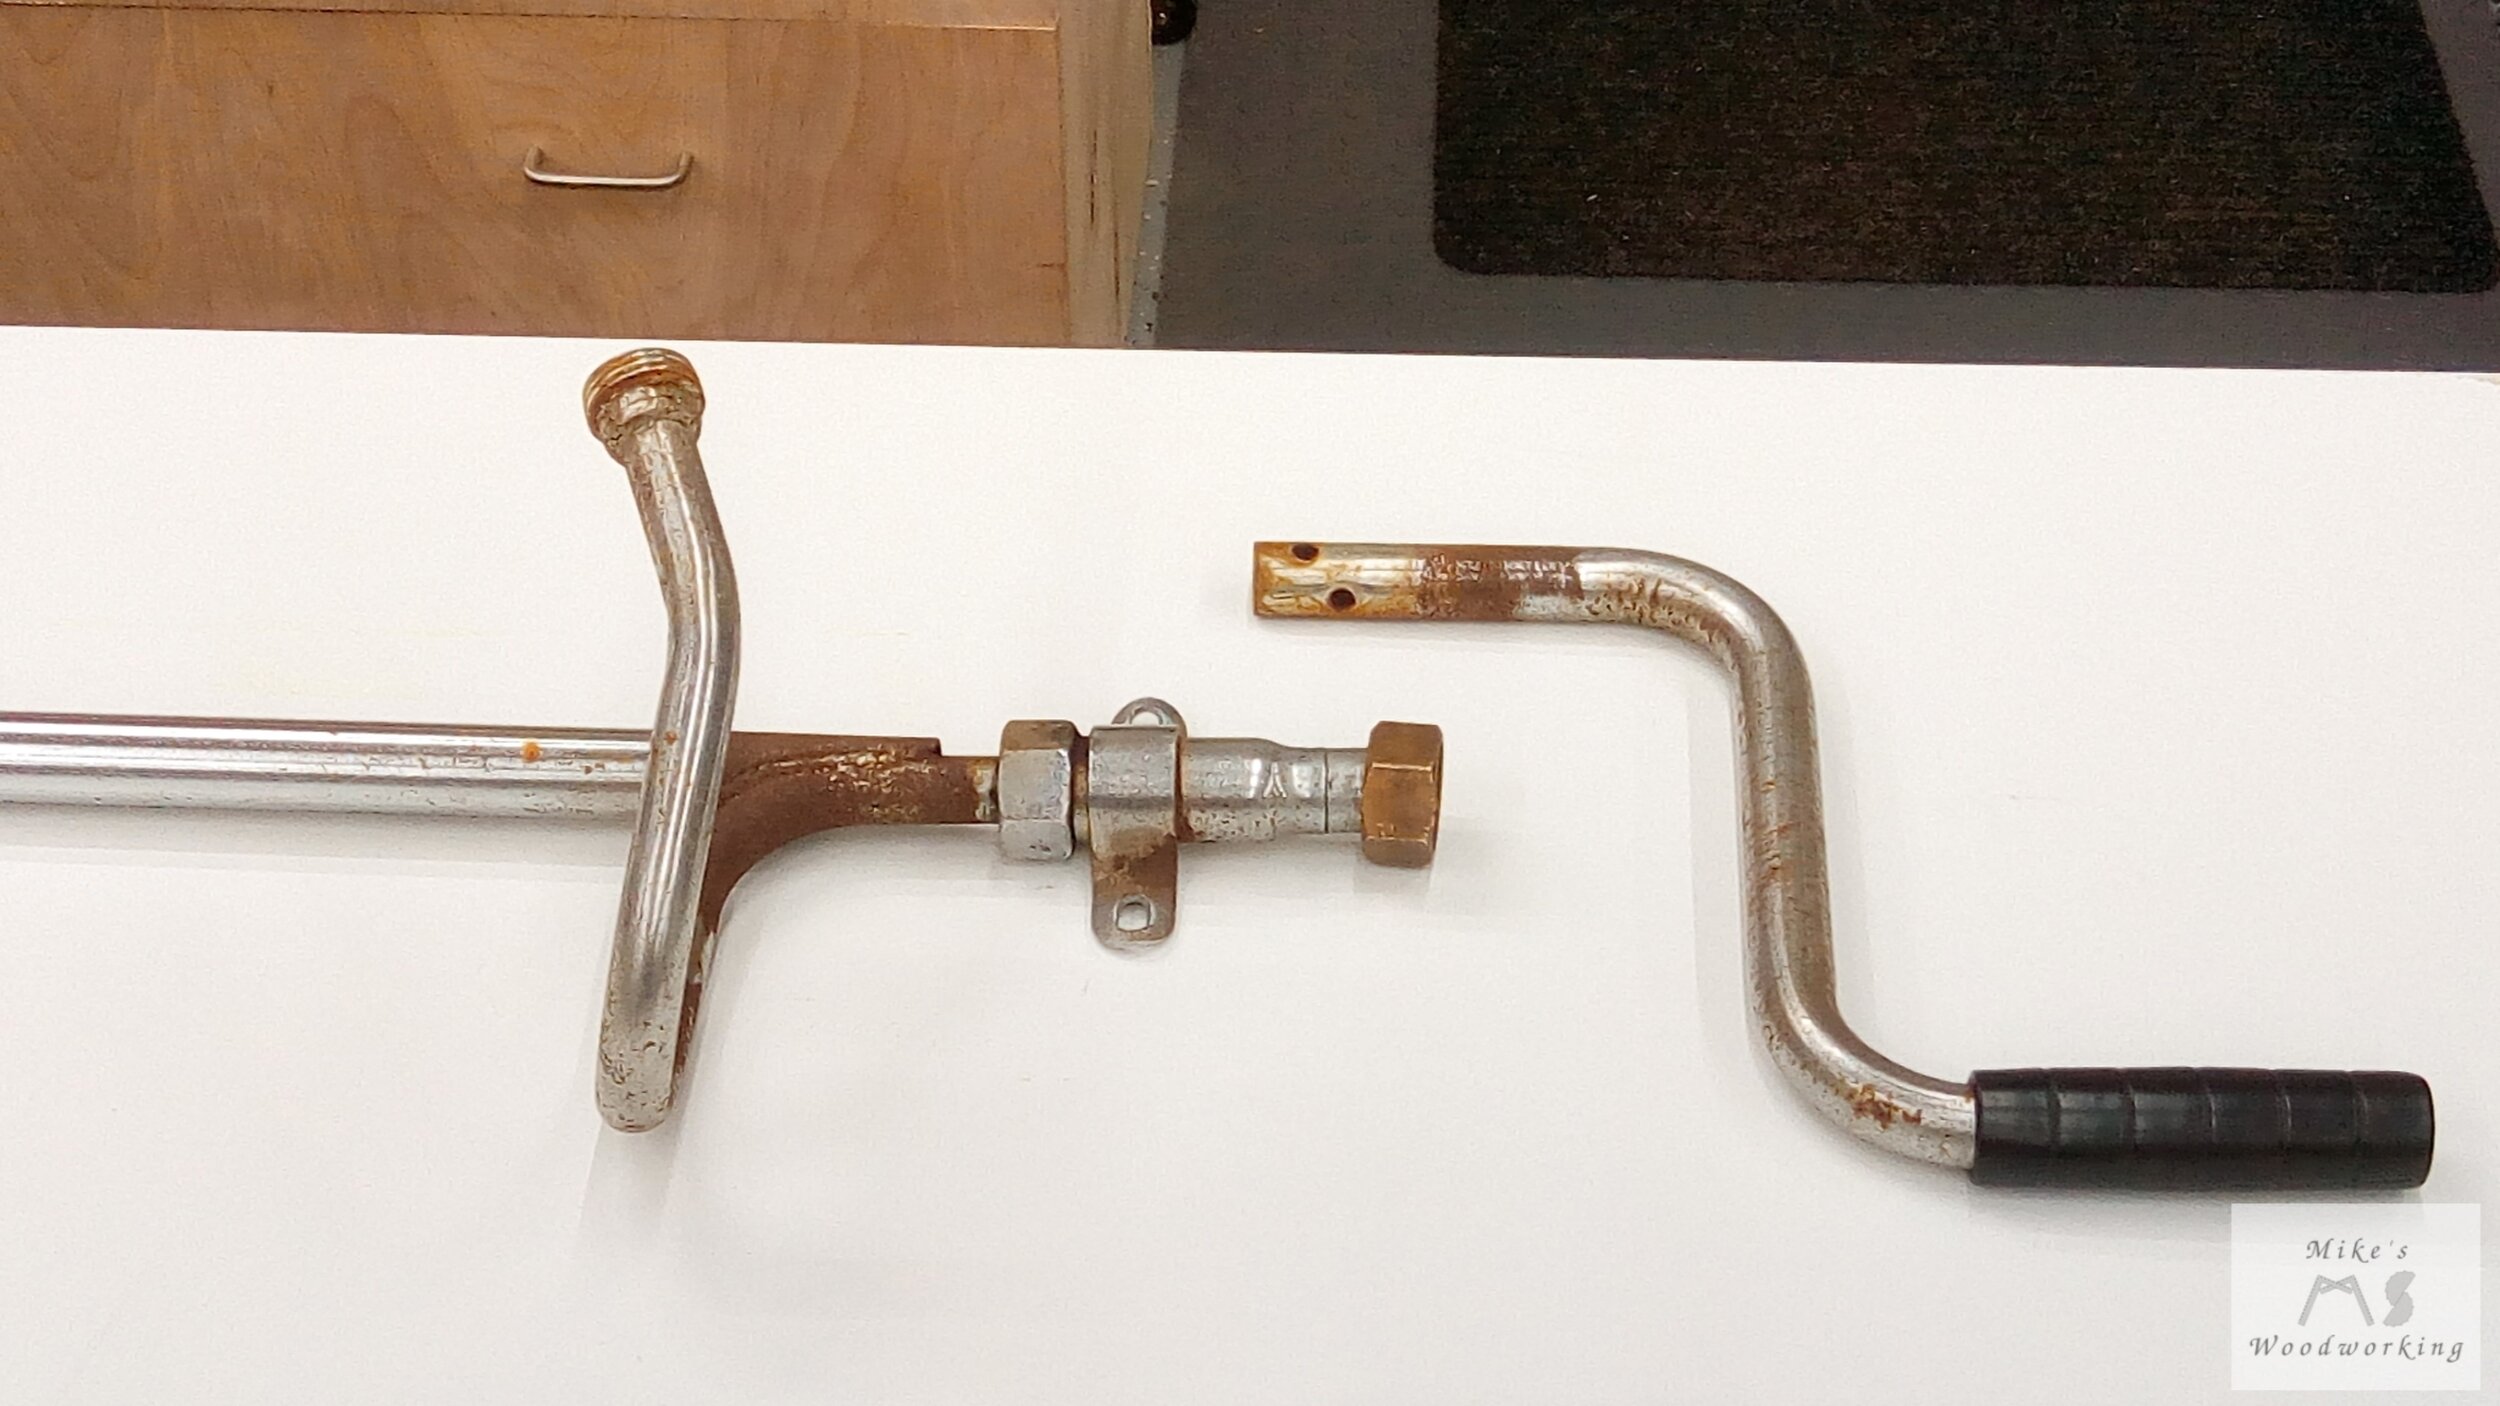
You can really see how rusty the old hose reel pieces were.
I decided to give them a treatment with some black exterior spray paint to cover all of the exposed metal surfaces (other than the threads and the brass nut). The finish is quite nice and it even goes with the finish on the reel (dumb luck).
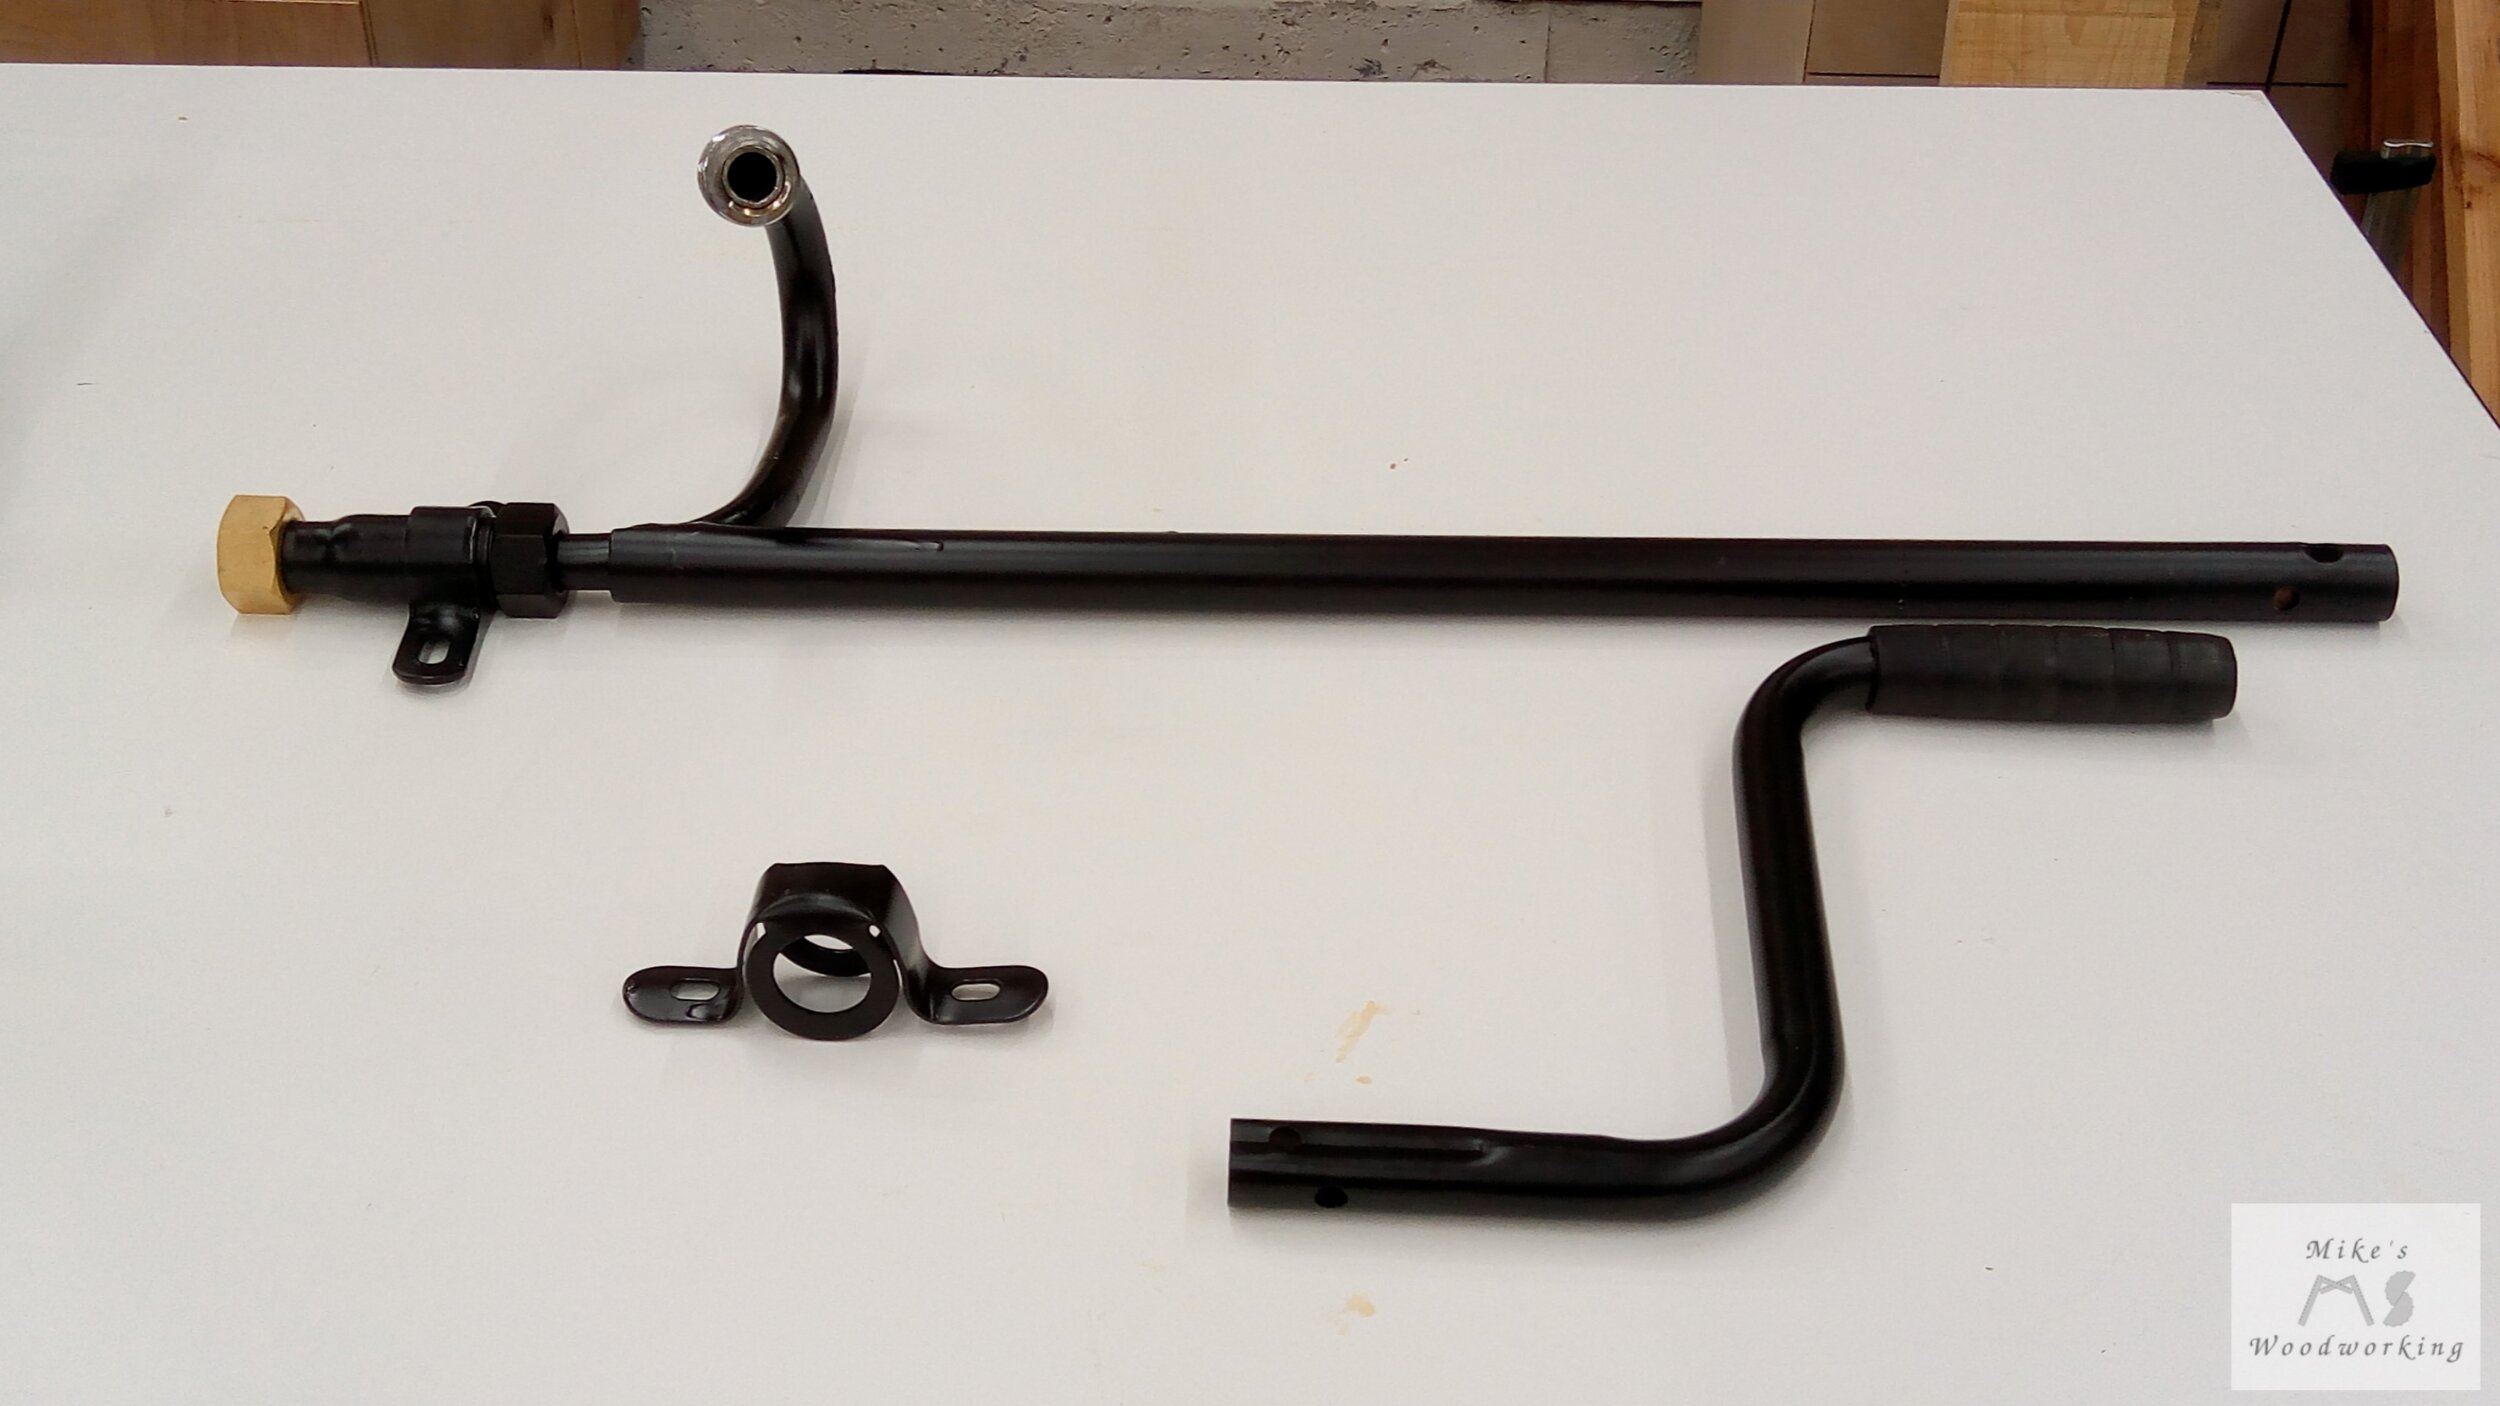
Long before I had installed the lid, I decided to apply some clear Flex Seal to the bottoms of the posts. I plan to have the box sitting on concrete pads, but I figured anything that can help hinder the wicking of moisture up the posts can’t hurt. I applied a couple of coats since the first coat soaked a bit into the cedar.

I carefully maneuvered the hose reel into the box, got it into position and screwed it into place. I closed the lid and this project was essentially done.

Once Lisa was done with work, we moved it outside and got it into its final position. I bought one 12” square concrete paver and cut it into four pieces and placed one piece under each post. We got it leveled out, with it leaning just a bit forward to let any water run off the front.
Once we finally got all of the hose on the reel, it was time to test it out. I slowly turned on the water and let it fill the hose...no leaks. I turned on the nozzle and we’re good to go. The lid will simply lean up against the house when it needs to be opened...no further support needed.


Recap
This was a great project. I couldn’t be happier with the way that it turned out. I decided not to put any kind of finish on the box. I’m just going to let the cedar naturally age and gray over time.
This was the first actual functional project that I’ve made for our house. I mean, I made those storage cabinets for our spare room, but those are just plywood panels screwed together (nothing special, in my opinion). This is something that anybody who drives or walks by our house can see, and I’m proud to show it off.
This was my first time working with cedar and I’m excited to work with it again in the future. I just loved the smell that completely enveloped my shop through the milling process. I’ve got a ton of scrap pieces left from resawing and ripping the boards down to size, so I’ve got plenty of material to make small decorative boxes (future project(s)?). I’m also going to use some of the off-cuts to make a small basket that will go inside the box to hold the nozzles for the hose.
This was also my first time really putting my Harvey P700 dust processor to work and I must say that I absolutely love it. I filled up the collection bin two or three times (man that cedar smells so awesome). It’s so much easier to empty this dust collector than my old JET one.
This project was my biggest win to date. It’s only been slightly more than a year since my shop accident. Having had the opportunity to use the jointer a great deal throughout this project has only bolstered my confidence that much more. What happened to me at the jointer will always be in the back of my mind, but I don’t dwell on it like I did the first couple of times using the tool after the accident.
***UPDATE: November 2021***
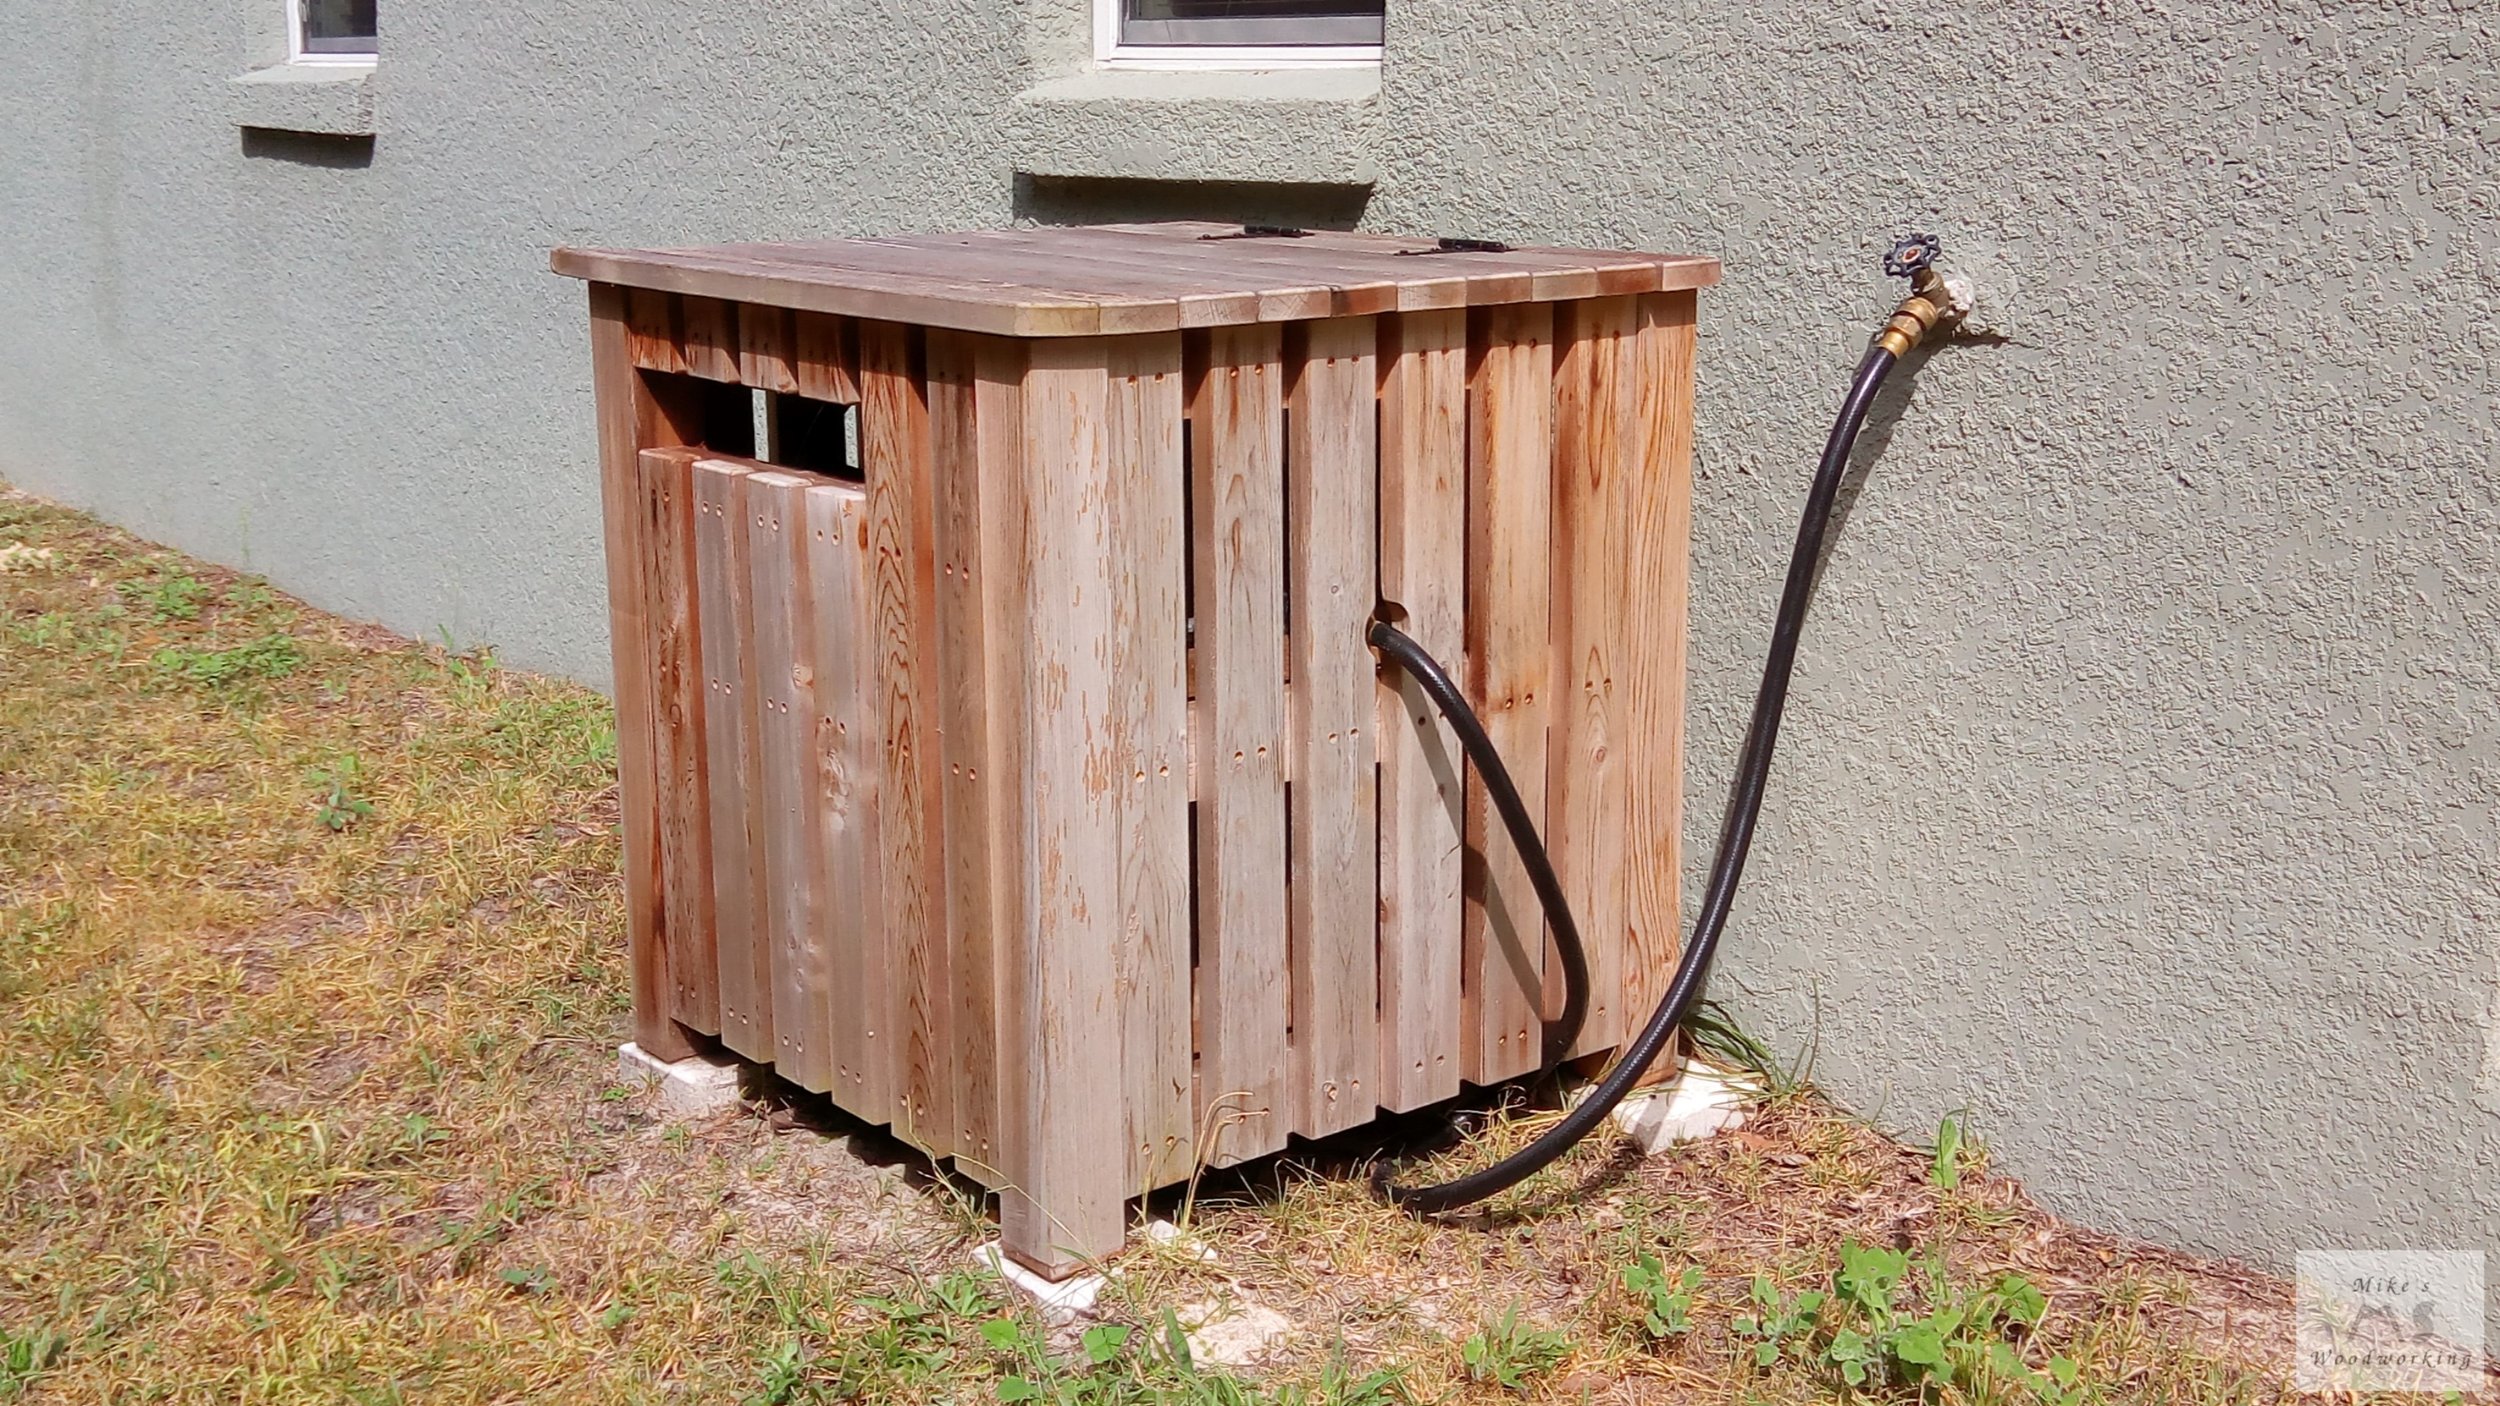
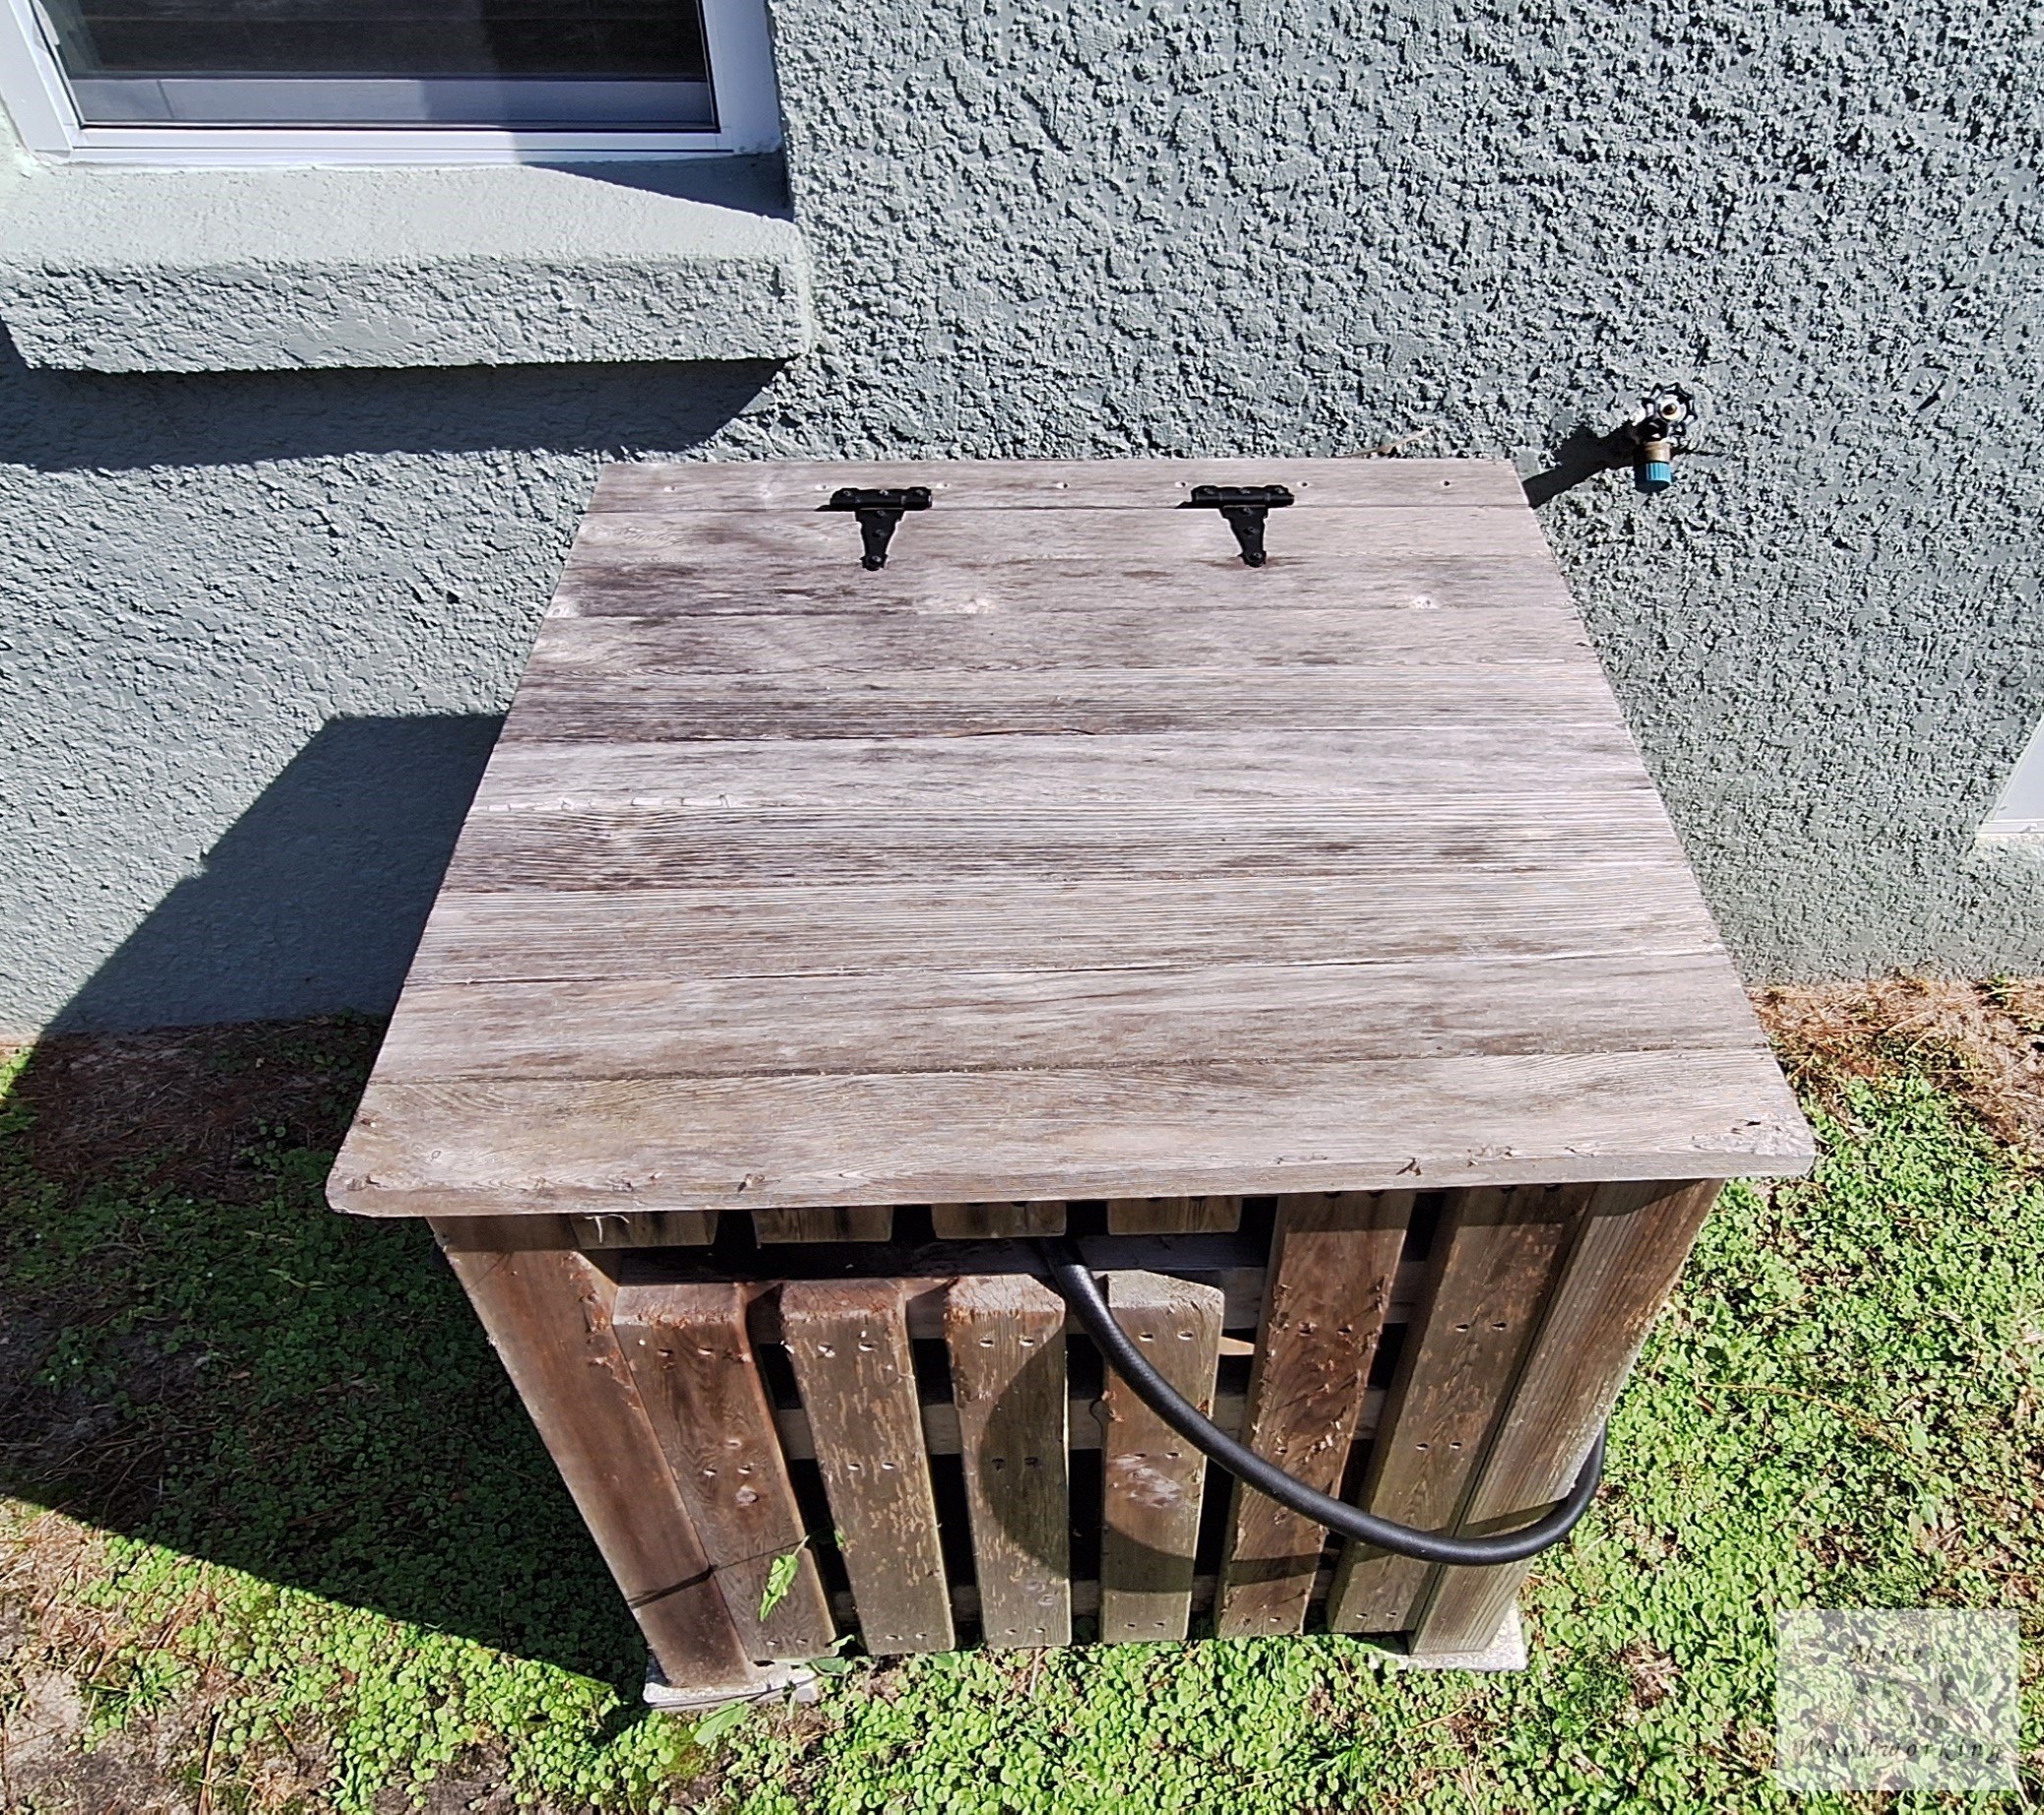
It has been one year since completing the garden hose box, and I thought I’d provide an update. The box is still sitting in the exact same place as it has been for the previous year. The hot Florida sun has certainly faded the cedar a bit, especially on the right side, as that side gets the brunt of the direct sunlight. So far, we’re both very happy with the function of the box thus far. I’m not sure how long the cedar will continue to last with the sun continuing to beat down on it, especially during the hot summer months. Only time will tell. Below are some pics of the now one year-old garden hose box.


***UPDATE: December 2022***
We’re two years in on the garden hose box. It’s definitely looking a bit worse off than around this time the previous year, and certainly not like when it was at its peak in 2020. The reality is the hot and harsh Florida sun is just eating this thing up. I knew this was going to be the case, especially with no kind of finish on it.
In the near future, I’m likely going to revisit this project again and attempt to remake it. At that time, I’ll make sure to put some kind of protective finish on it to help slow the process of weathering. Until then, the garden hose box will continue to age naturally.


***UPDATE: November 2023***
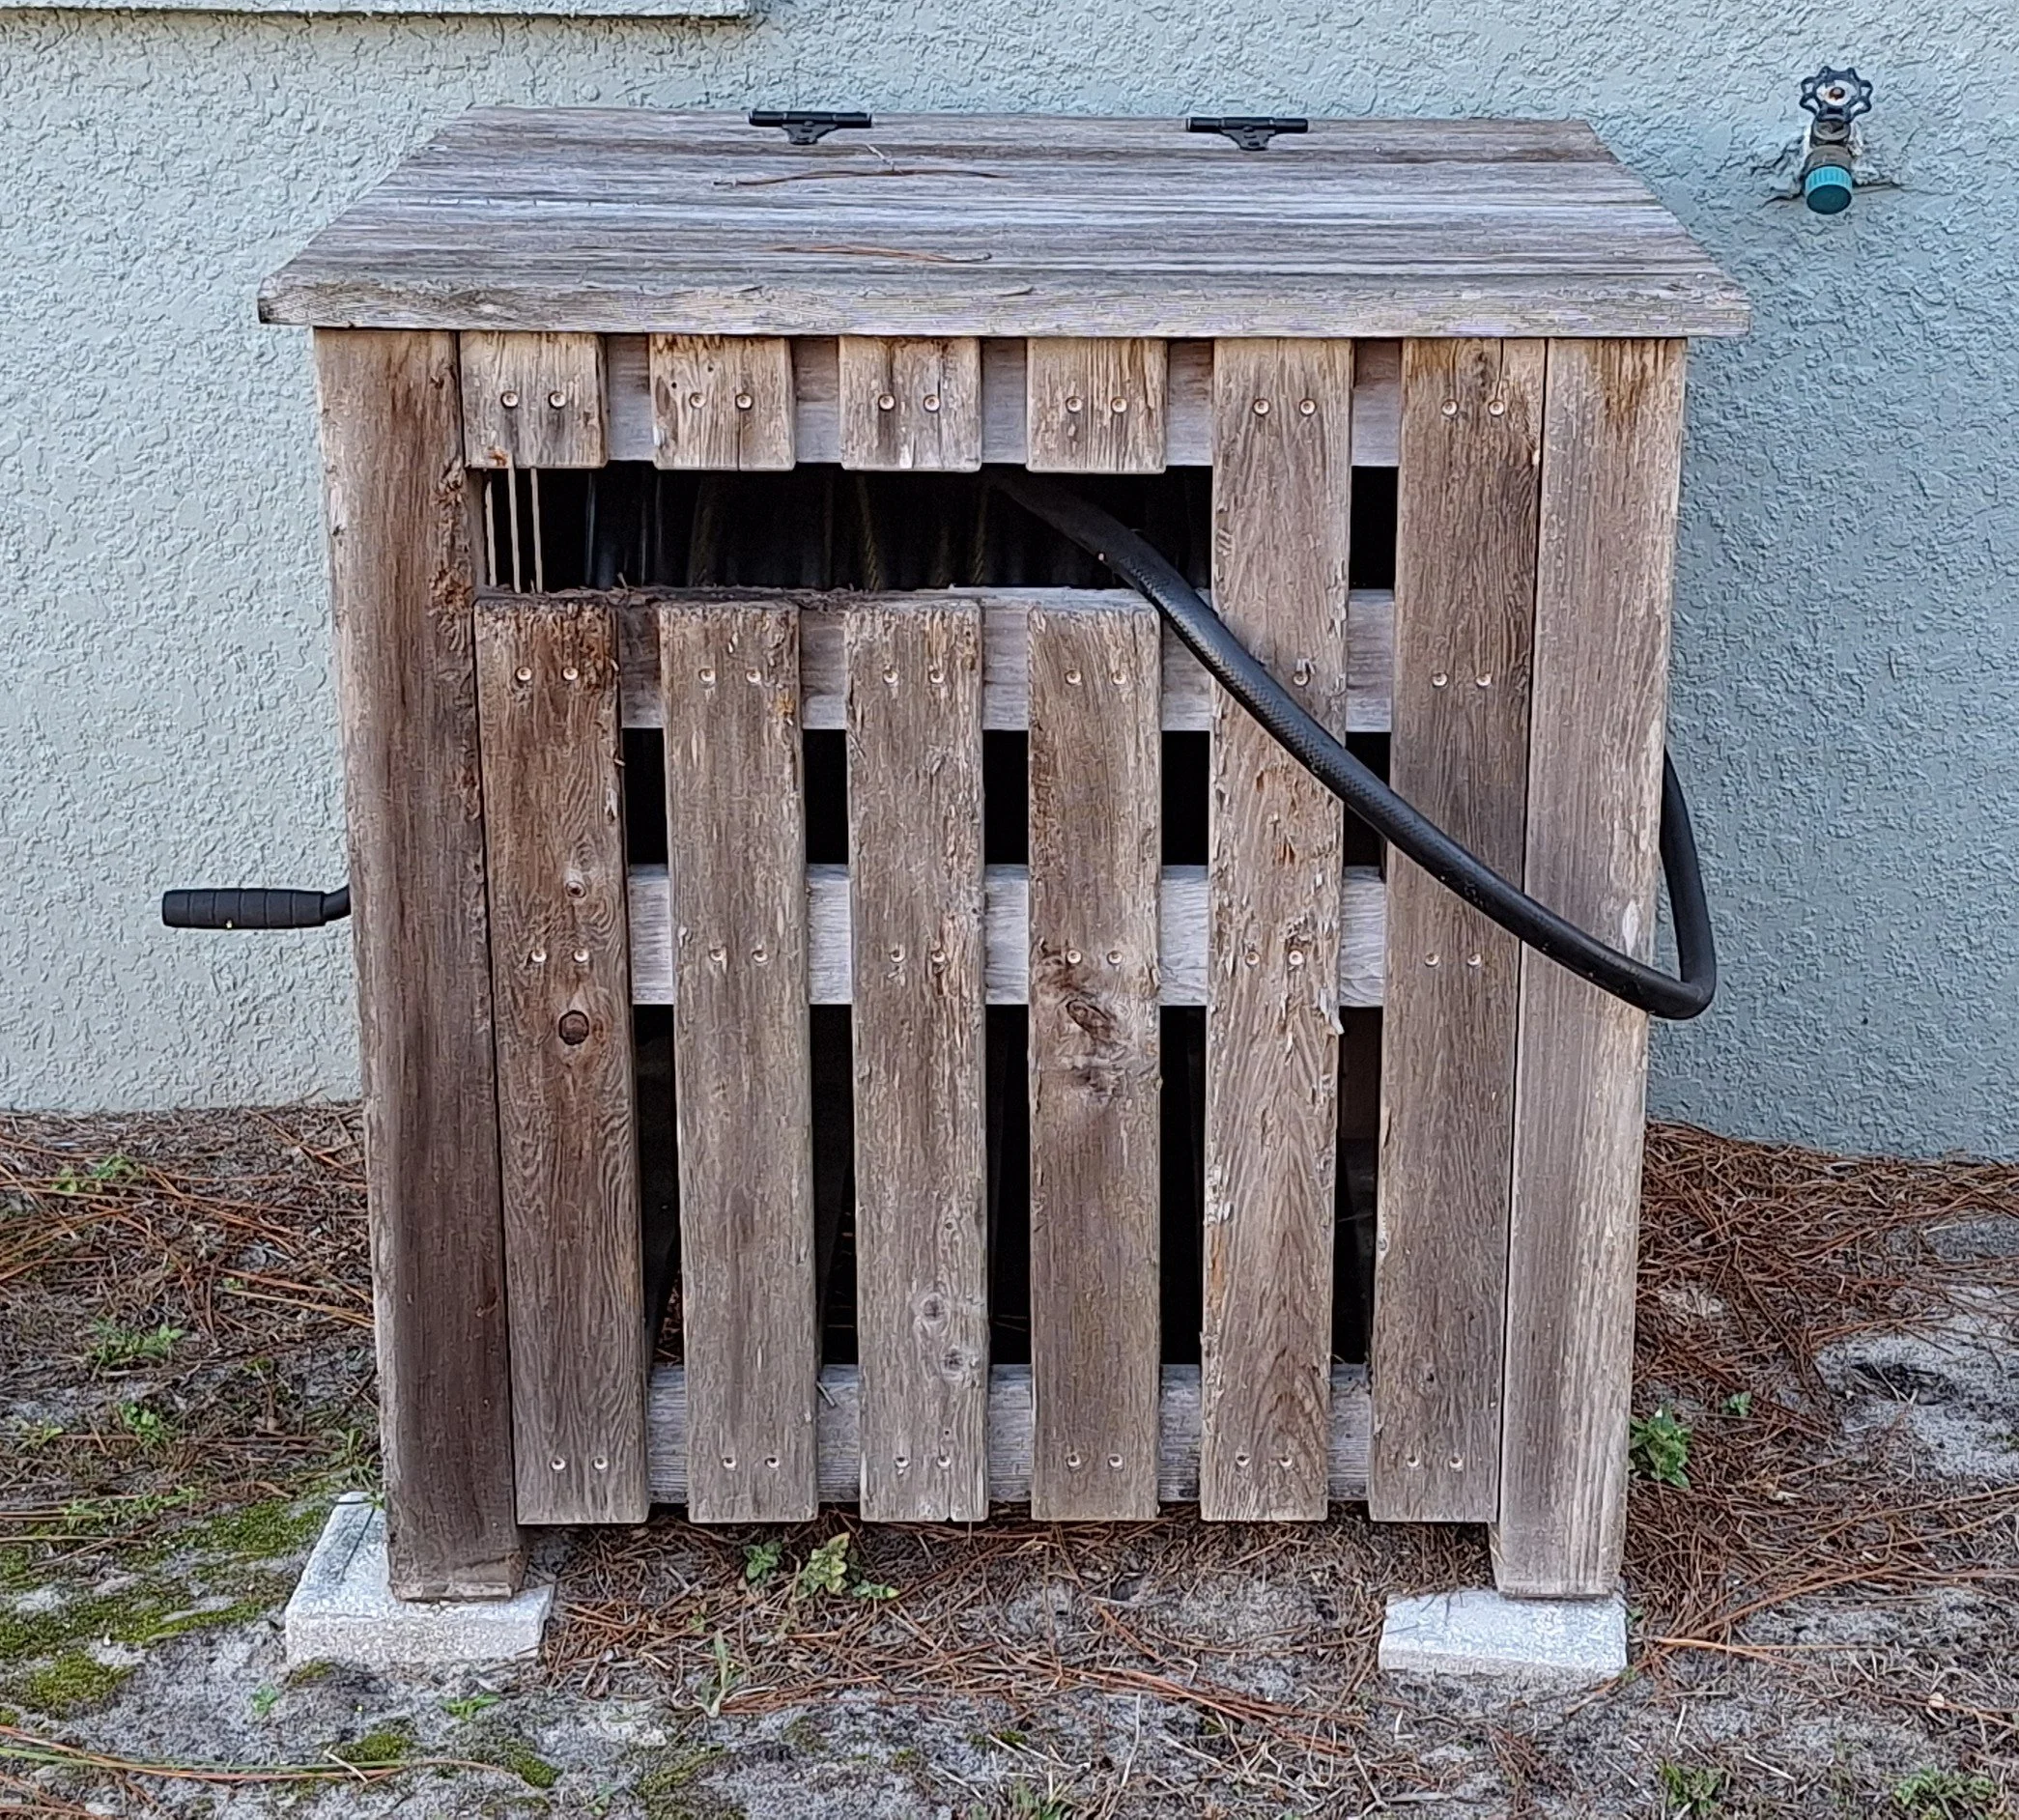
Well…It’s now year three of this experiment and the garden hose box has taken a beating.
The lot next to ours was mostly cleared for a house currently being constructed, so that means A LOT more of the harsh afternoon sun is hitting the cedar than it ever was before.
There’s a bit of splintering in places on the front and top, but I’m not sure if that’s from natural weathering or the local critters (or both).
We haven’t used the hose AT ALL this year, as evidenced by the leader line tucked into the box. We haven’t had as much use for the hose since we no longer have to clean out our gutters. Our lawn has a sprinkler system so we don’t need it for that either, and I can’t remember the last time I actually washed my truck.
I’m pondering how much longer I’ll let the cedar continue to deteriorate before I come up with a new design. I might go with Trex for the next iteration, but we’ll see.


***UPDATE: December 2024***
It’s that time again…an update on the garden hose box.
With more sunlight getting to the front, right side (as looking at it) and top, the cedar is continuing to look pretty bad. I’m not sure if it has changed a great deal from last year, but it’s definitely seen better days.
The plan is to make a new box in the near future, I just don’t have a specific time frame for that right now. There are other projects and priorities to take care of first before I can redesign/rebuild the garden hose box.


***UPDATE: November 2025***
Another year has passed, and there doesn’t appear to be much change in the garden hose box. It’s still very much getting battered by the sun on a daily basis. In all honesty, I haven’t opened the lid on this thing in well over a year.
The plan is still to make a new garden hose box in the future. However, I have far greater/more important things going on in my life right now than to worry about this thing. It will likely still be holding together for a few more years, if need be.